A getting started guide to self-hosting Plausible Community Edition
Contact:
-
For release announcements please go to GitHub releases.
-
For a question or advice please go to GitHub discussions.
Install • Upgrade • Configure • Integrate • FAQ
Install
Plausible Community Edition (or CE for short) is designed to be self-hosted through Docker. You don't have to be a Docker expert to launch your own instance, but you should have a basic understanding of the command-line and networking to successfully set it up.
Requirements
The only thing you need to install Plausible CE is a server with Docker. The server must have a CPU with x86_64 or arm64 architecture and support for SSE 4.2 or equivalent NEON instructions. We recommend using a minimum of 4GB of RAM but the requirements will depend on your site traffic.
We've tested this on Digital Ocean (affiliate link) but any hosting provider works. If your server doesn't come with Docker pre-installed, you can follow their docs to install it.
To make your Plausible CE instance accessible on a (sub)domain, you also need to be able to edit your DNS. Plausible CE isn't currently designed for subfolder installations.
Quick start
To get started quickly, clone the plausible/community-edition repo. It has everything you need to boot up your own Plausible CE server.
console
$ mkdir hosting
$ cd hosting
$ git clone https://github.com/plausible/community-edition .
Cloning into 'community-edition'...
remote: Enumerating objects: 280, done.
remote: Counting objects: 100% (146/146), done.
remote: Compressing objects: 100% (74/74), done.
remote: Total 280 (delta 106), reused 86 (delta 71), pack-reused 134
Receiving objects: 100% (280/280), 69.44 KiB | 7.71 MiB/s, done.
Resolving deltas: 100% (136/136), done.
$ ls
README.md           clickhouse/         docker-compose.yml  images/             plausible-conf.env  reverse-proxy/      upgrade/
In the downloaded directory you'll find two important files:
docker-compose.yml- installs and orchestrates networking between your Plausible CE server, Postgres database, Clickhouse database (for stats), and an SMTP server.plausible-conf.env- configures the Plausible server itself. Full configuration options are documented below.
Right now the latter looks like this:
BASE_URL=replace-me
SECRET_KEY_BASE=replace-me
Let's do as it asks and populate these required environment variables with our own values.
First we generate the SECRET_KEY_BASE using openssl
console
$ openssl rand -base64 48
GLVzDZW04FzuS1gMcmBRVhwgd4Gu9YmSl/k/TqfTUXti7FLBd7aflXeQDdwCj6Cz
And then we decide on the BASE_URL where the instance would be accessible. Let's assume we choose http://plausible.example.com
plausible-conf.env
- BASE_URL=replace-me
+ BASE_URL=http://plausible.example.com
- SECRET_KEY_BASE=replace-me
+ SECRET_KEY_BASE=GLVzDZW04FzuS1gMcmBRVhwgd4Gu9YmSl/k/TqfTUXti7FLBd7aflXeQDdwCj6Cz
We can start our instance now but the requests would be served over HTTP. Not cool! Let's configure Caddy to enable HTTPS.
For other reverse-proxy setups please see reverse-proxy docs.
First we need to point DNS records for plausible.example.com to the IP address of the instance. This is needed for Caddy to issue the TLS certificates.
Then we need to let Caddy know the domain name for which to issue the TLS certificate and the service to redirect the requests to.
reverse-proxy/docker-compose.caddy-gen.yml
  plausible:
    labels:
-     virtual.host: "example.com" # change to your domain name
+     virtual.host: "plausible.example.com"
      virtual.port: "8000"
-     virtual.tls-email: "admin@example.com" # change to your email
+     virtual.tls-email: "admin@plausible.example.com"
Finally we need to update BASE_URL to use https:// scheme.
plausible-conf.env
- BASE_URL=http://plausible.example.com
+ BASE_URL=https://plausible.example.com
  SECRET_KEY_BASE=GLVzDZW04FzuS1gMcmBRVhwgd4Gu9YmSl/k/TqfTUXti7FLBd7aflXeQDdwCj6Cz
Now we can start everything together.
console
$ docker compose -f docker-compose.yml -f reverse-proxy/docker-compose.caddy-gen.yml up -d
[+] Running 19/19
 ✔ plausible_db 9 layers [⣿⣿⣿⣿⣿⣿⣿]          Pulled
 ✔ plausible_events_db 7 layers [⣿⣿⣿⣿⣿⣿⣿]   Pulled
 ✔ plausible 7 layers [⣿⣿⣿⣿⣿⣿⣿]             Pulled
 ✔ caddy-gen 8 layers [⣿⣿⣿⣿⣿⣿⣿⣿]            Pulled
[+] Running 5/5
 ✔ Network hosting_default                  Created
 ✔ Container hosting-plausible_db-1         Started
 ✔ Container hosting-plausible_events_db-1  Started
 ✔ Container hosting-plausible-1            Started
 ✔ Container caddy-gen                      Started
It takes some time to start PostgreSQL and ClickHouse, create the databases, and run the migrations. After about fifteen seconds you should be able to access your instance at BASE_URL and see the registration screen for the admin user.
In case something feels off, make sure to check out the logs with docker compose logs and start a GitHub discussion.
Happy hosting!
Next we'll go over how to upgrade the instance when a new release comes out, more things to configure, and how to integrate with Google and others!
Upgrade
Each new release contains information on how to upgrade to it from the previous version. This section outlines the general steps and explains the versioning.
Version management
Plausible CE follows semantic versioning: MAJOR.MINOR.PATCH
You can find available Plausible versions on DockerHub. The default latest tag refers to the latest stable release tag. You can also pin your version:
plausible/analytics:v2pins the major version to2but allows minor and patch version upgradesplausible/analytics:v2.0pins the minor version to2.0but allows only patch upgrades
None of the functionality is backported to older versions. If you wish to get the latest bug fixes and security updates you need to upgrade to a newer version.
New versions are published on the releases page and their changes are documented in our Changelog. Please note that database schema changes require running migrations when you're upgrading. However, we consider the schema as an internal API and therefore schema changes aren't considered a breaking change.
We recommend to pin the major version instead of using latest. Either way the general flow for upgrading between minor version would look like this:
$ cd hosting
$ docker compose stop plausible
[+] Running 1/1
 ✔ Container hosting-plausible-1  Stopped
$ docker compose rm plausible
? Going to remove hosting-plausible-1 Yes
[+] Running 1/0
 ✔ Container hosting-plausible-1  Removed
$ docker compose -f docker-compose.yml -f reverse-proxy/docker-compose.caddy-gen.yml up -d
[+] Running 8/8
 ✔ plausible 7 layers [⣿⣿⣿⣿⣿⣿⣿]      0B/0B      Pulled 6.4s
   ✔ 96526aa774ef Pull complete    0.4s
   ✔ 93631fa7258d Pull complete    0.6s
   ✔ 06afbc05374b Pull complete    1.6s
   ✔ 7ddeeadcce1e Pull complete    1.2s
   ✔ 724ddb9b523f Pull complete    2.8s
   ✔ 32581b0068b9 Pull complete    1.7s
   ✔ 4f4fb700ef54 Pull complete    2.0s
[+] Running 4/4
 ✔ Container hosting-plausible_events_db-1  Running    0.0s
 ✔ Container hosting-plausible_db-1         Running    0.0s
 ✔ Container hosting-plausible-1            Started    1.2s
 ✔ Container caddy-gen                      Running    0.0s
$ docker images --filter=reference='plausible/analytics:*'
REPOSITORY            TAG       IMAGE ID       CREATED        SIZE
plausible/analytics   v2.0      2b2735265a65   7 months ago   163MB
plausible/analytics   v1.5      5e1e0047953a   8 months ago   130MB
$ docker rmi 5e1e0047953a
Untagged: plausible/analytics:v1.5
Untagged: plausible/analytics@sha256:365124b00f103ac40ce3c64cd49a869d94f2ded221d9bb7900be1cecfaf34acf
Deleted: sha256:5e1e0047953afc179ee884389e152b3f07343fb34e5586f9ecc2f33c6ba3bcaa
// etc.
You can omit -f docker-compose.yml -f reverse-proxy/docker-compose.caddy-gen.yml if you are not using Caddy.
Changes in major versions would involve performing a data migration (e.g.v2.0.0) or some other extra step.
Configure
Plausible is configured with environment variables, by default supplied via plausible-conf.env env_file.
Note that if you start a container with one set of ENV vars and then update the ENV vars and restart the container, they won't take effect due to the immutable nature of the containers. The container needs to be recreated.
Here's the minimal plausible-conf.env we got from Quick start.
BASE_URL=https://plausible.example.com
SECRET_KEY_BASE=GLVzDZW04FzuS1gMcmBRVhwgd4Gu9YmSl/k/TqfTUXti7FLBd7aflXeQDdwCj6Cz
And here's plausible-conf.env with some extra configuration
BASE_URL=https://plausible.example.com
SECRET_KEY_BASE=GLVzDZW04FzuS1gMcmBRVhwgd4Gu9YmSl/k/TqfTUXti7FLBd7aflXeQDdwCj6Cz
MAXMIND_LICENSE_KEY=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
MAXMIND_EDITION=GeoLite2-City
GOOGLE_CLIENT_ID=140927866833-002gqg48rl4iku76lbkk0qhu0i0m7bia.apps.googleusercontent.com
GOOGLE_CLIENT_SECRET=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
MAILER_NAME=Plausible
MAILER_EMAIL=plausible@plausible.example.com
DISABLE_REGISTRATION=invite_only
Here're the currently supported ENV vars:
Required
BASE_URL
Configures the base URL to use in link generation, doesn't have any defaults and needs to be provided in the ENV vars
plausible-conf.env
BASE_URL=https://example.fun
In production systems, this should be your ingress host (CDN or proxy).
SECRET_KEY_BASE
Configures the secret used for sessions in the dashboard, doesn't have any defaults and needs to be provided in the ENV vars, can be generated with openssl rand -base64 48
console
$ openssl rand -base64 48
GLVzDZW04FzuS1gMcmBRVhwgd4Gu9YmSl/k/TqfTUXti7FLBd7aflXeQDdwCj6Cz
plausible-conf.env
SECRET_KEY_BASE=GLVzDZW04FzuS1gMcmBRVhwgd4Gu9YmSl/k/TqfTUXti7FLBd7aflXeQDdwCj6Cz
⚠️ Don't use this exact value or someone would be able to sign a cookie with
user_id=1and log in as the admin!
Optional
Registration
DISABLE_REGISTRATION
Default: true
Restricts registration of new users. Possible values are true (full restriction), false (no restriction), and invite_only (only the invited users can register).
ENABLE_EMAIL_VERIFICATION
Default: false
When enabled, new users need to verify their email addressby following a link delivered to their mailbox. Please configure your server for SMTP to receive this email. You can find Plausible's SMTP configuration options under "Email" below.
If something went wrong you can run this command to verify all users in the database:
console
$ cd hosting
$ docker compose exec plausible_db psql -U postgres -h localhost -d plausible_db -c "UPDATE users SET email_verified = true;"
Web
LISTEN_IP
Default: 0.0.0.0
Configures the IP address to bind the listen socket for the web server.
Note that setting it to
127.0.0.1in a container would make the web server unavailable from outside the container.
PORT
Default: 8000
Configures the port to bind the listen socket for the web server.
Database
Plausible uses PostgreSQL for storing user data and ClickhouseDB for analytics data. Use the following variables to configure them.
DATABASE_URL
Default: postgres://postgres:postgres@plausible_db:5432/plausible_db
Configures the URL for PostgreSQL database.
CLICKHOUSE_DATABASE_URL
Default: http://plausible_events_db:8123/plausible_events_db
Configures the URL for ClickHouse database.
ECTO_IPV6
Enables Ecto to use IPv6 when connecting to the PostgreSQL database. Not set by default.
plausible-conf.env
ECTO_IPV6=true
ECTO_CH_IPV6
Enables Ecto to use IPv6 when connecting to the ClickHouse database. Not set by default.
plausible-conf.env
ECTO_CH_IPV6=true
For step-by-step integration with Google see below.
GOOGLE_CLIENT_ID
The Client ID from the Google API Console for your project. Not set by default.
plausible-conf.env
GOOGLE_CLIENT_ID=140927866833-002gqg48rl4iku76lbkk0qhu0i0m7bia.apps.googleusercontent.com
GOOGLE_CLIENT_SECRET
The Client Secret from the Google API Console for your project. Not set by default.
plausible-conf.env
GOOGLE_CLIENT_SECRET=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
IP Geolocation
Plausible CE uses the country database created by db-ip for enriching analytics data with visitor countries. The database is shipped within the container image and country data collection happens automatically.
Optionally, you can provide a different database. For example, you can use MaxMind services and enable city-level geolocation.
| Parameter | Default | Description |
|---|---|---|
IP_GEOLOCATION_DB |
/app/lib/plausible-0.0.1/priv/geodb/dbip-country.mmdb.gz | This database is used to lookup GeoName IDs for IP addresses. If not set, Plausible defaults to the file shipped within the container image. |
GEONAMES_SOURCE_FILE |
/app/lib/location-0.1.0/priv/geonames.lite.csv | This file is used to turn GeoName IDs into human readable strings for display on the dashboard. Defaults to the one shipped within the container image. |
MAXMIND_LICENSE_KEY |
-- | If set, this ENV variable takes precedence over IP_GEOLOCATION_DB and makes Plausible download (and keep up to date) a free MaxMind GeoLite2 MMDB of the selected edition. See below for integration instructions. |
MAXMIND_EDITION |
GeoLite2-City | MaxMind database edition to use (only if MAXMIND_LICENSE_KEY is set) |
Example plausible-conf.env with MaxMind configured
BASE_URL=https://plausible.example.com
SECRET_KEY_BASE=GLVzDZW04FzuS1gMcmBRVhwgd4Gu9YmSl/k/TqfTUXti7FLBd7aflXeQDdwCj6Cz
MAXMIND_LICENSE_KEY=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
MAXMIND_EDITION=GeoLite2-City
Plausible CE uses a SMTP server to send transactional emails e.g. account activation, password reset. In addition, it sends non-transactional emails like weekly or monthly reports.
| Parameter | Default | Description |
|---|---|---|
MAILER_EMAIL |
hello@plausible.local | The email id to use for as from address of all communications from Plausible. |
MAILER_NAME |
-- | The display name for the sender (from). |
SMTP_HOST_ADDR |
localhost | The host address of your SMTP server. |
SMTP_HOST_PORT |
25 | The port of your SMTP server. |
SMTP_USER_NAME |
-- | The username/email in case SMTP auth is enabled. |
SMTP_USER_PWD |
-- | The password in case SMTP auth is enabled. |
SMTP_HOST_SSL_ENABLED |
false | If SSL is enabled for SMTP connection |
SMTP_RETRIES |
2 | Number of retries to make until mailer gives up. |
Alternatively, you can use other Bamboo Adapters such as Postmark, Mailgun, Mandrill or Send Grid to send transactional emails. In this case, use the following parameters:
| Parameter | Default | Description |
|---|---|---|
MAILER_ADAPTER |
Bamboo.SMTPAdapter | Instead of the default, replace this with Bamboo.PostmarkAdapter, Bamboo.MailgunAdapter, Bamboo.MandrillAdapter or Bamboo.SendGridAdapter and add the appropriate variables below |
POSTMARK_API_KEY |
-- | Enter your Postmark API key. |
MAILGUN_API_KEY |
-- | Enter your Mailgun API key. |
MAILGUN_DOMAIN |
-- | Enter your Mailgun domain. |
MAILGUN_BASE_URI |
-- | This is optional. Mailgun makes a difference in the API base URL between sender domains from within the EU and outside. By default, the base URL is set to https://api.mailgun.net/v3. To override this you can pass https://api.eu.mailgun.net/v3 if you are using an EU domain. |
MANDRILL_API_KEY |
-- | Enter your Mandrill API key. |
SENDGRID_API_KEY |
-- | Enter your SendGrid API key. |
In case you are using Postmark, you have to set the MAILER_EMAIL variable which needs to be configured in PostmarkApps sender signatures.
Integrate
Integrating with Google either to get search keywords for hits from Google search or for imports from Universal Analytics can be frustrating.
The following screenshot-annotated guide shows how to do it all in an easy way: follow the Google-colored arrows.
Here's the outline of what we'll do:
- Set up OAuth on Google Cloud
- Integrate with Google Search
- Import historical data from Universal Analytics
Set up OAuth on Google Cloud
Select or create a Google Cloud project
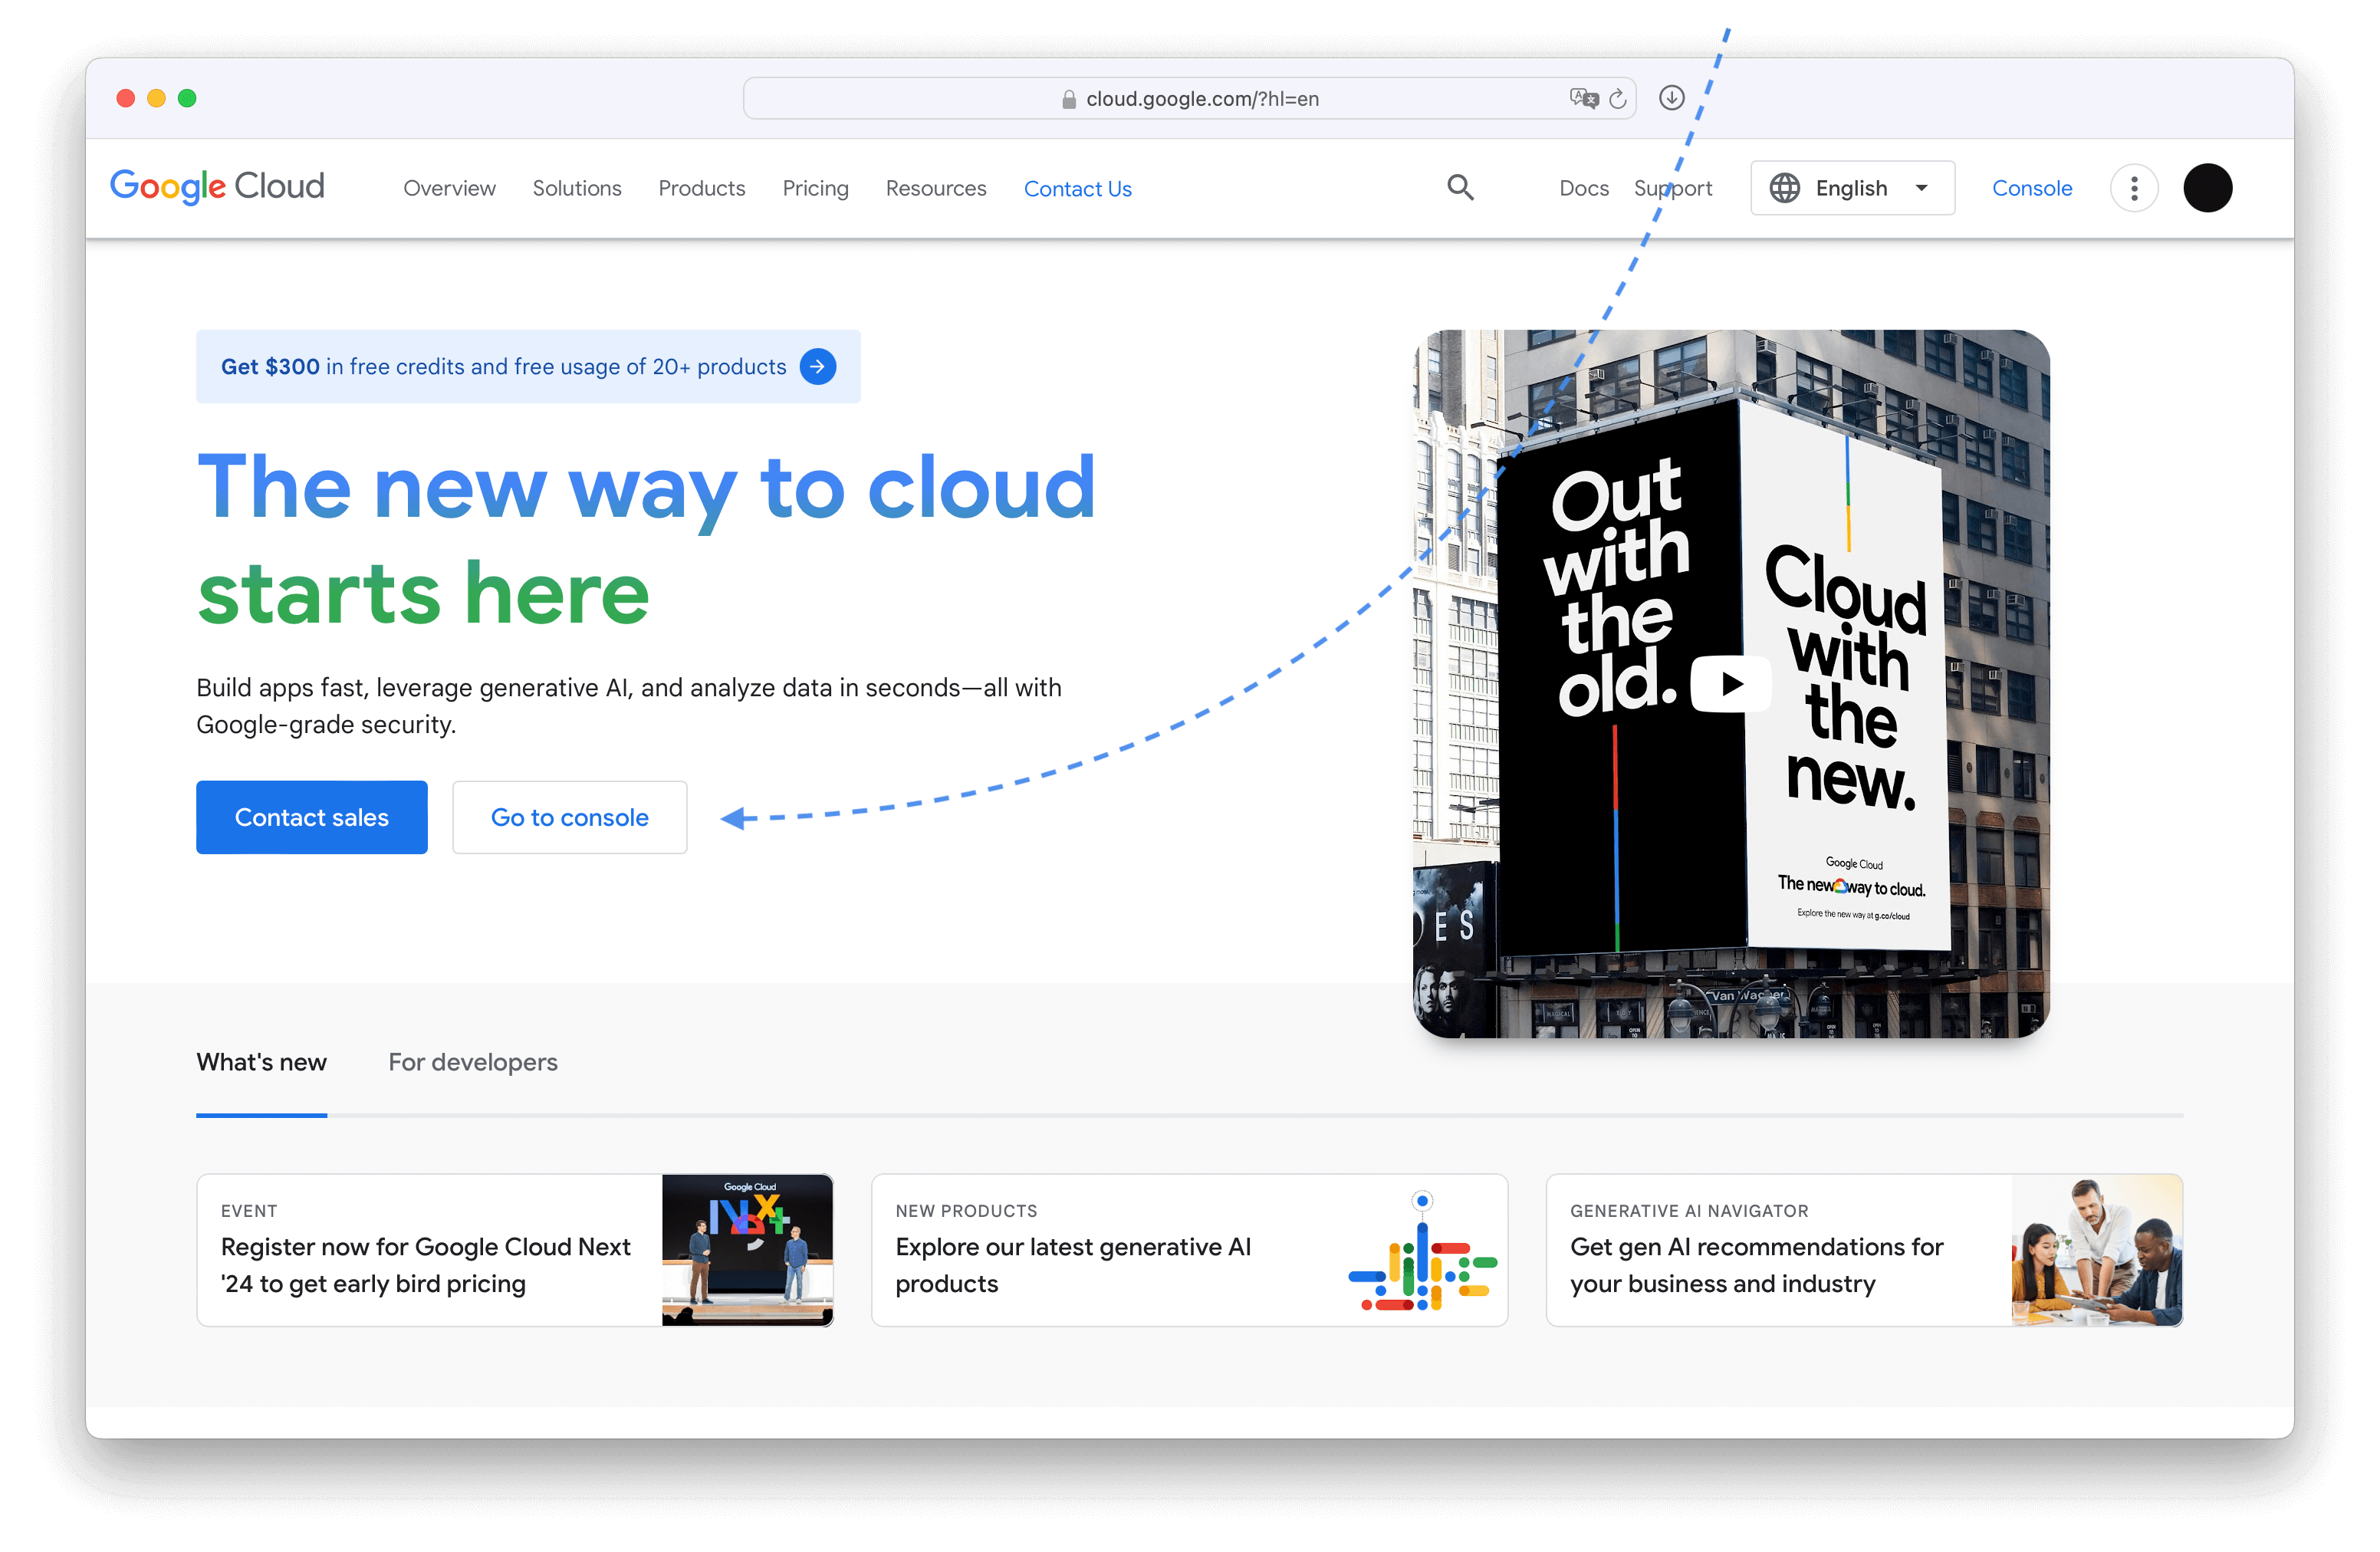
Go to Google Cloud console, for example, by clicking Go to console on Google Cloud landing page. If Google asks you to register, just do it.
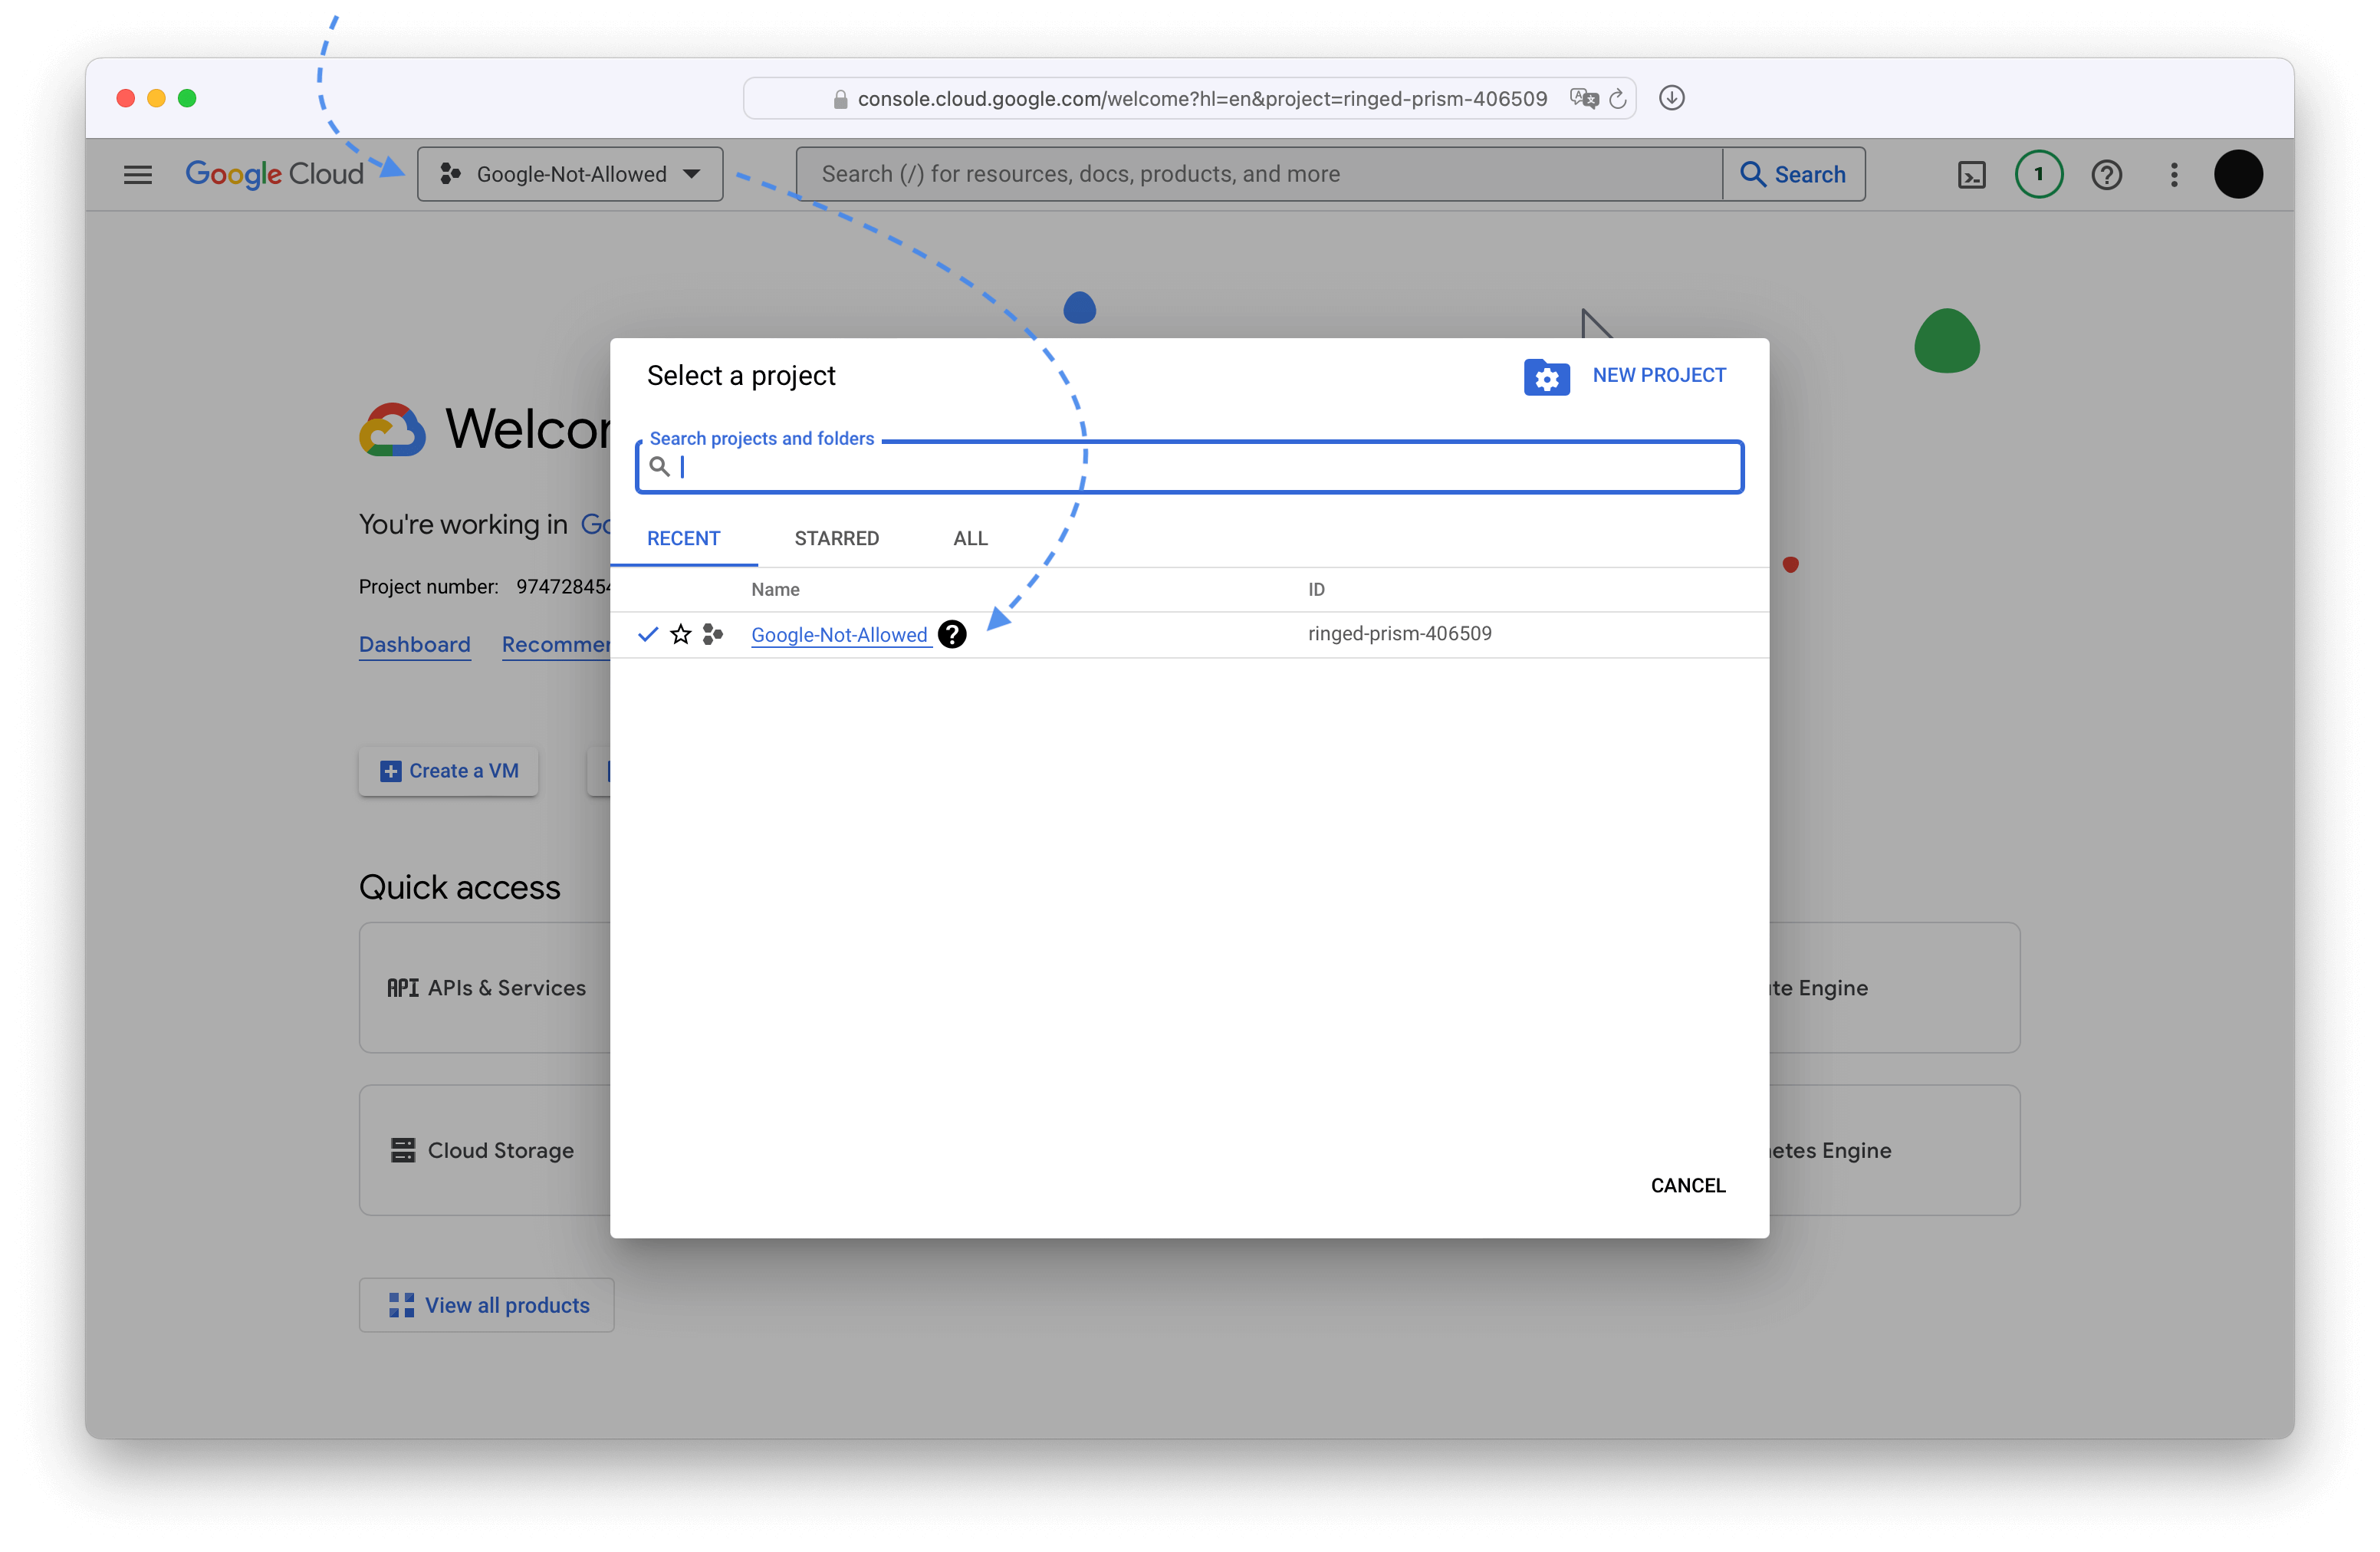
Once there, select a project that you want to use for Plausible OAuth app.
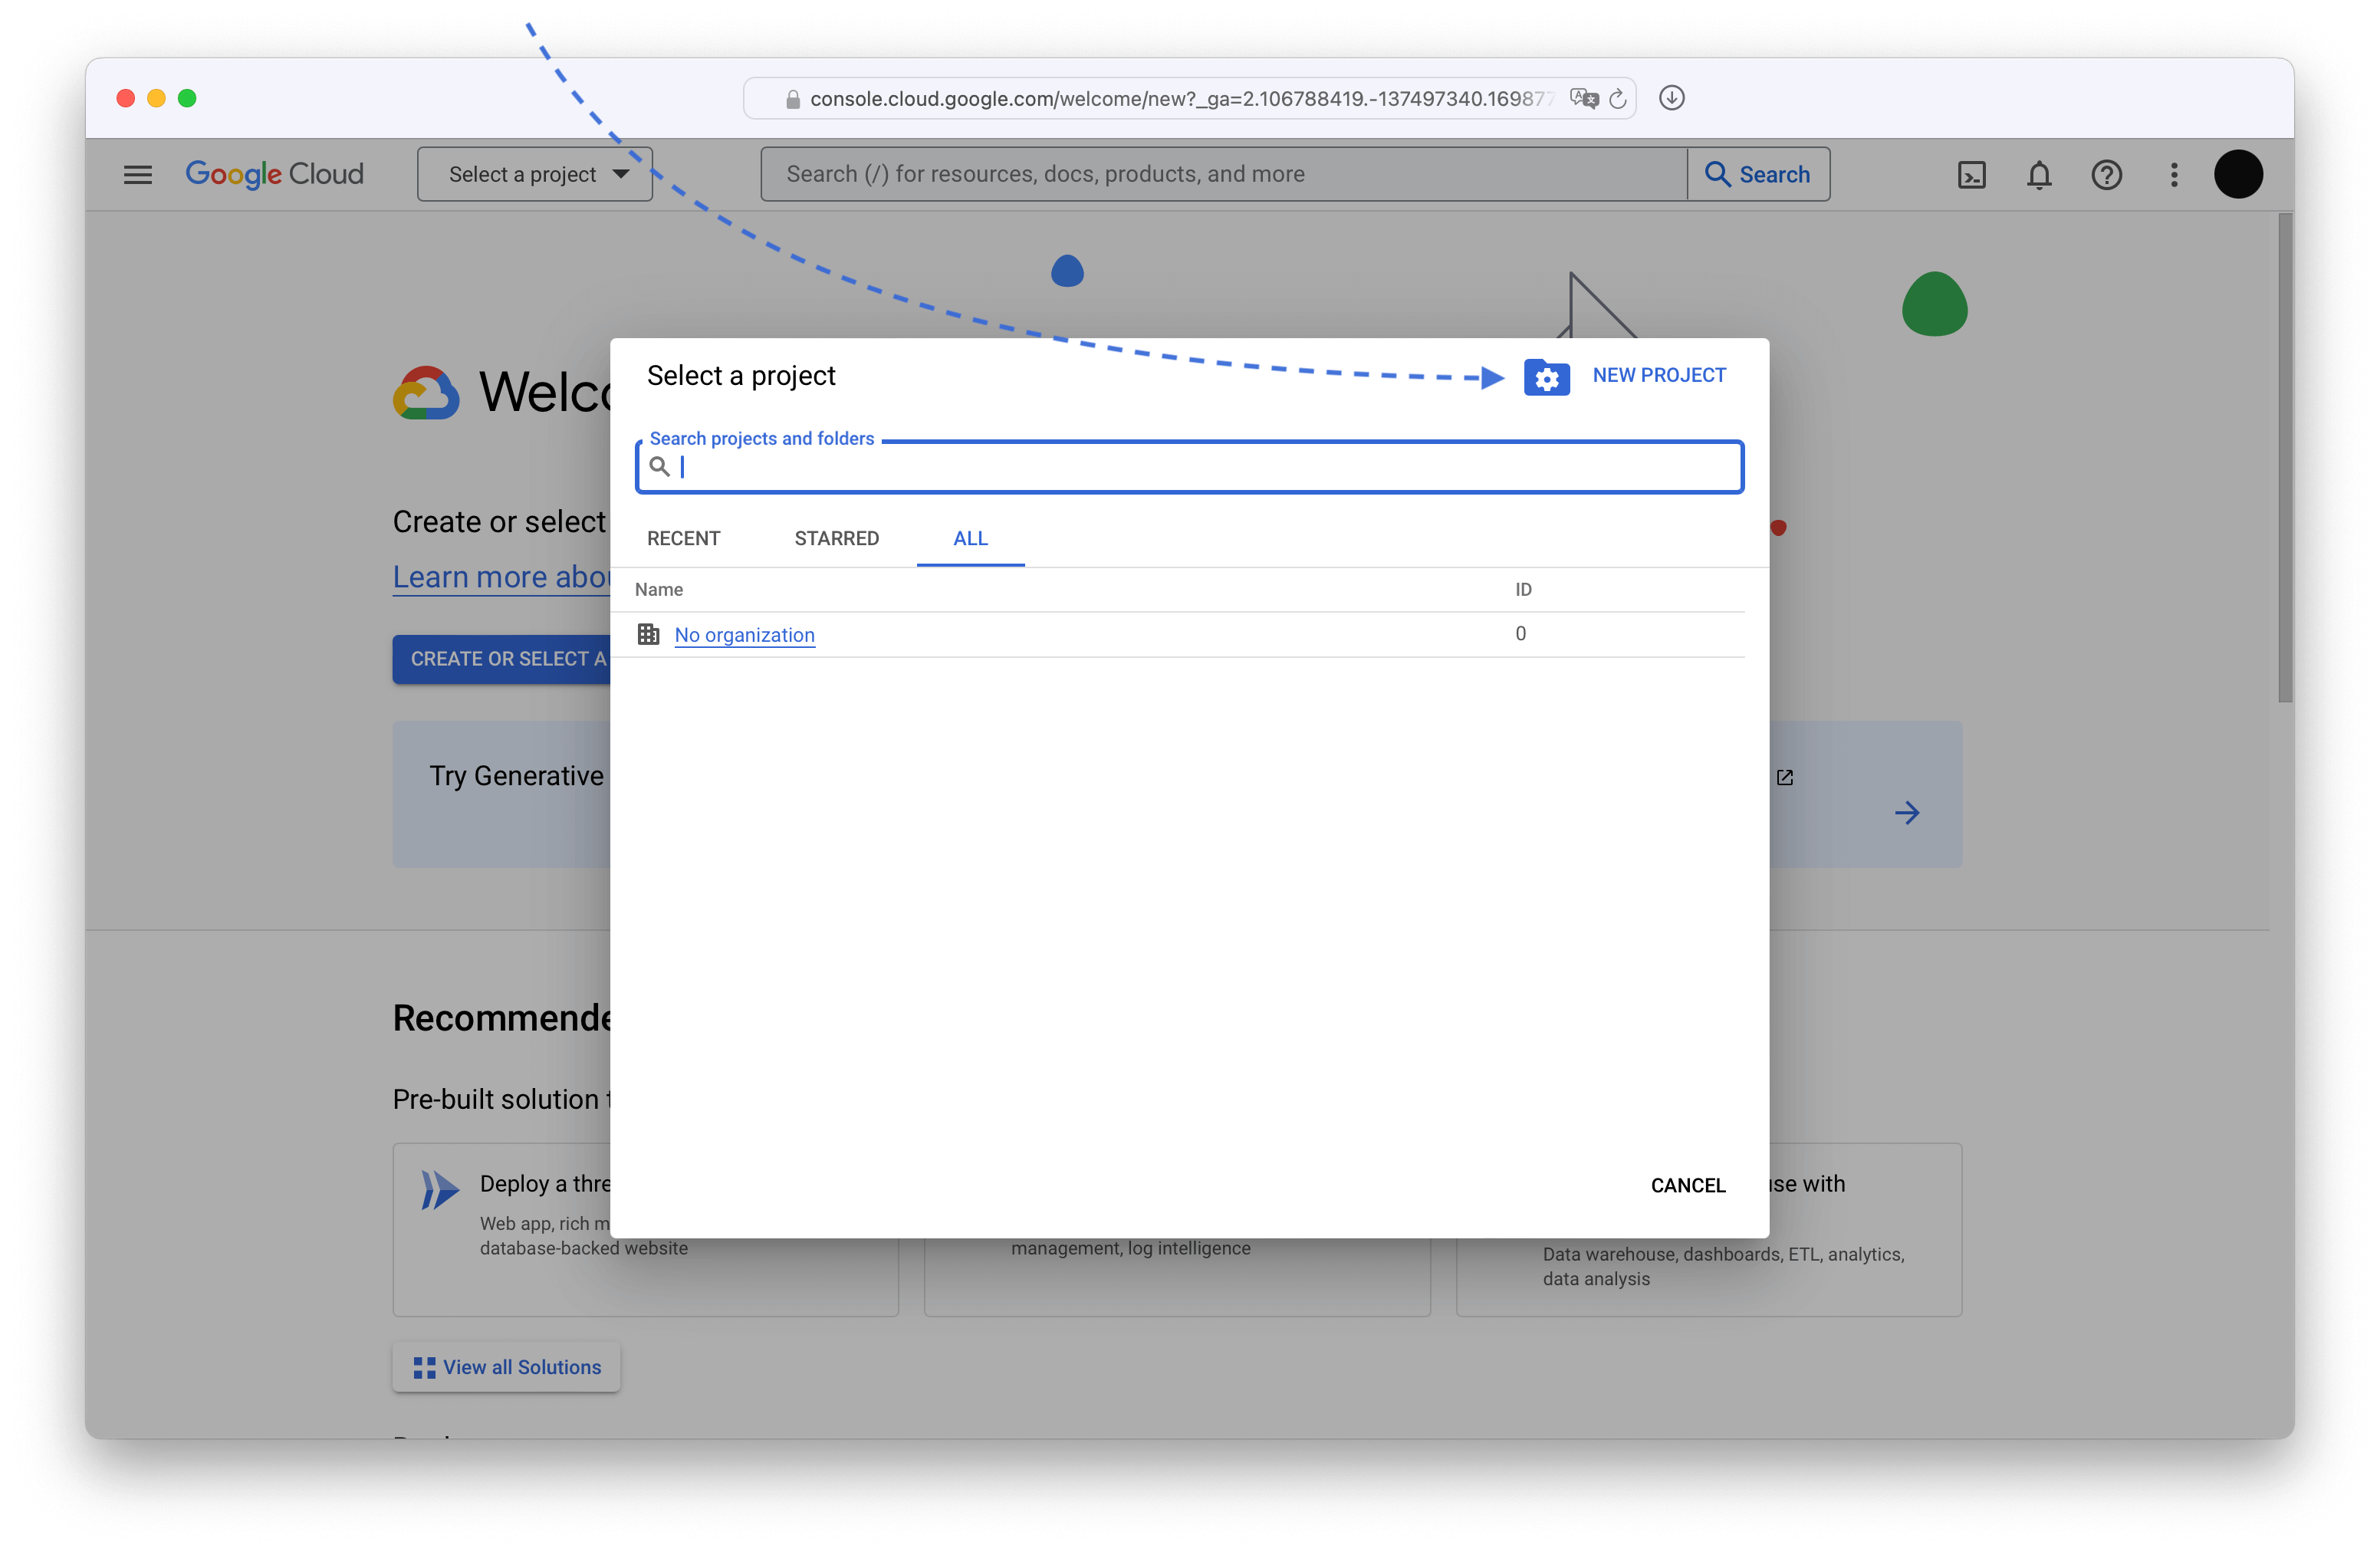
If you don't have a project already, or if you want to isolate Plausible from all your other Google Cloud things, you should create a new project.
Here's how to create a new Google Cloud project
In the Select a project pop-up, click New project
Pick a descriptive name. Organizations don't matter.
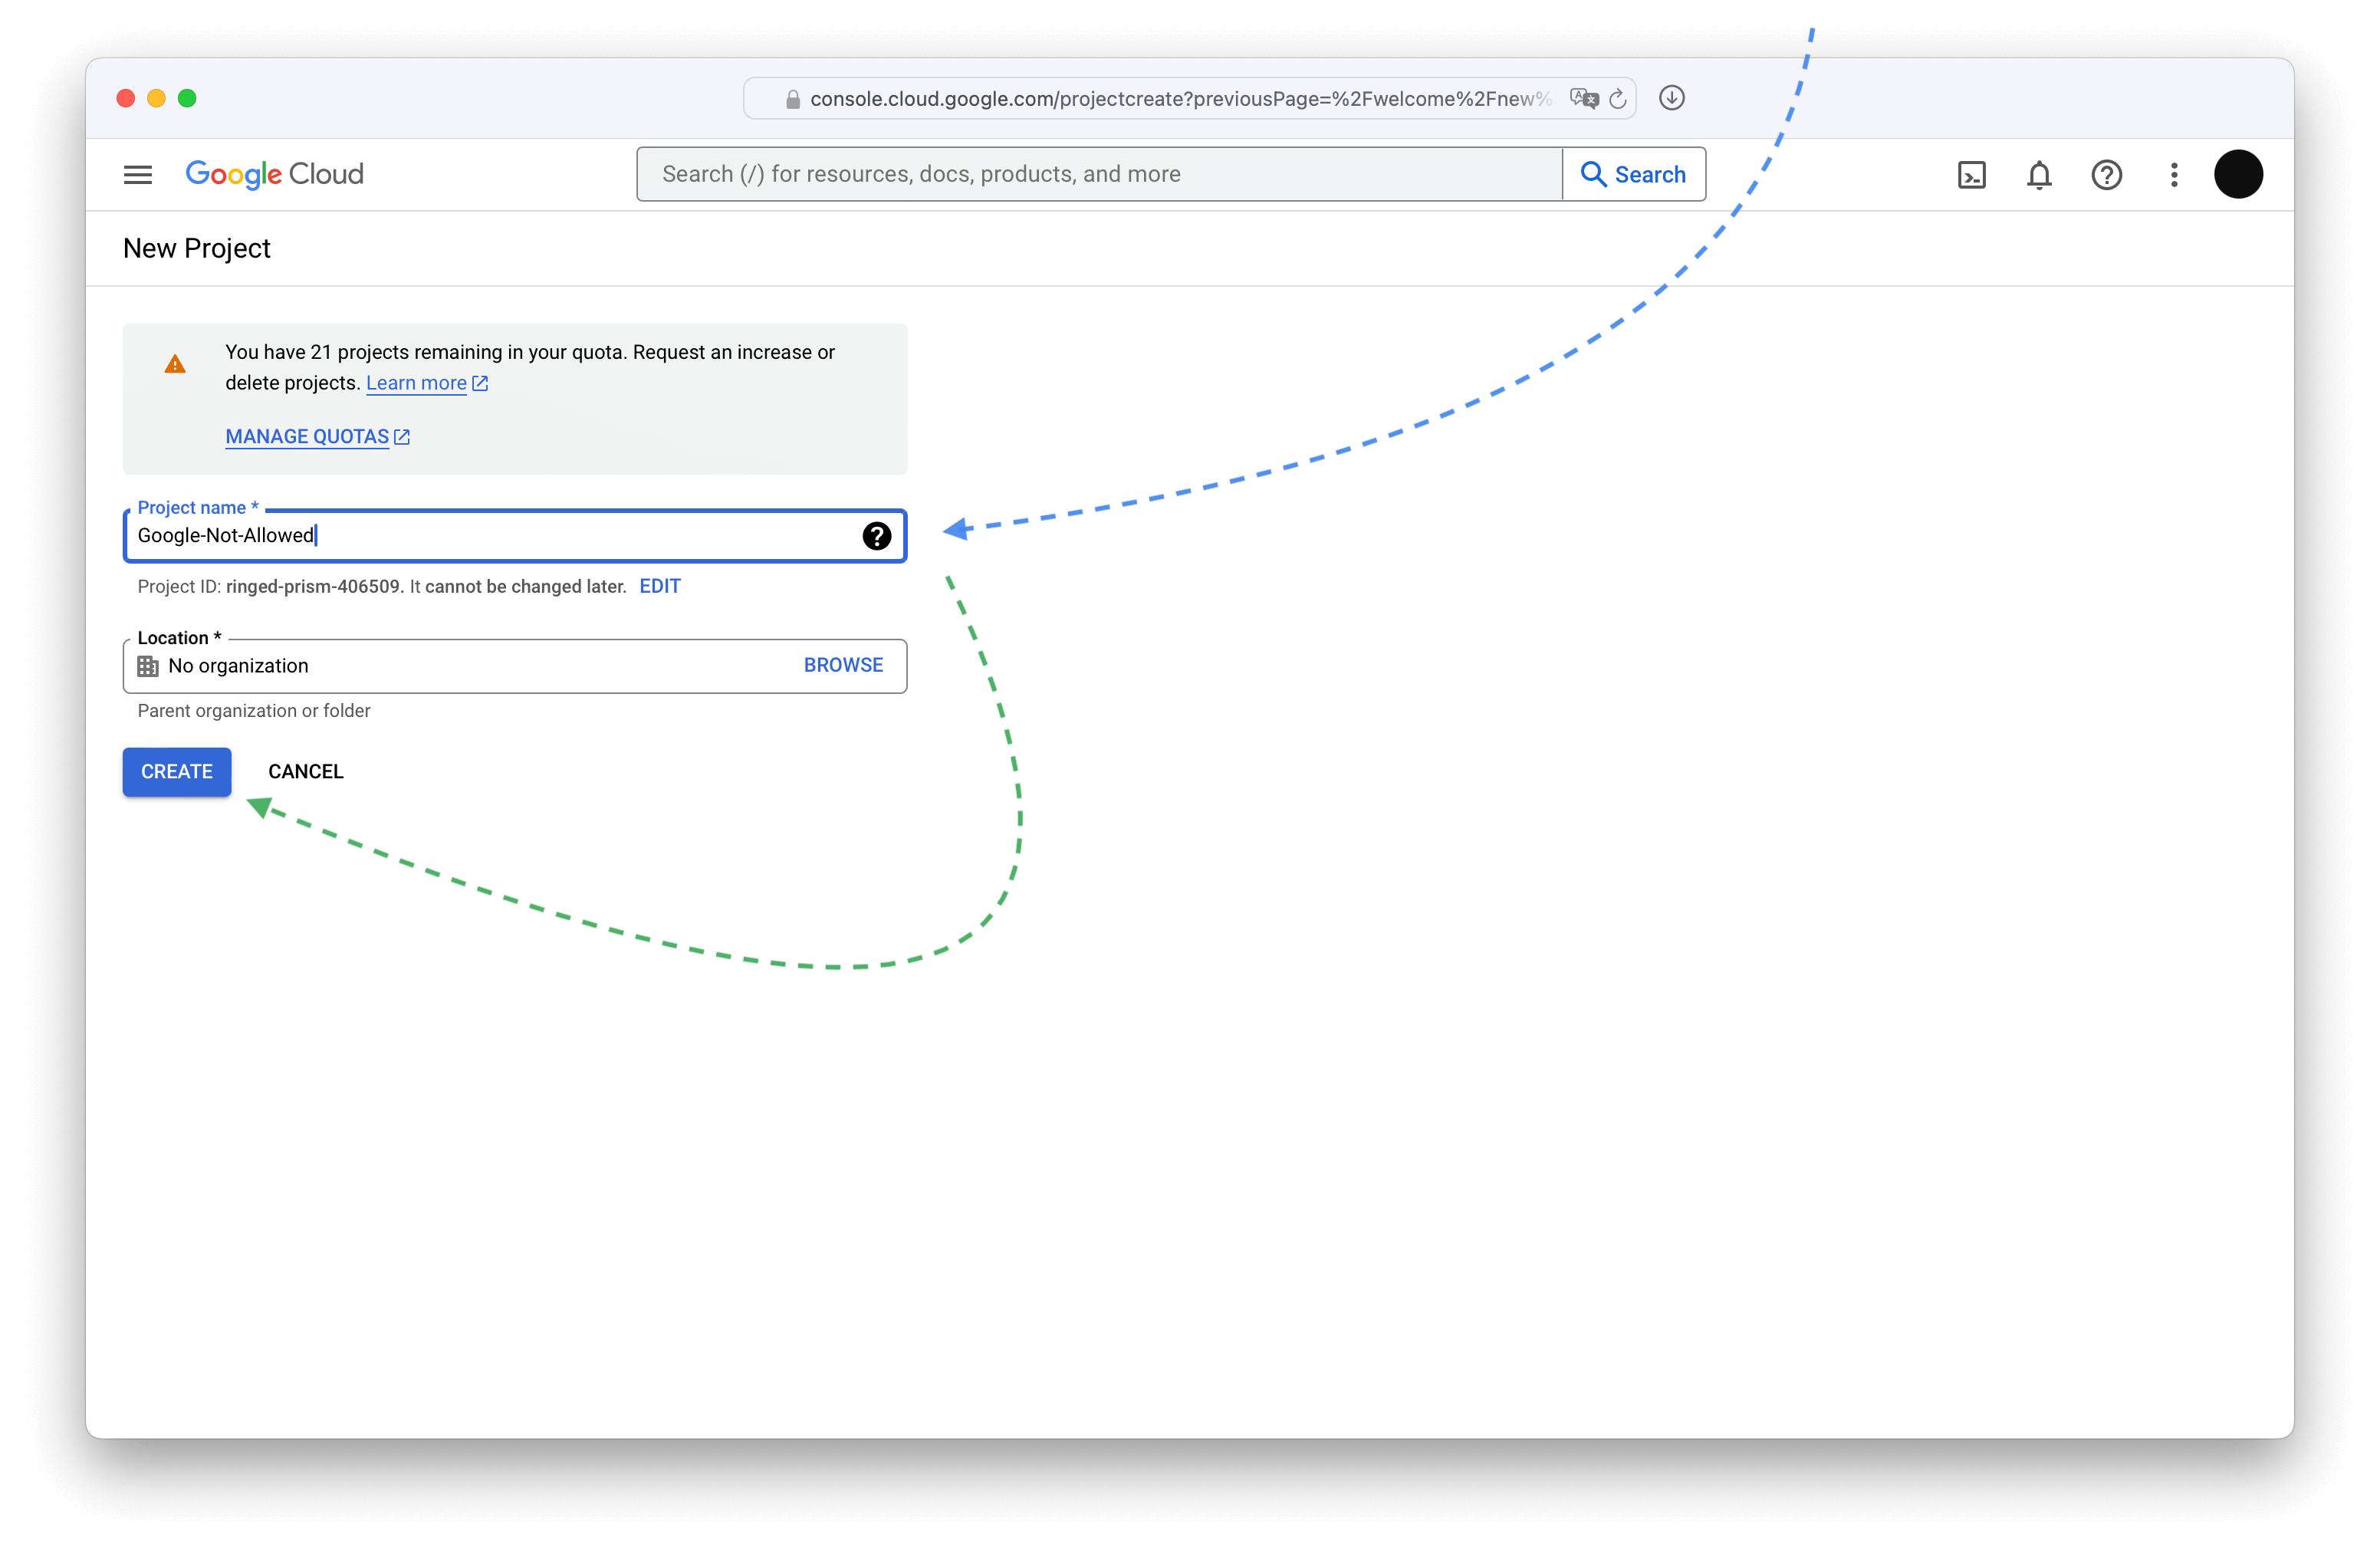
Once the project is created, select it and make sure all the other steps happen within that project. Google is tricky and sometimes switches you to a "default" project.
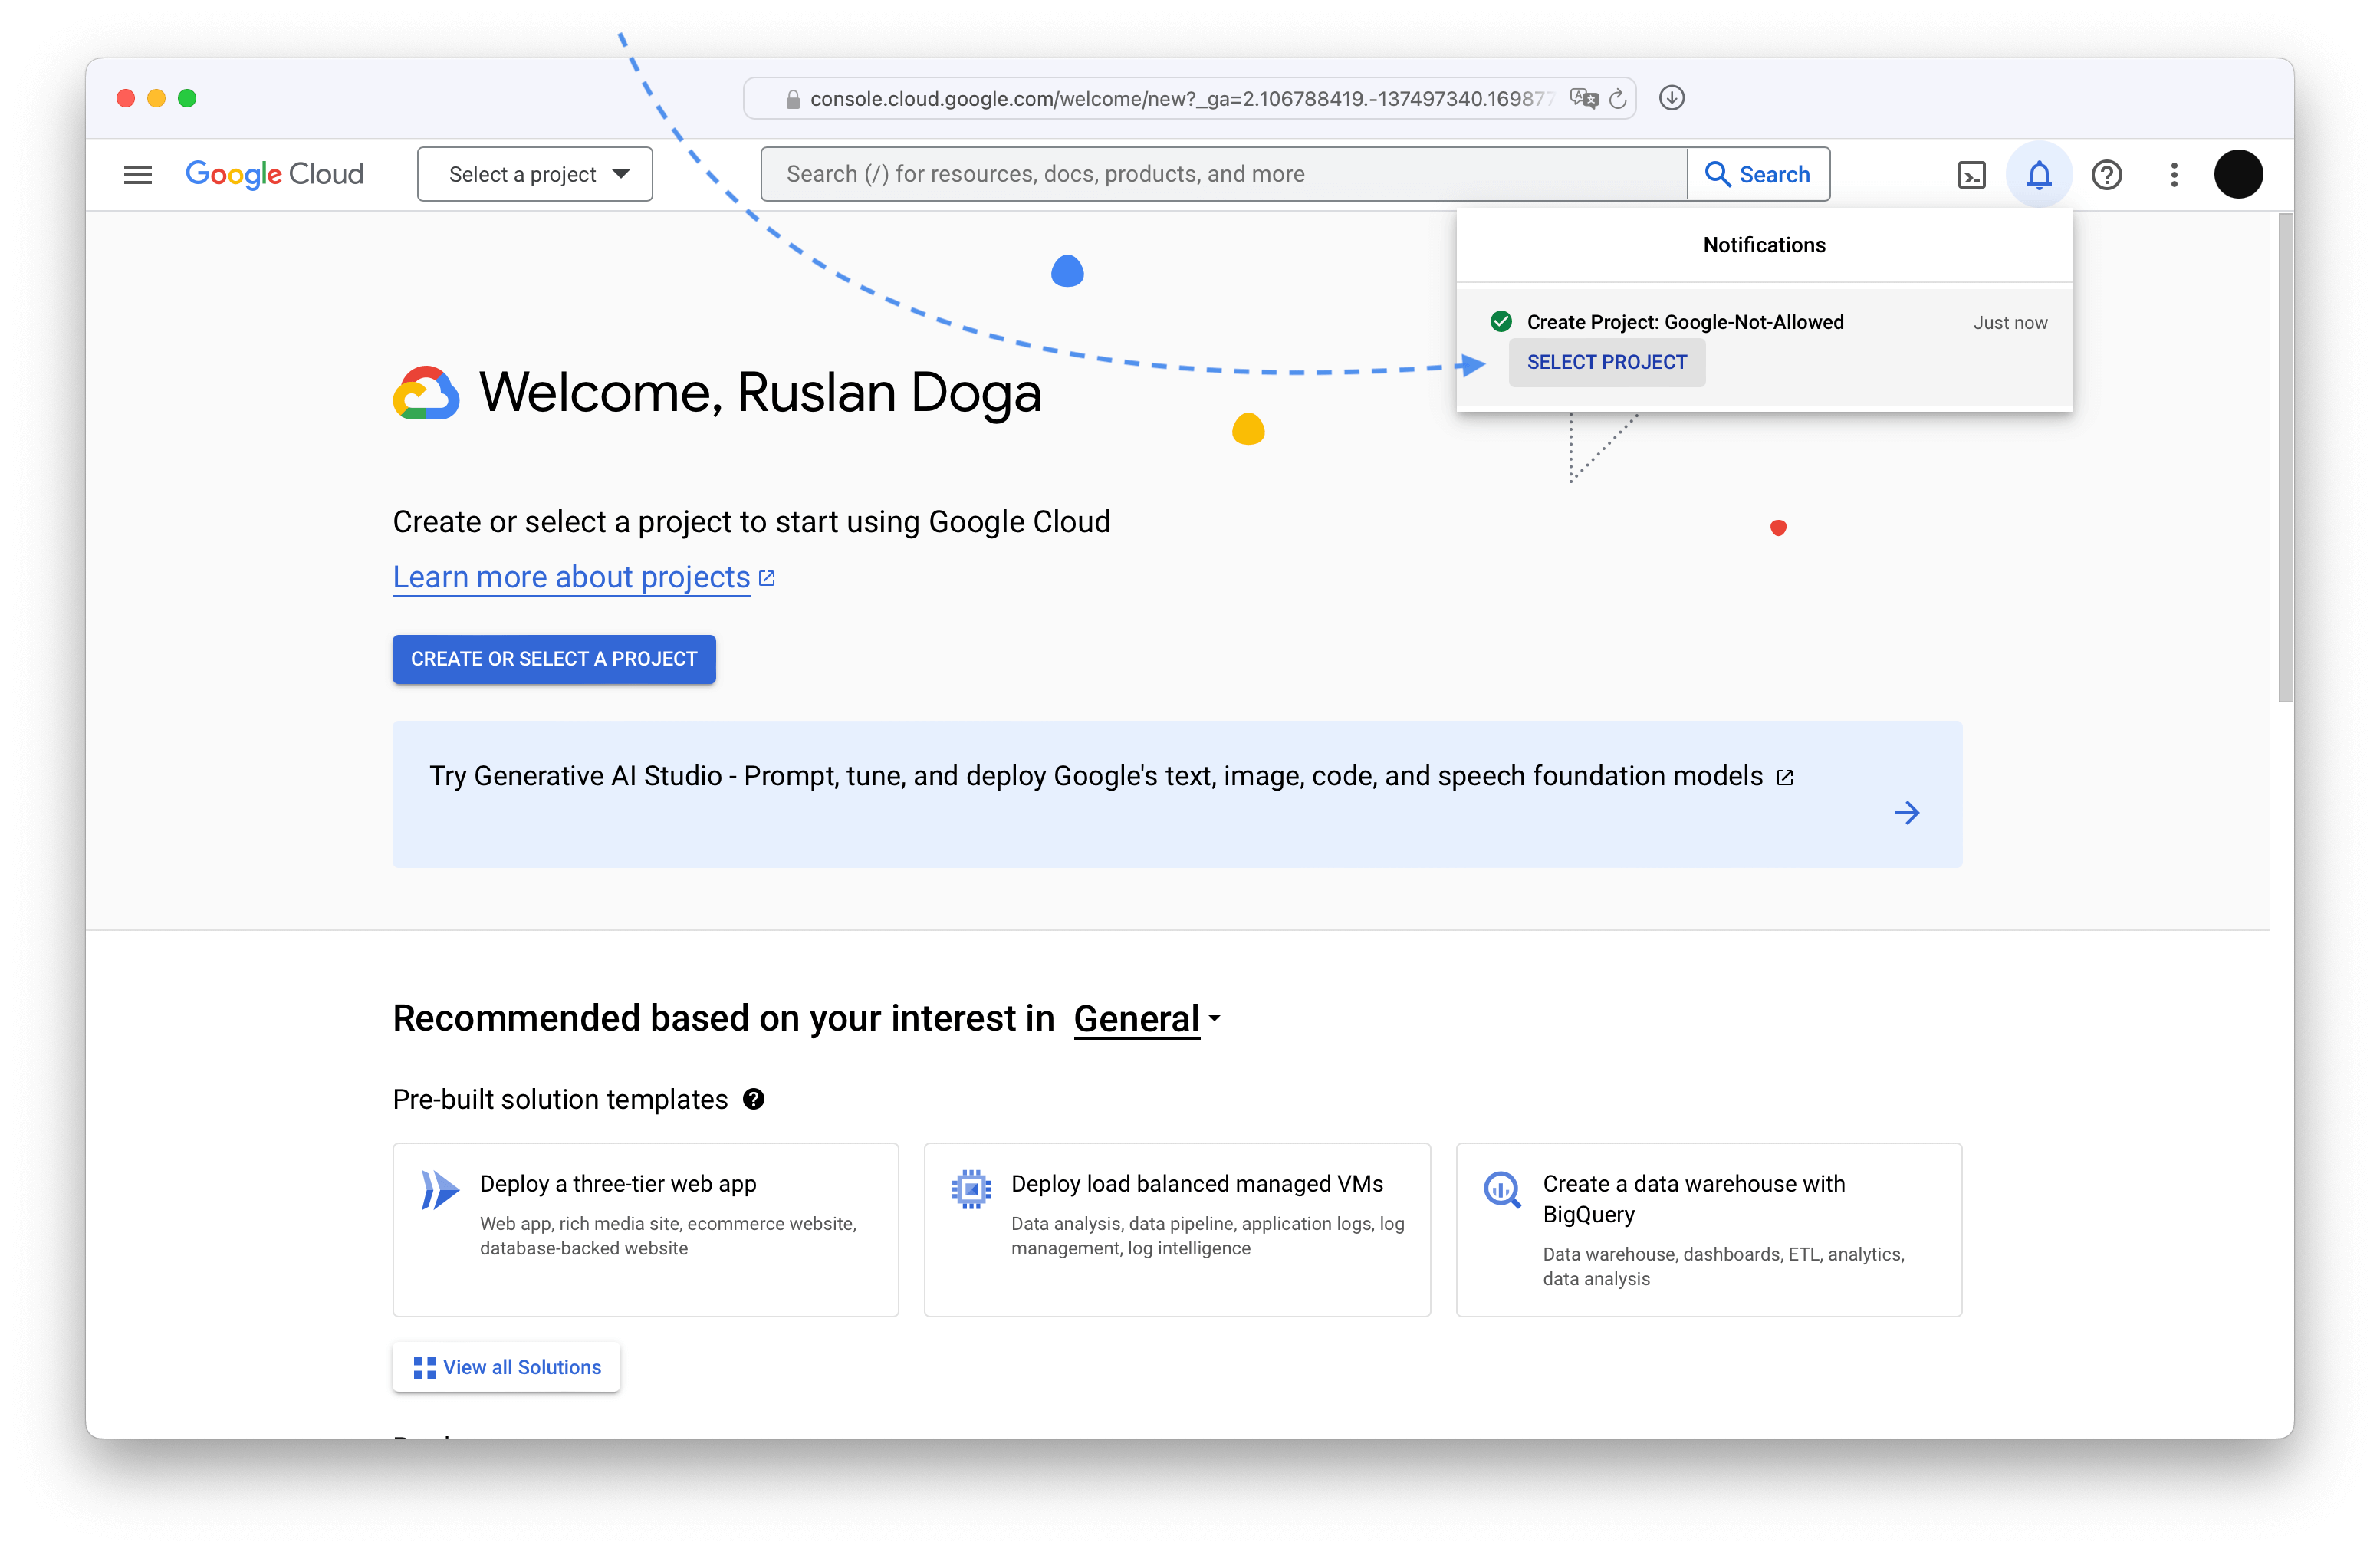
And just like that, you have a new Google Cloud project! Please do make sure it stays selected.
Register an OAuth application for a domain
Search for APIs & Services or something like that.
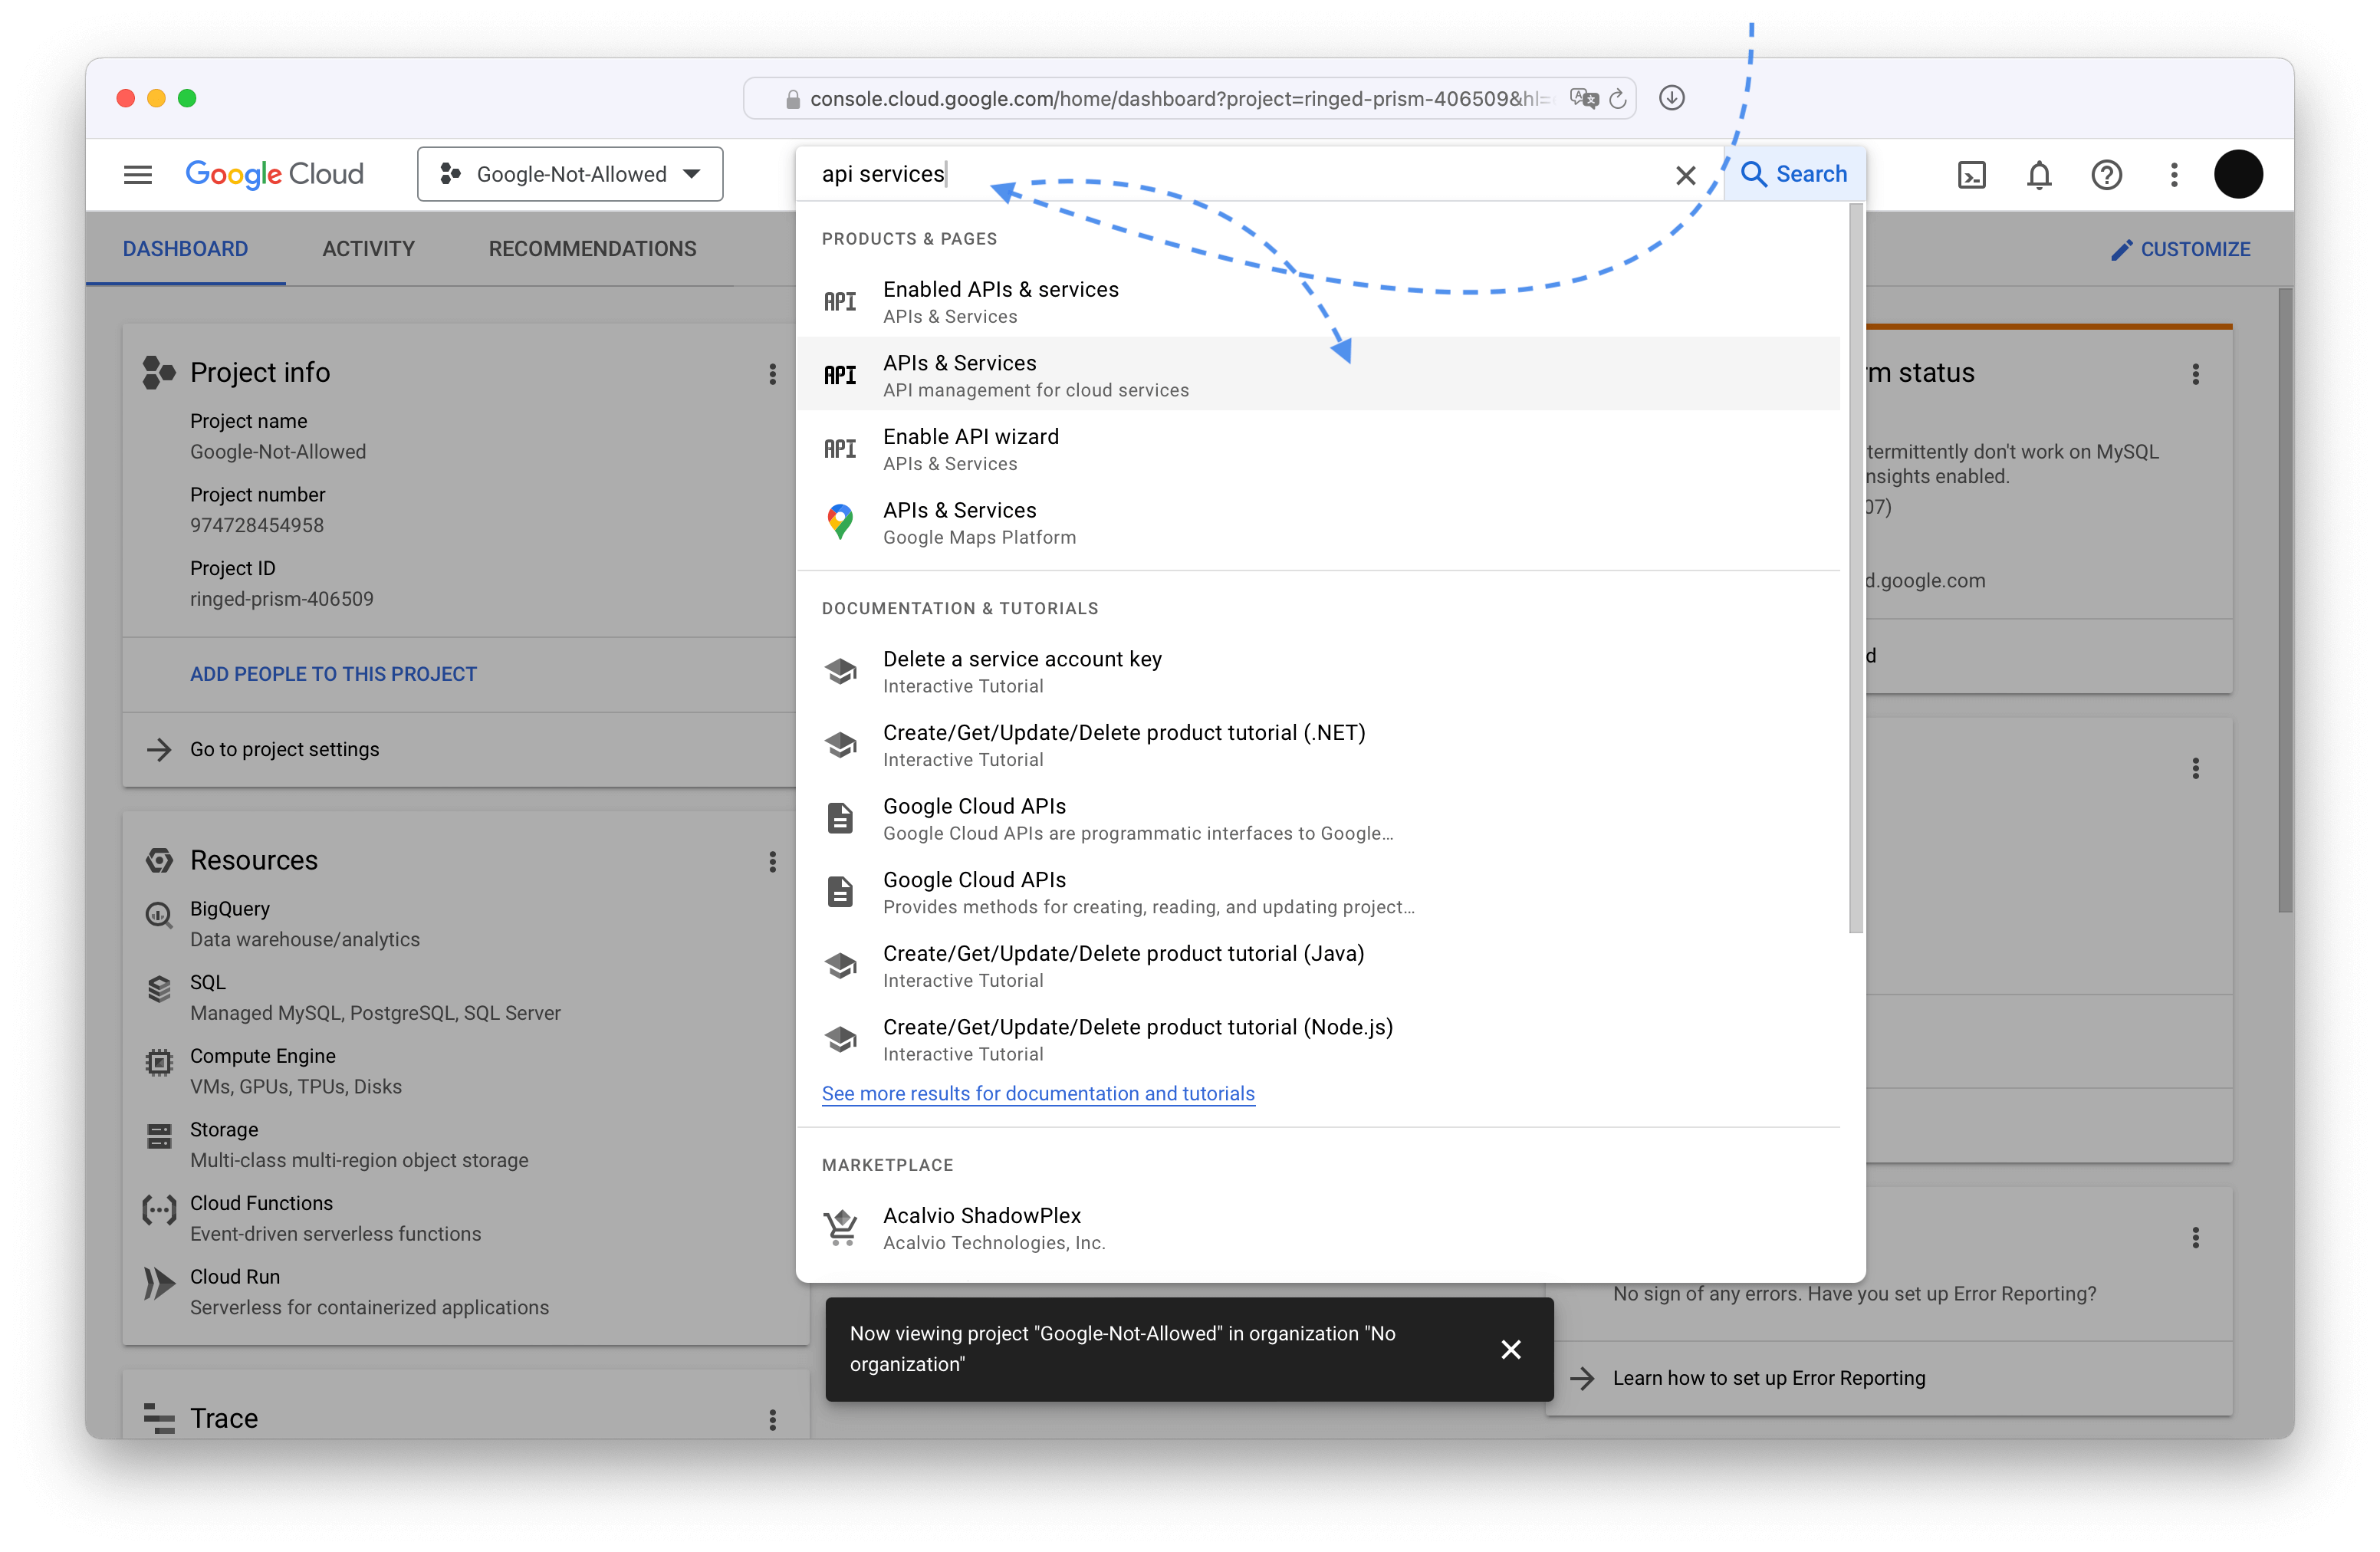
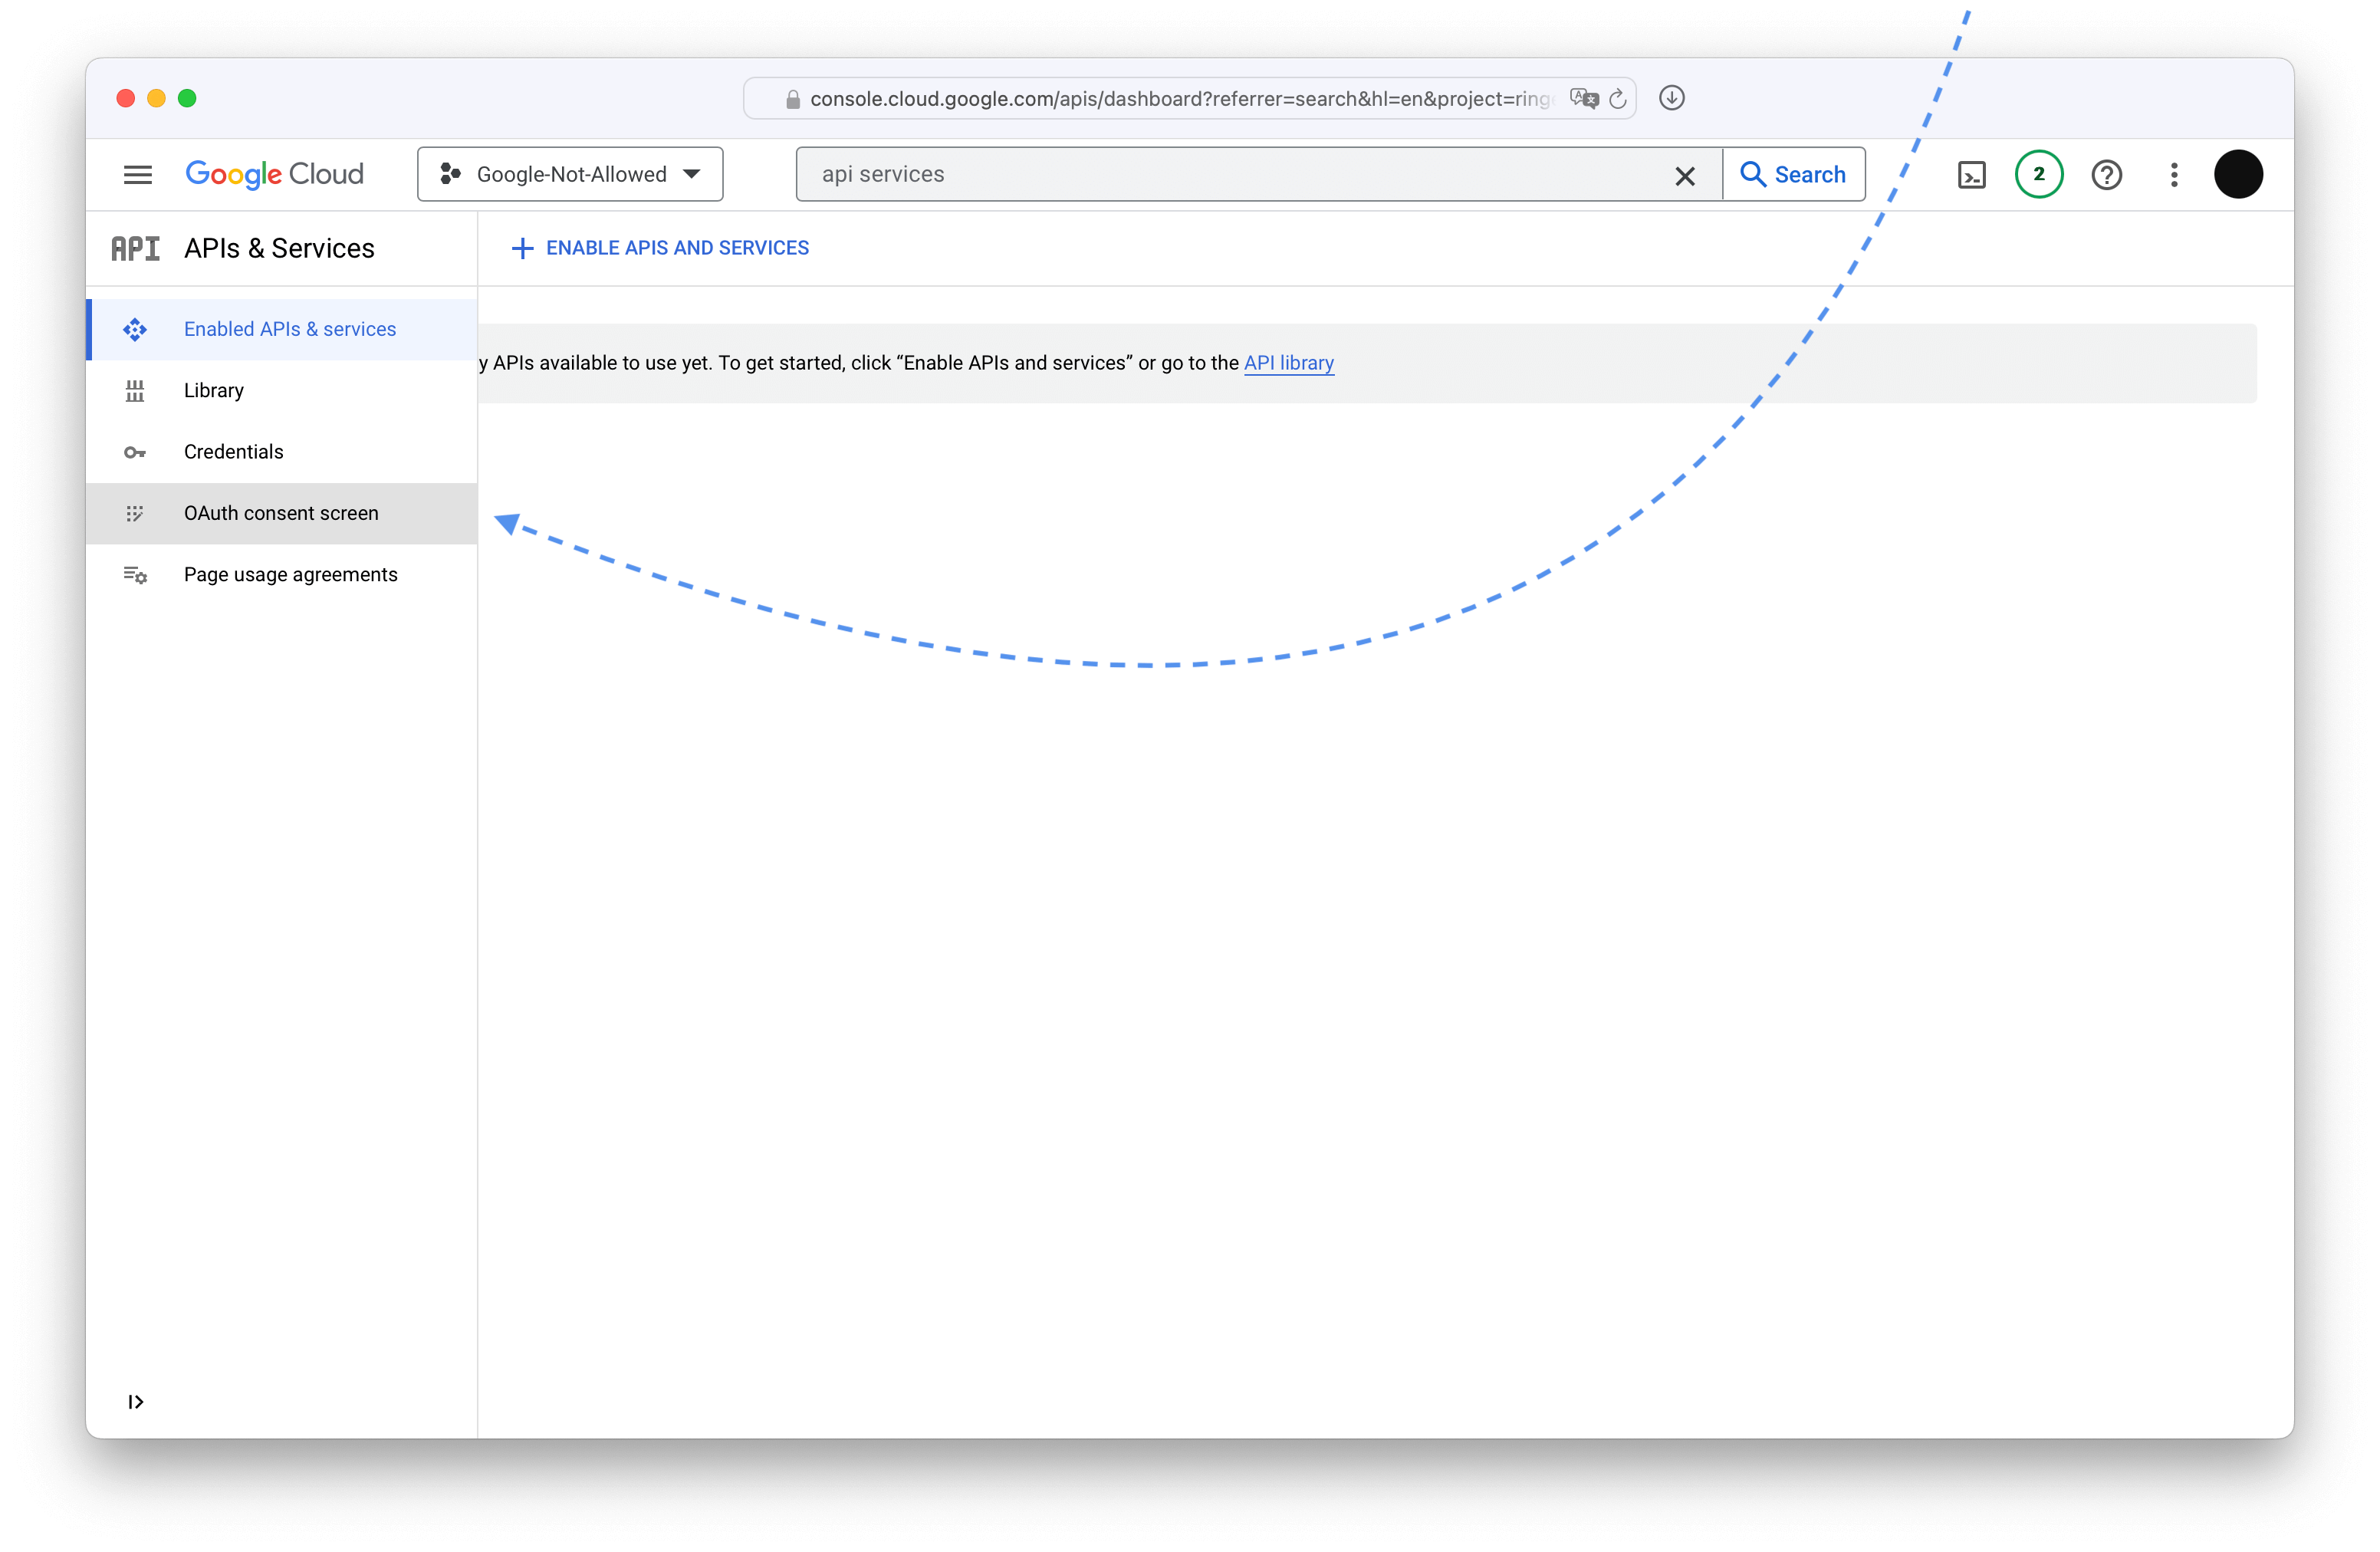
Then in the left sidebar pick OAuth consent screen to begin the OAuth application registration.
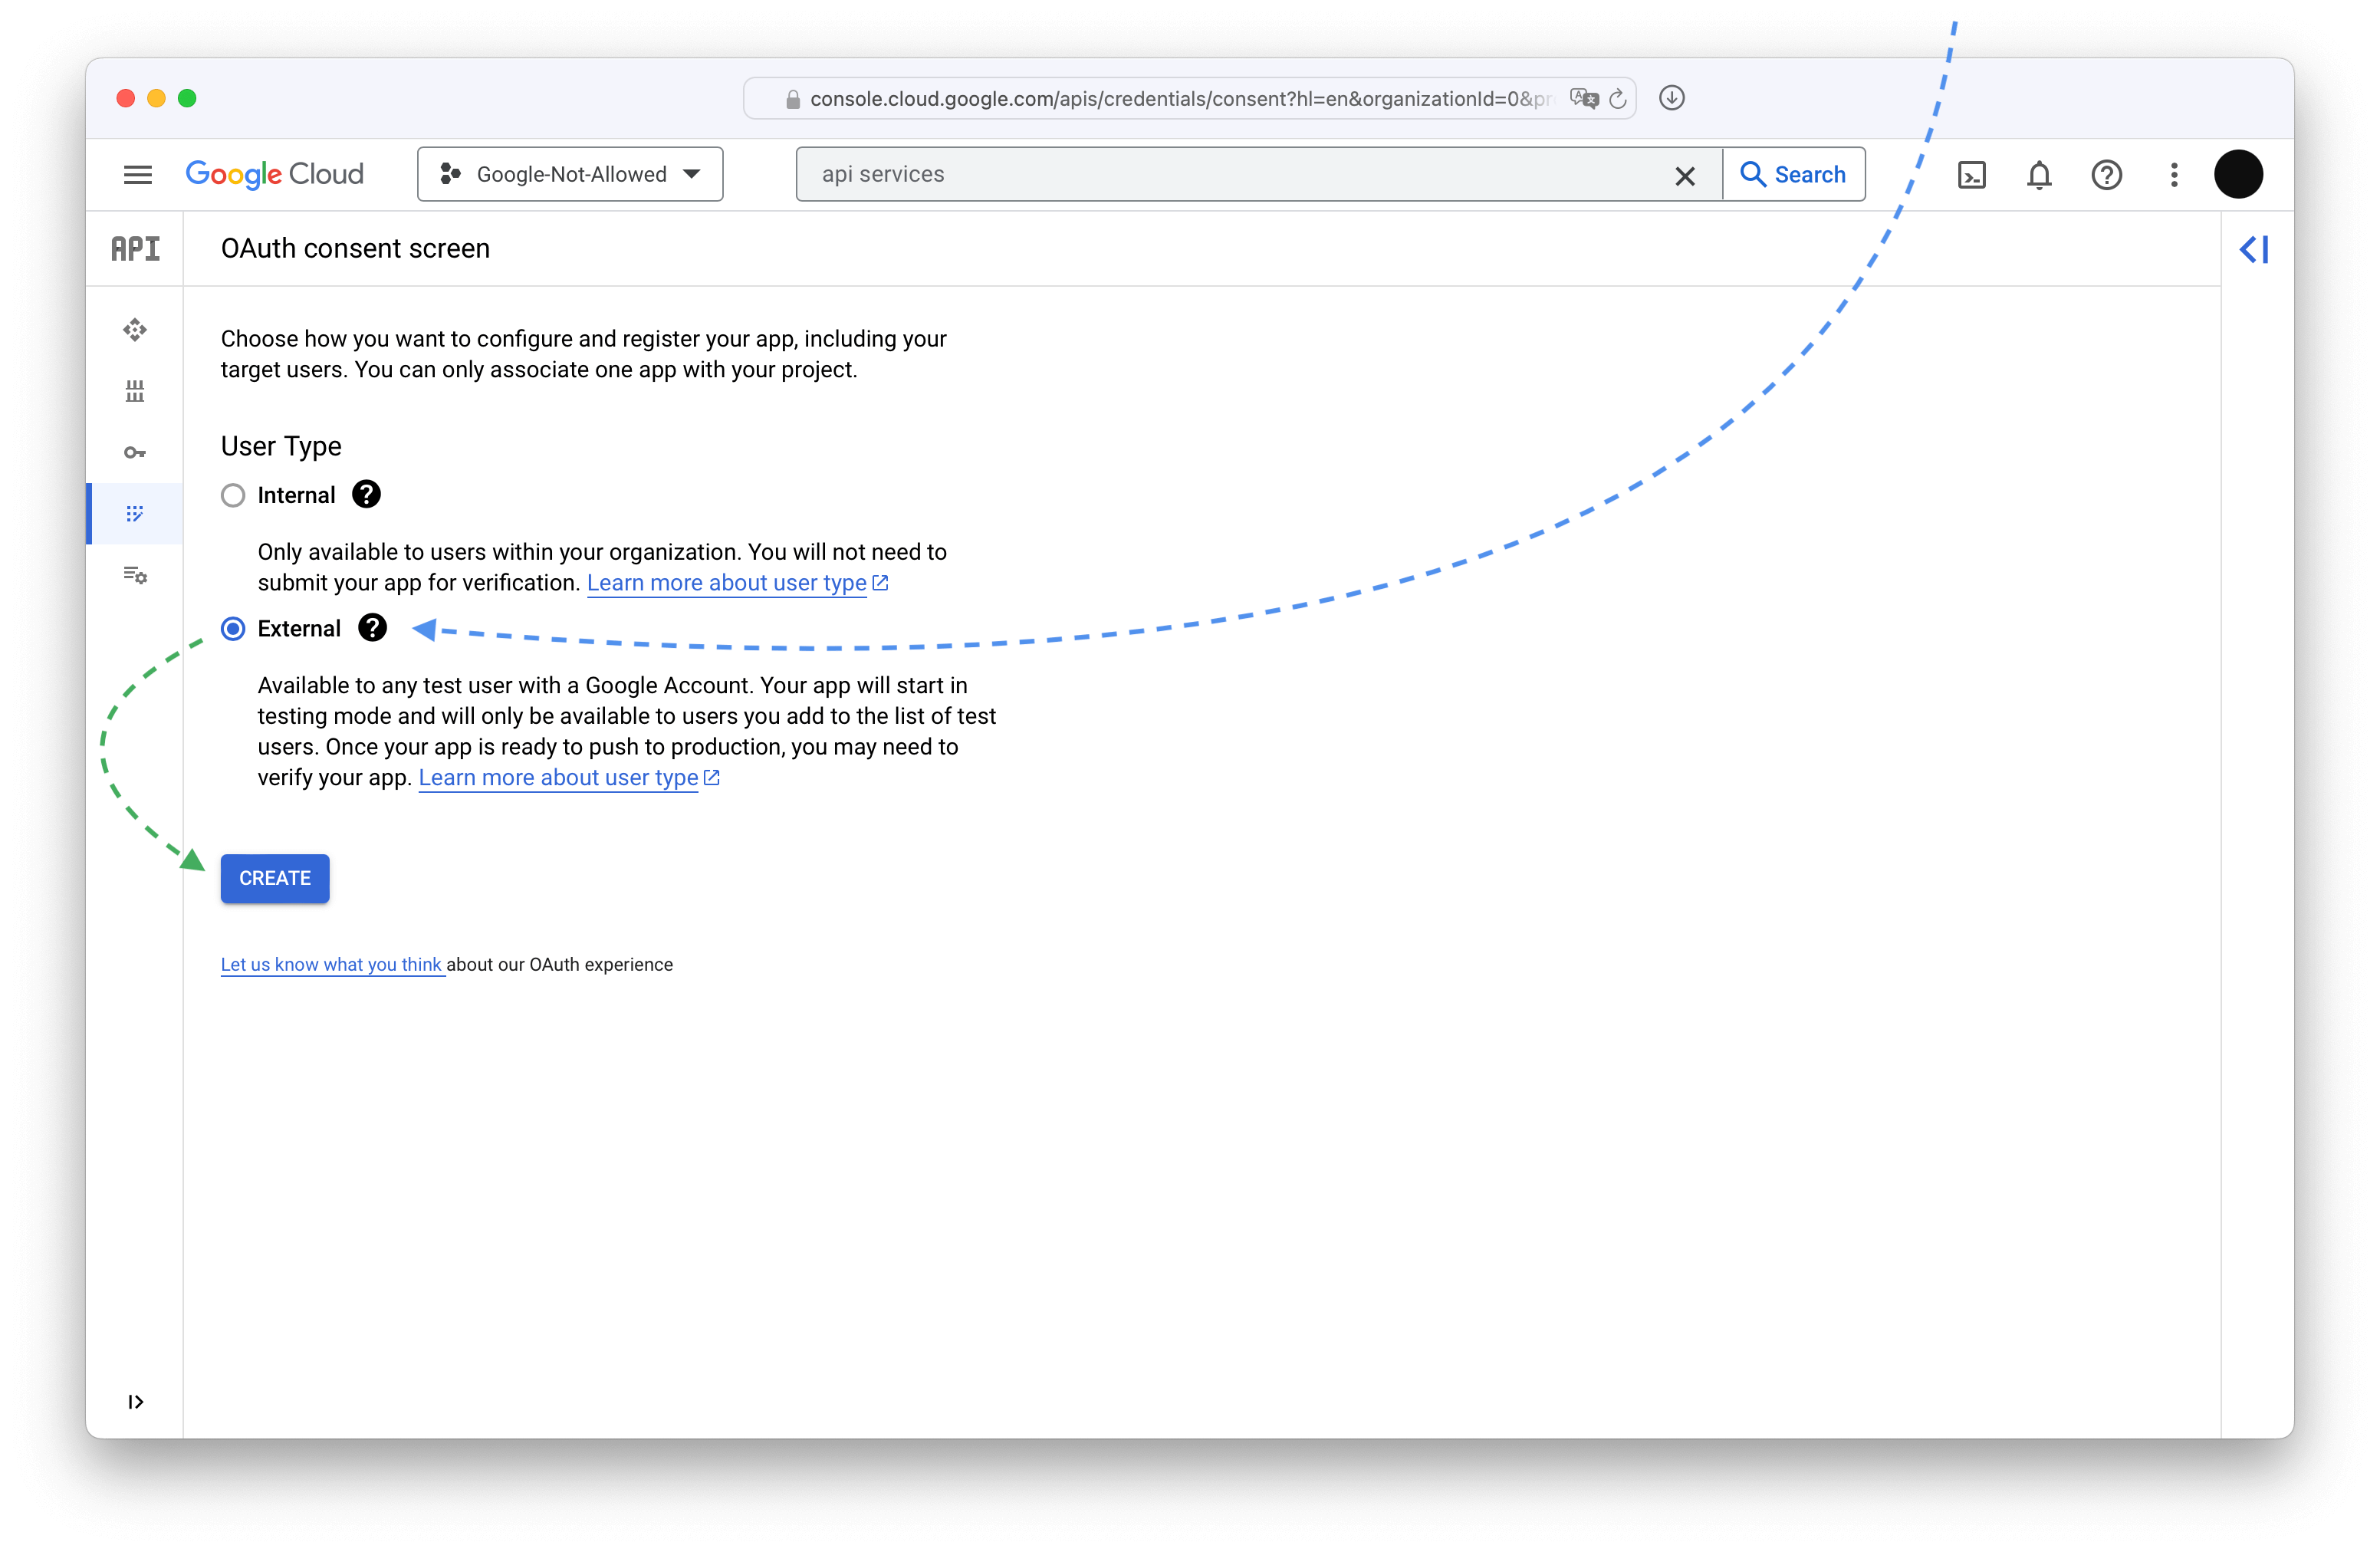
Choose External for the application type since the other one requires a Google Workspace and that costs money.
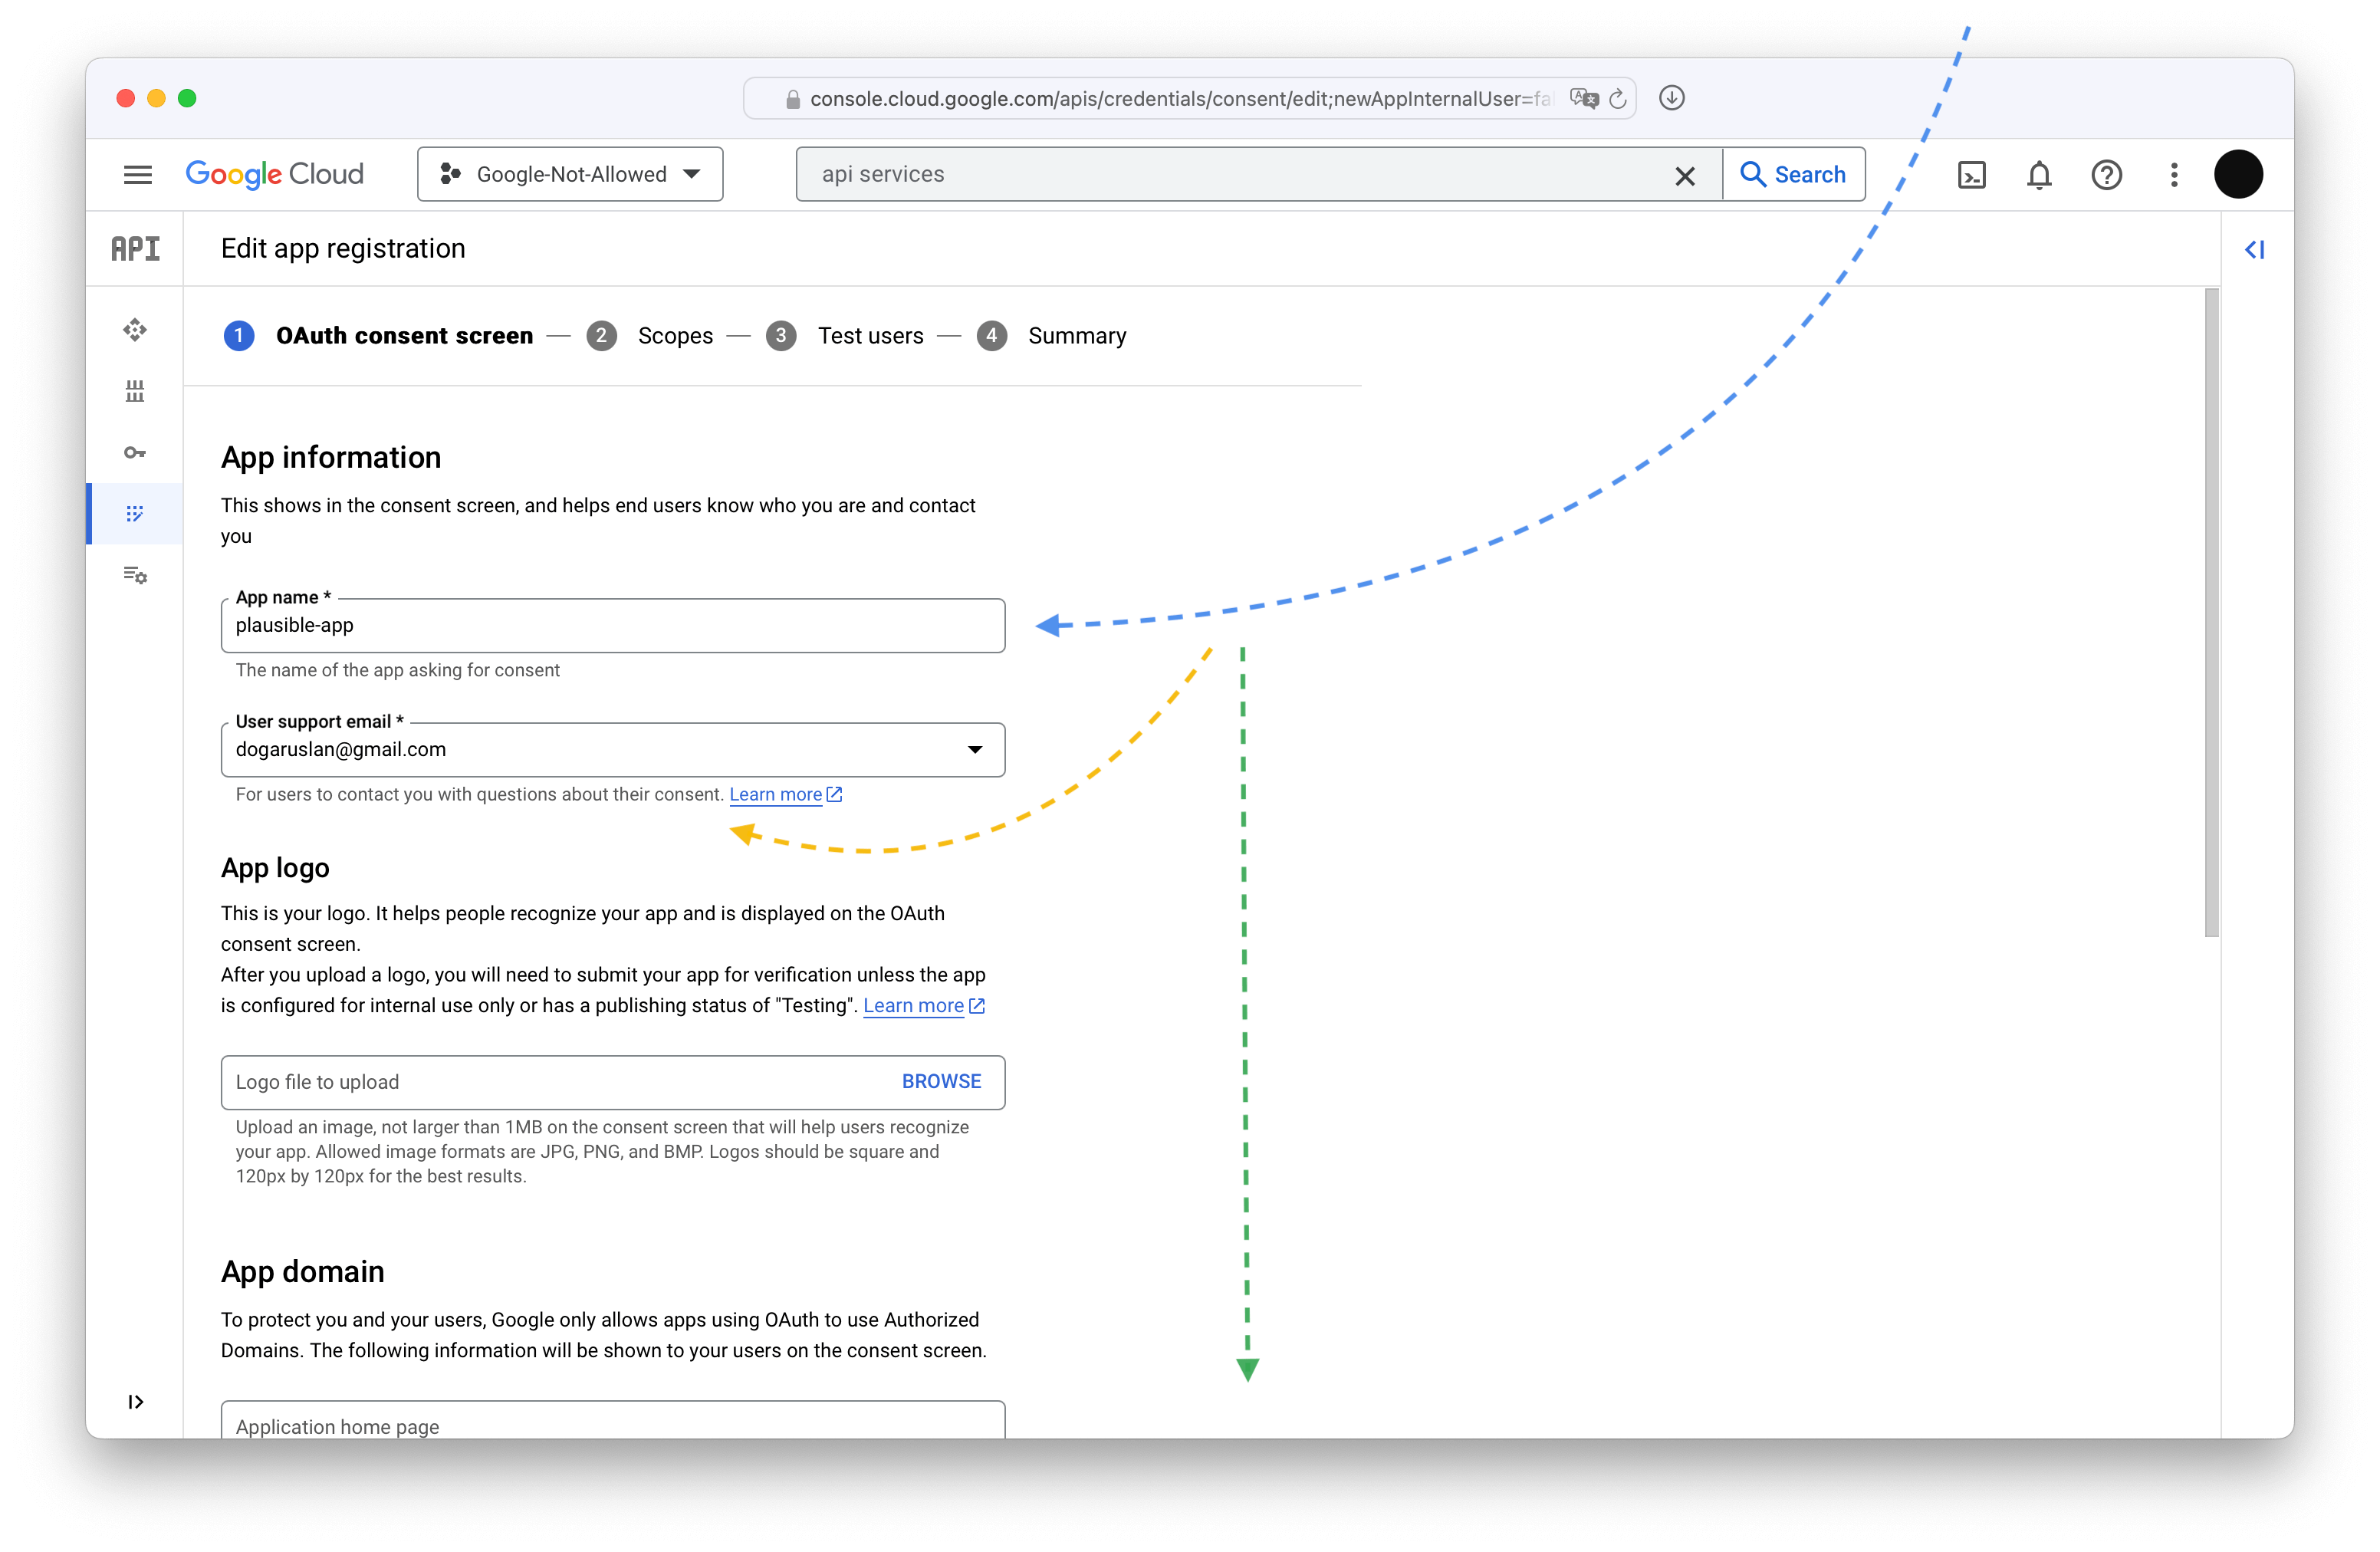
On the next screen pick the name for your application and add your contact information.
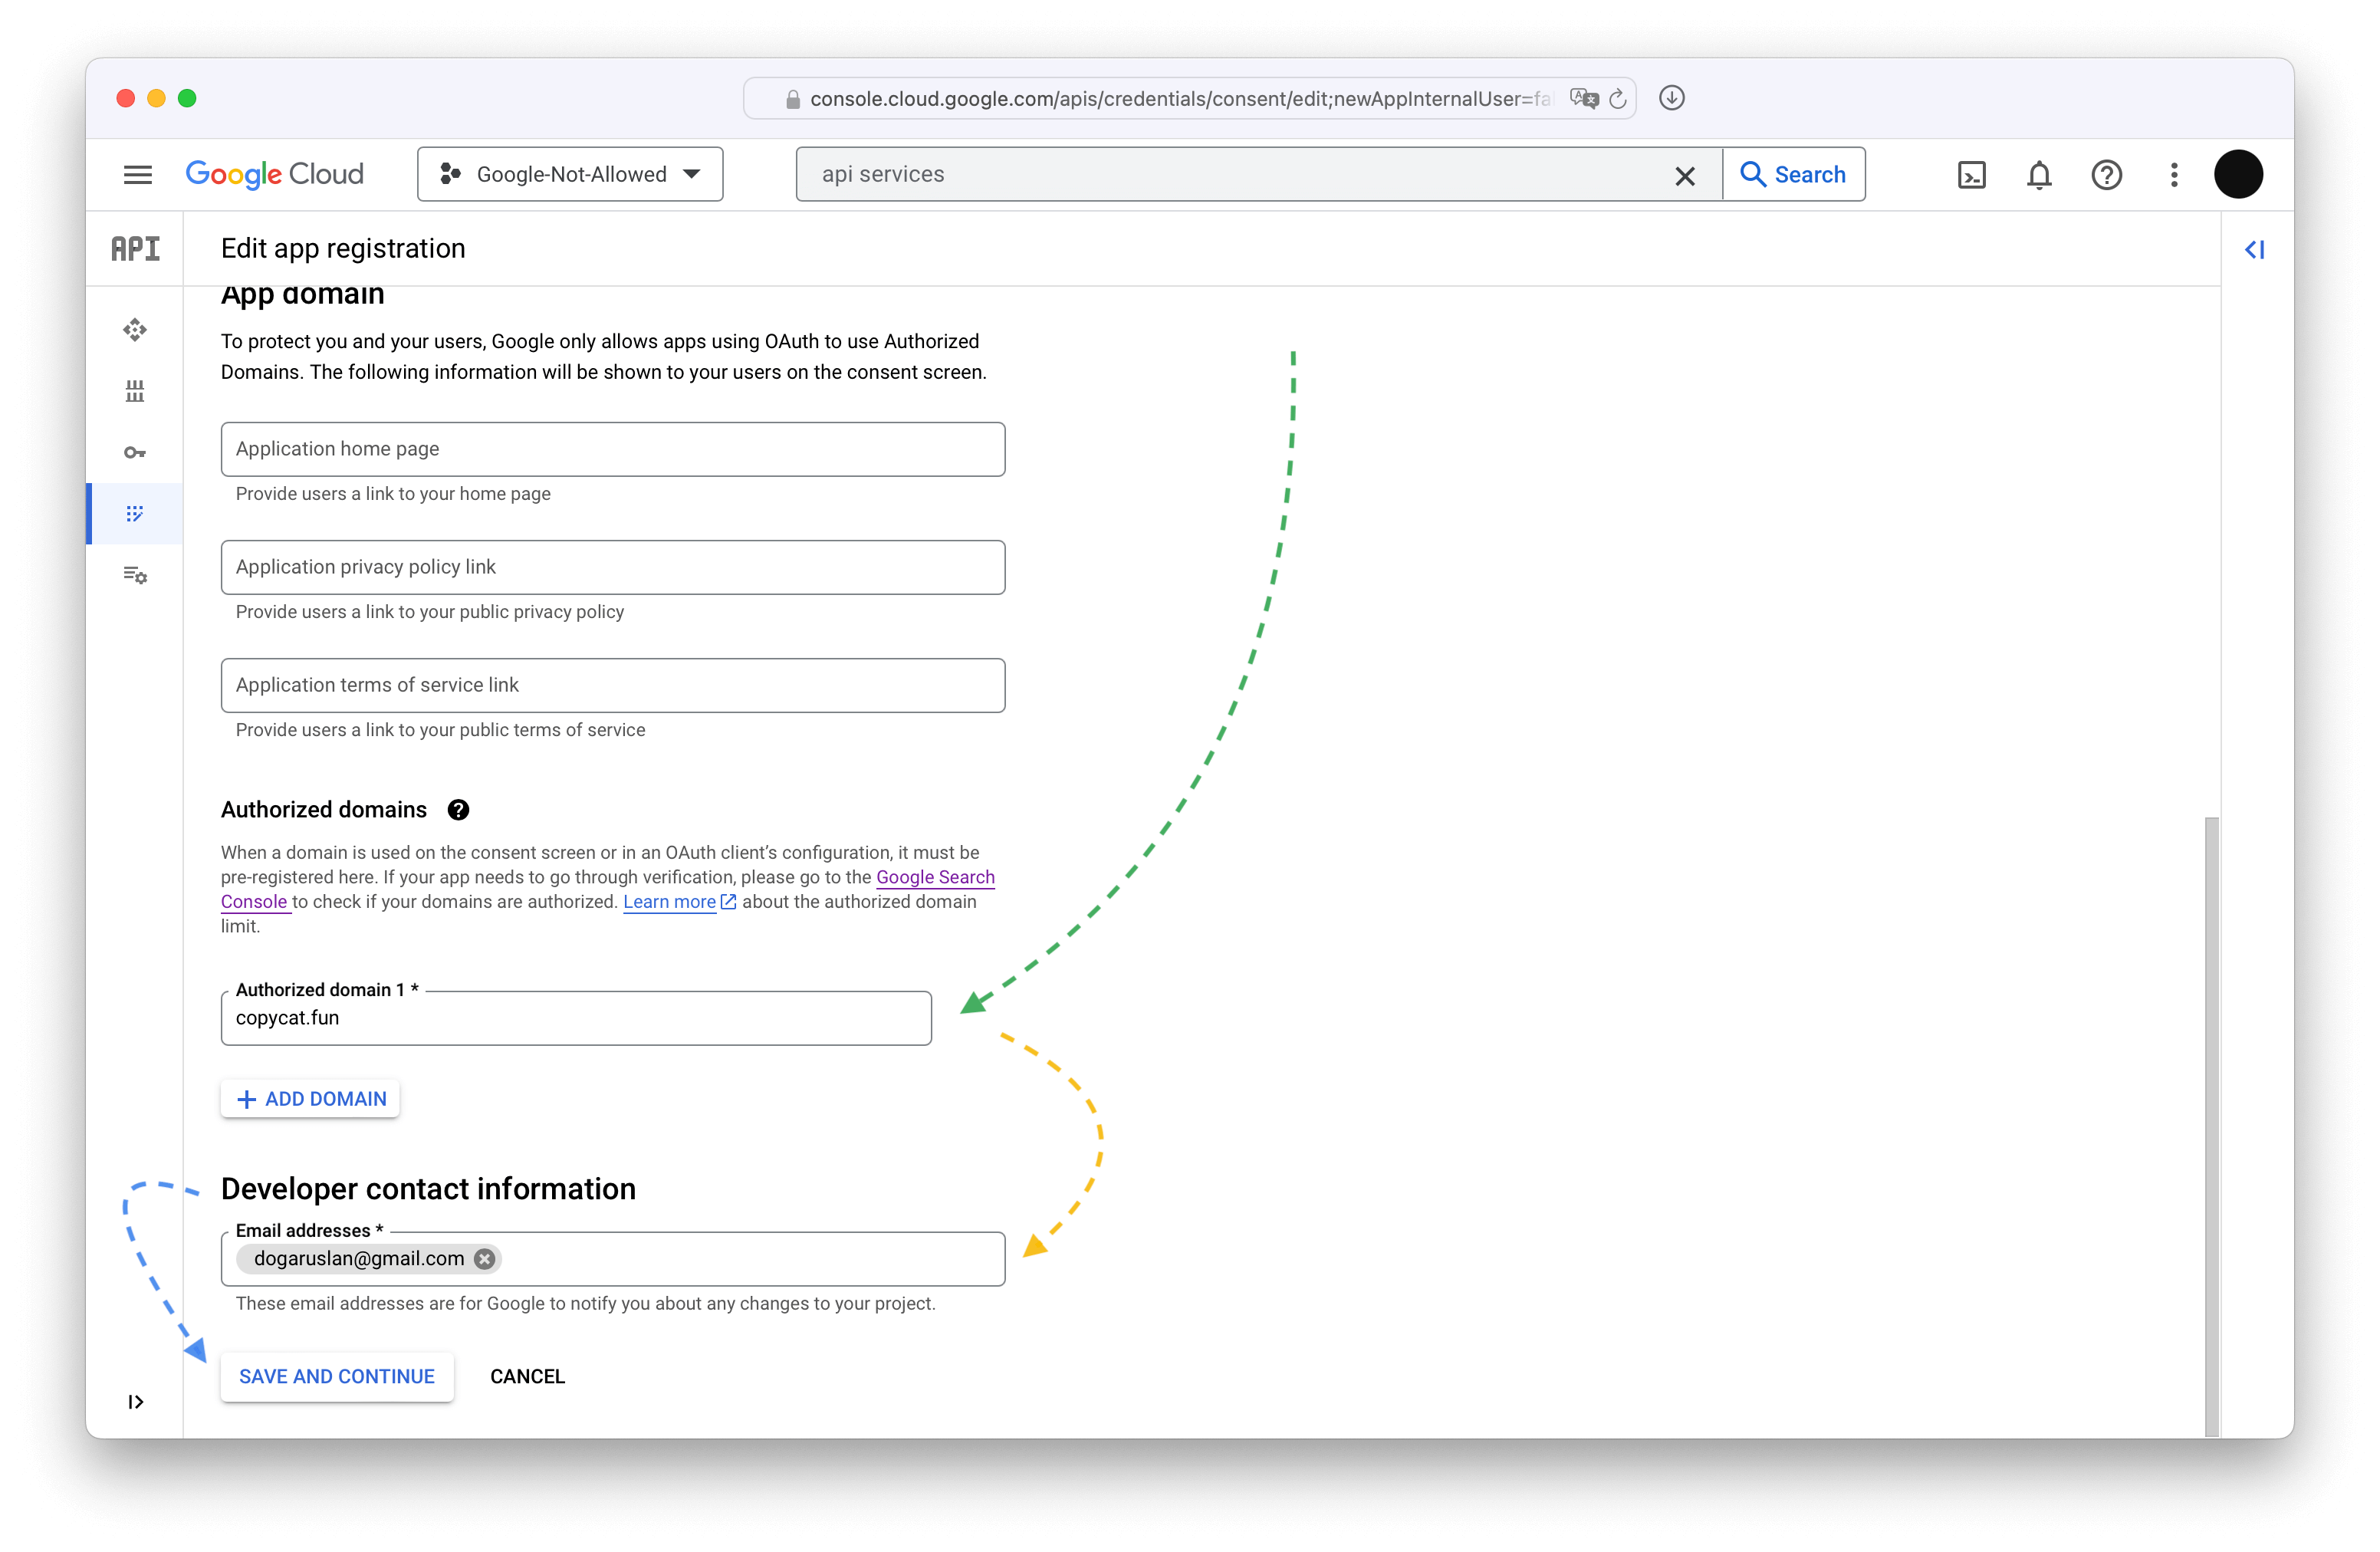
Scroll down -- skipping optional fields -- and type in your domain name and contact information (again).
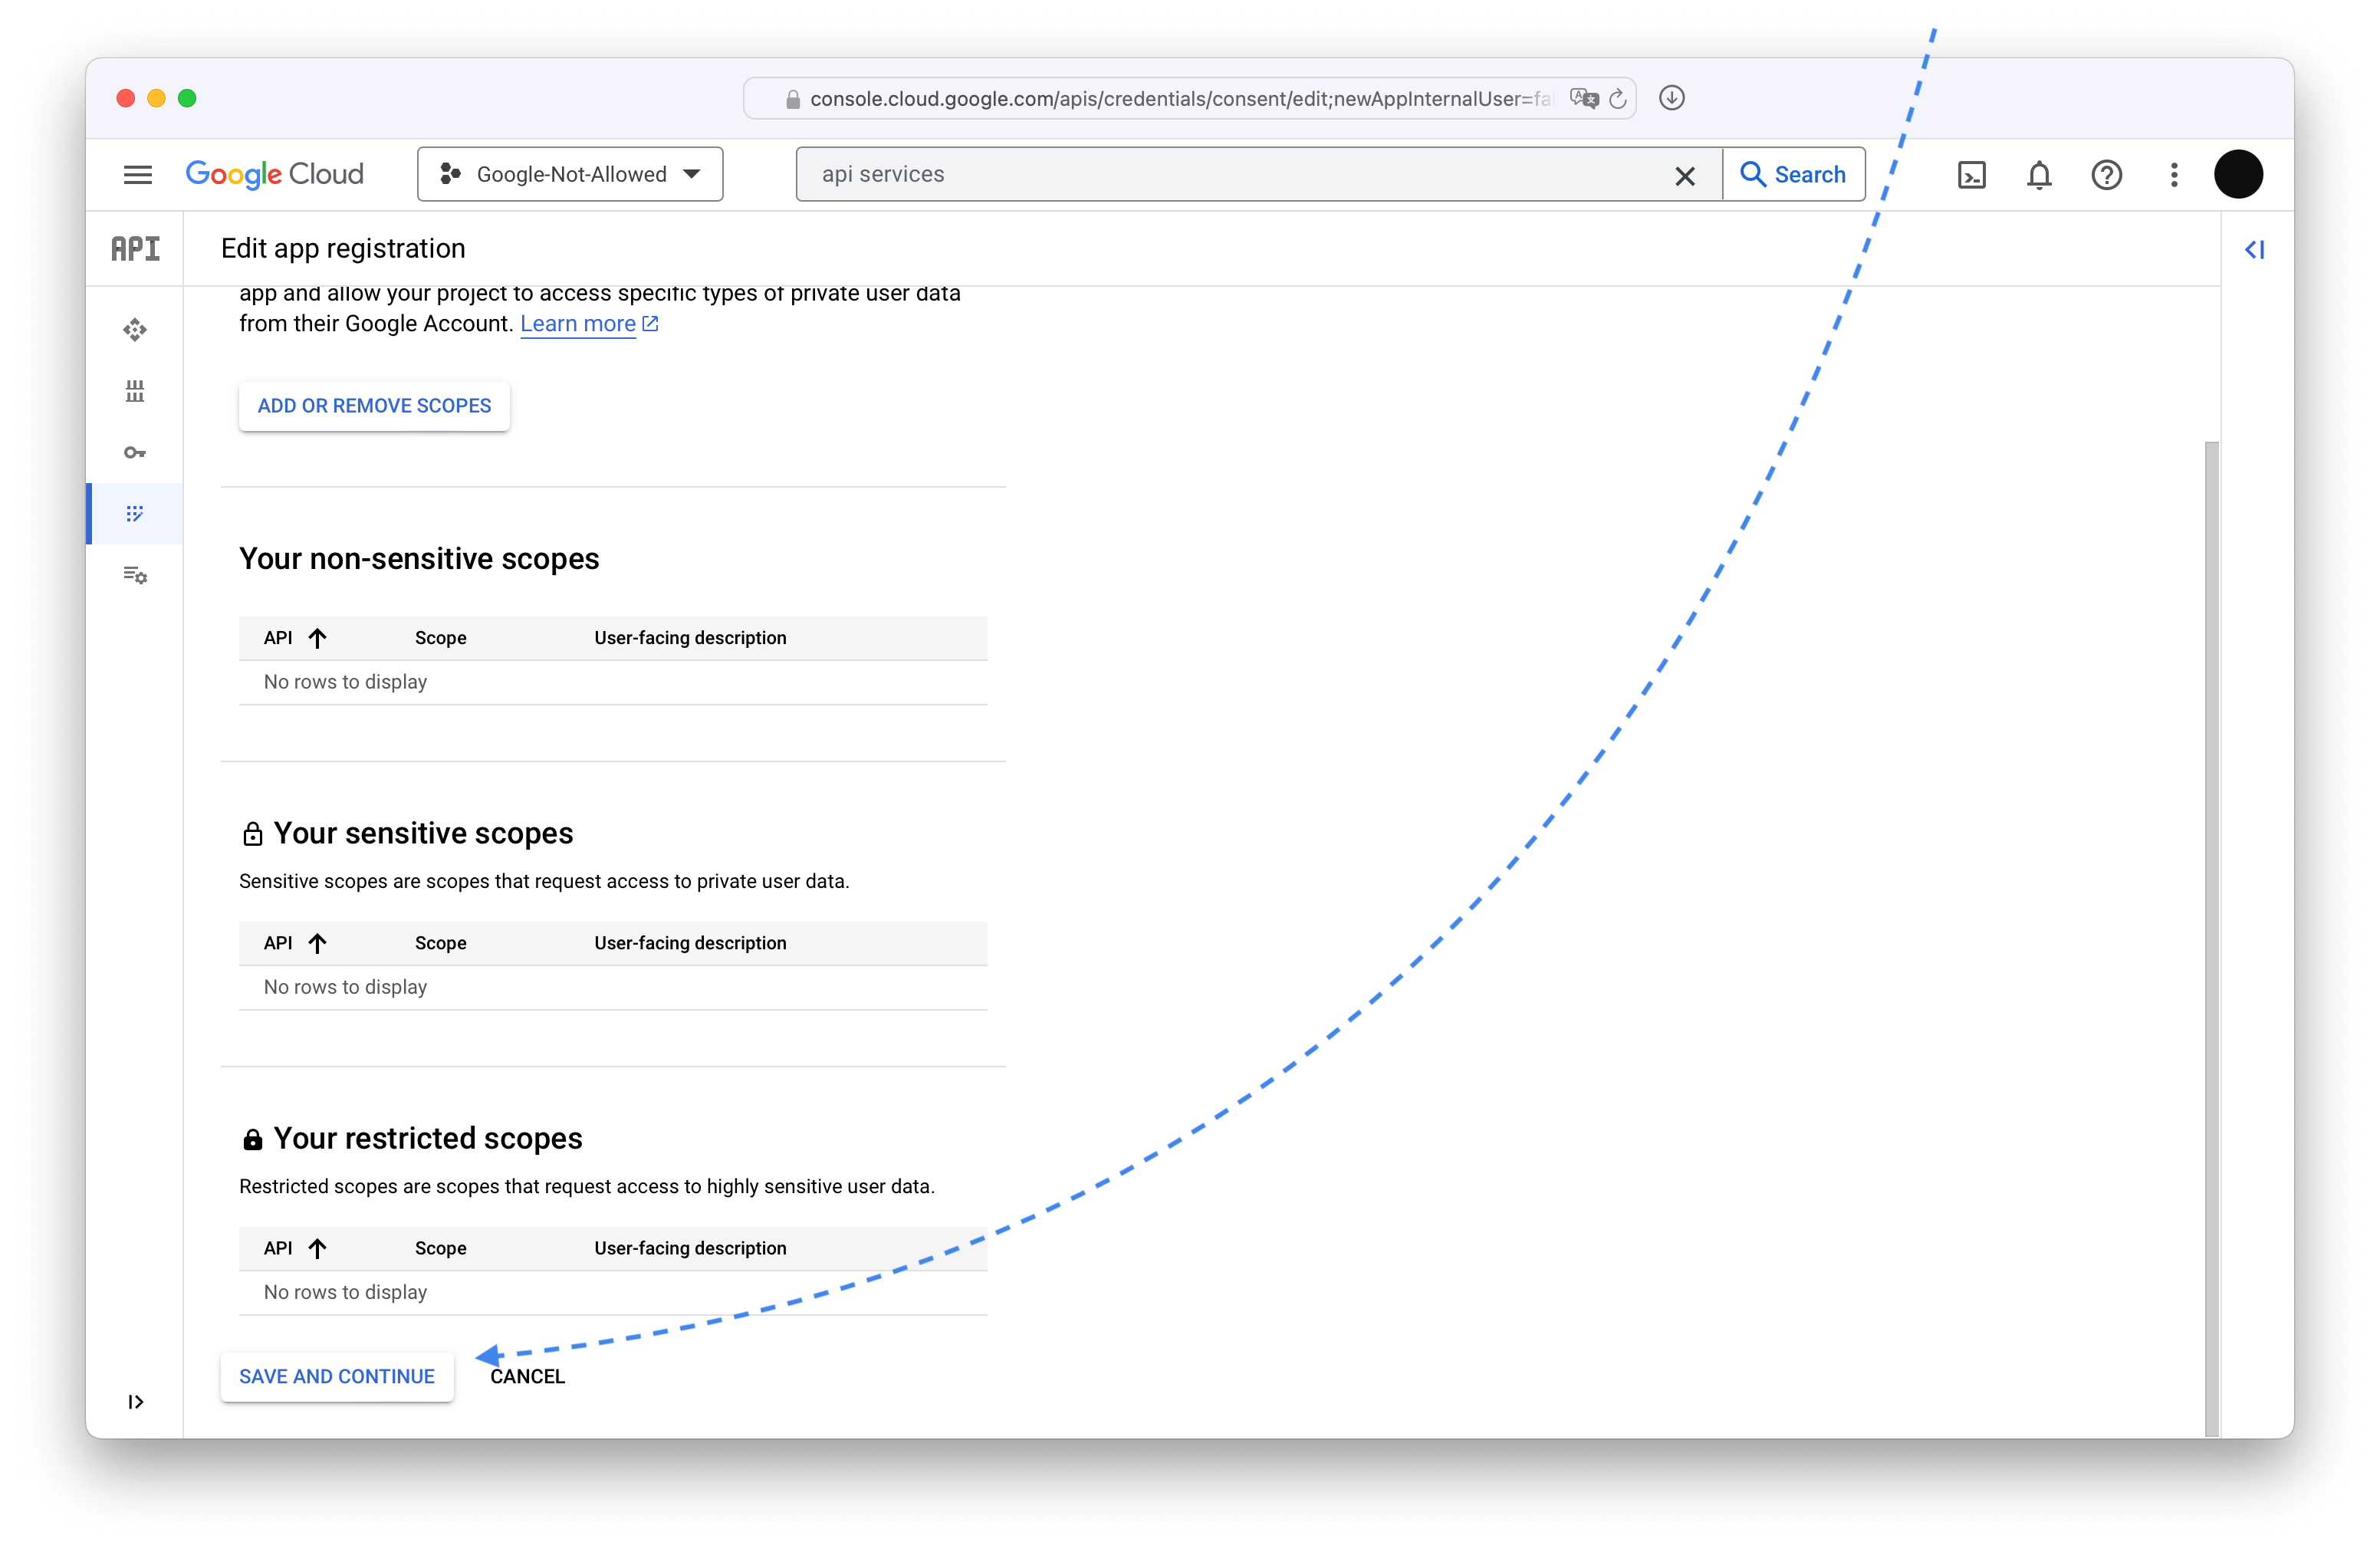
Skip the scopes.
Pick yourself as the test user, Google might complain about it but it works.

Click the final Save and continue and you have the OAuth application registered.
Issue an OAuth client and key for that application
Pick Credentials in the sidebar.
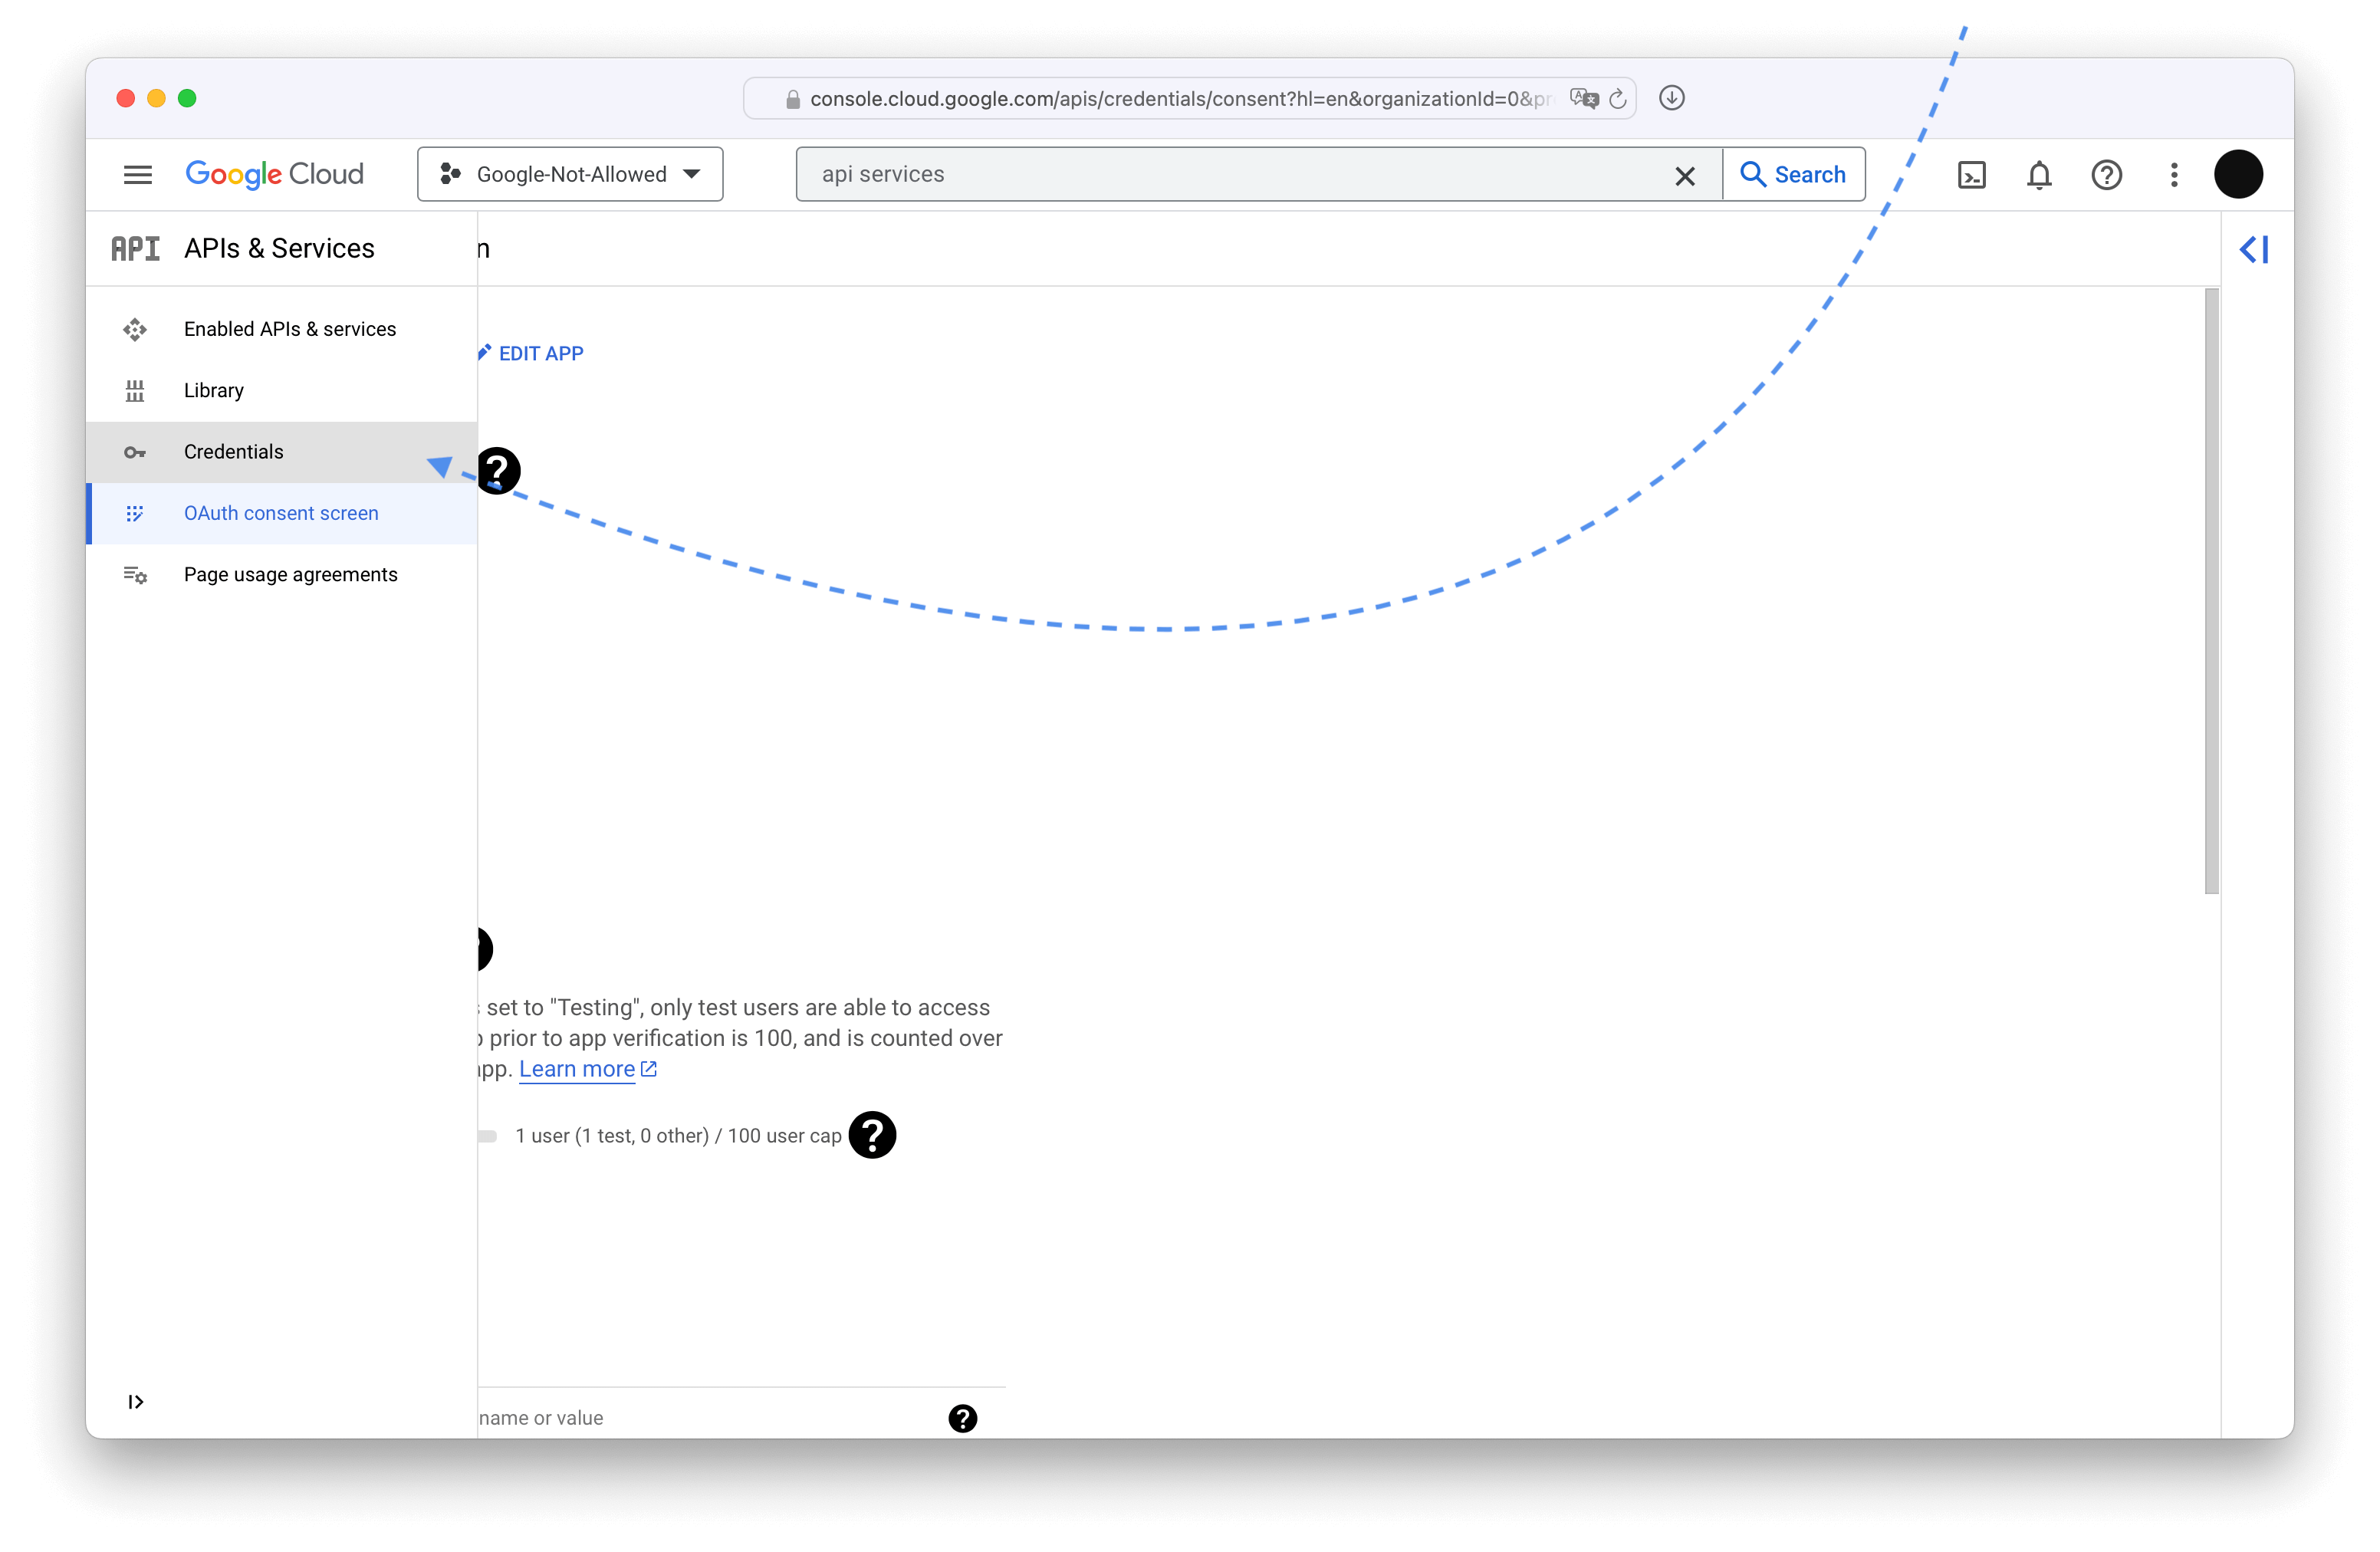
Click + Create credentials dropdown and select OAuth client ID

Pick Web application for the application type, type the name for the client, and add the redirect URL.

That redirect URL should be /auth/google/callback on your Plausible instance's BASE_URL

Copy these to your plausible-conf.env and make sure to recreate the plausible container since the ENV vars provided on startup get "baked in"
plausible-conf.env
GOOGLE_CLIENT_ID=974728454958-e1vcqqqs6hmoc394663kjrkgfajrifdg.apps.googleusercontent.com
GOOGLE_CLIENT_SECRET=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
console
$ docker compose stop plausible
[+] Running 1/1
 ⠿ Container hosting-plausible-1  Stopped
$ docker compose rm plausible
? Going to remove hosting-plausible-1 Yes
[+] Running 1/0
 ⠿ Container hosting-plausible-1  Removed
$ docker compose -f docker-compose.yml -f reverse-proxy/docker-compose.caddy-gen.yml up -d
[+] Running 4/4
 ✔ Container hosting-plausible_events_db-1  Running    0.0s
 ✔ Container hosting-plausible_db-1         Running    0.0s
 ✔ Container hosting-plausible-1            Started    1.2s
 ✔ Container caddy-gen                      Running    0.0s
[+] Running 3/3
 ⠿ Container hosting-plausible_db-1         Healthy 0.5s
 ⠿ Container hosting-plausible_events_db-1  Healthy 0.5s
 ⠿ Container hosting-plausible-1            Started
$ docker compose exec plausible sh -c 'echo $GOOGLE_CLIENT_ID'
974728454958-e1vcqqqs6hmoc394663kjrkgfajrifdg.apps.googleusercontent.com
You can omit -f docker-compose.yml -f reverse-proxy/docker-compose.caddy-gen.yml if you are not using Caddy
Verify the chosen domain on Google Search console
Did you notice that during OAuth application registratation there was a note about Authorized URLs saying that they need to be verified? Nevermind, we are doing it now.
Start by navigating to Google Search Console page.
Once there, either ensure that you've already verified your domain by checking the properties in the Select property dropdown on the left or pick one of the two ways to verify it. I only have screenshots for the "Domain" type so that's what I'm picking.

Whichever you pick, just follow the instruction in the pop-up, they are good.
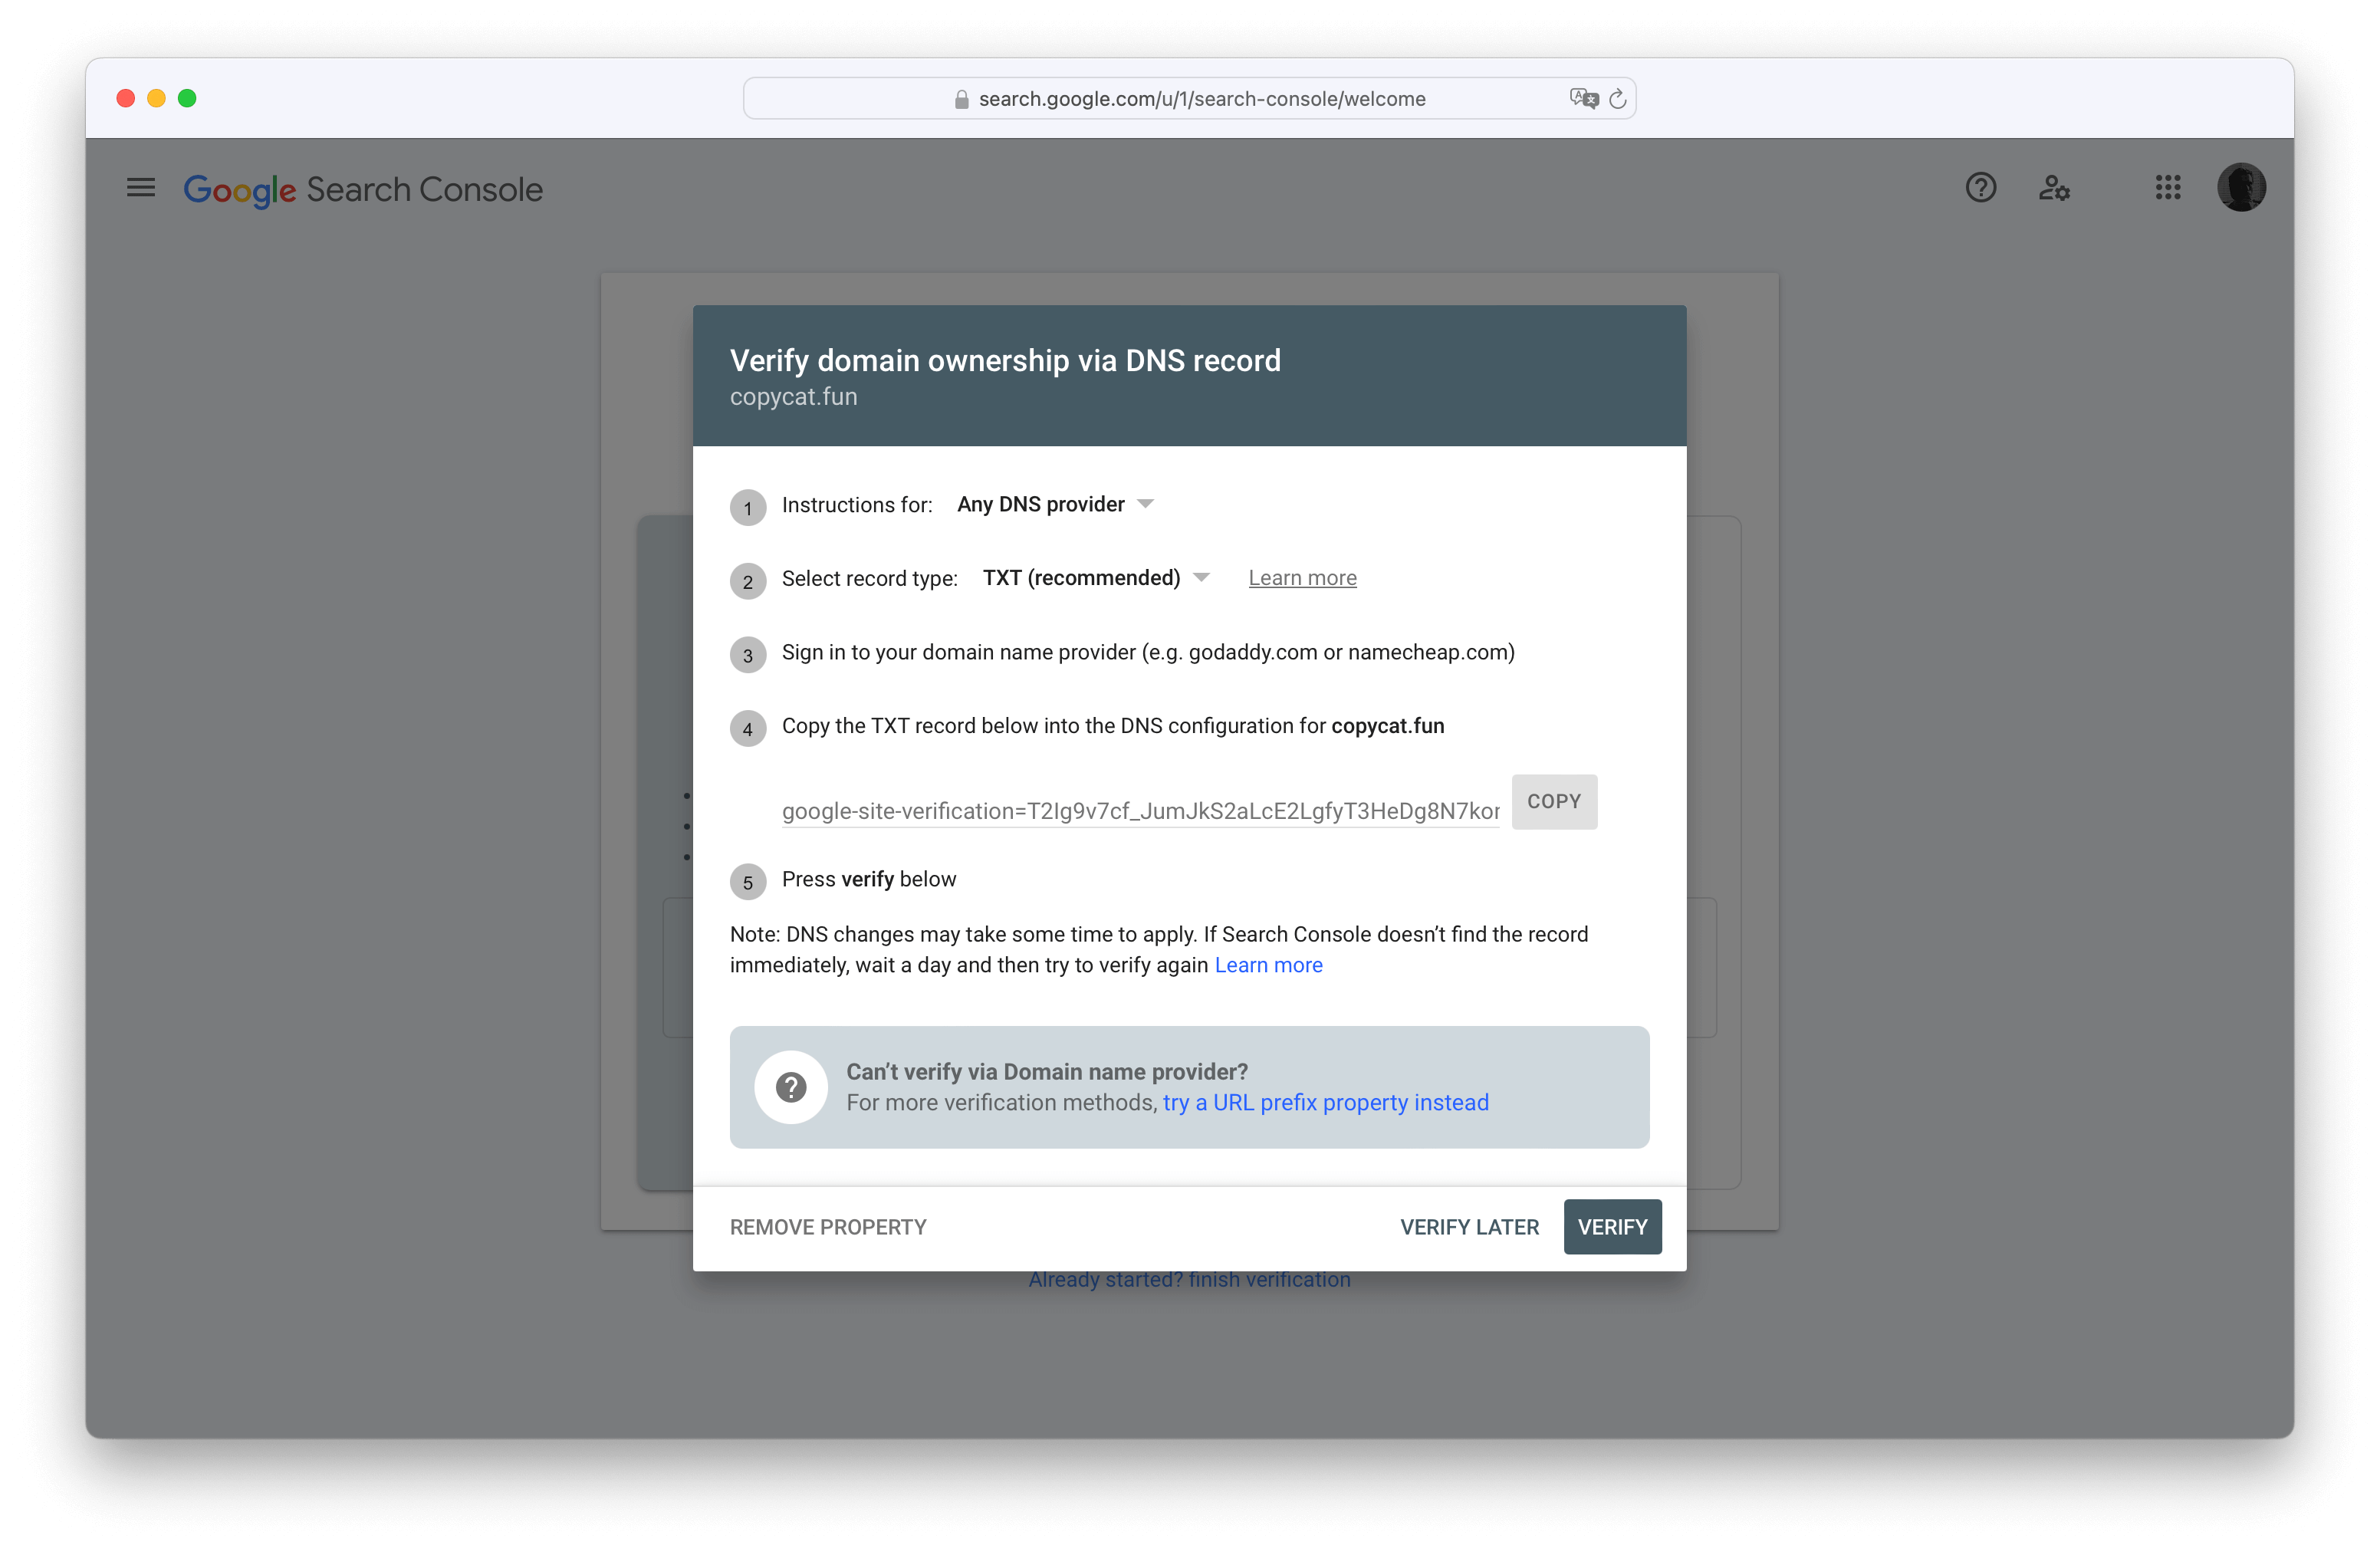
Success looks like this.

With that, you are ready to integrate Plausible with Google Search and import Universal Analytics data. You can do both, neither, and anything in between.
Integrate with Google Search
Enable APIs for Google Search integration
Go back to Google Cloud, ensure you have the correct project selected, and search for Google Search Console API

Enable it.
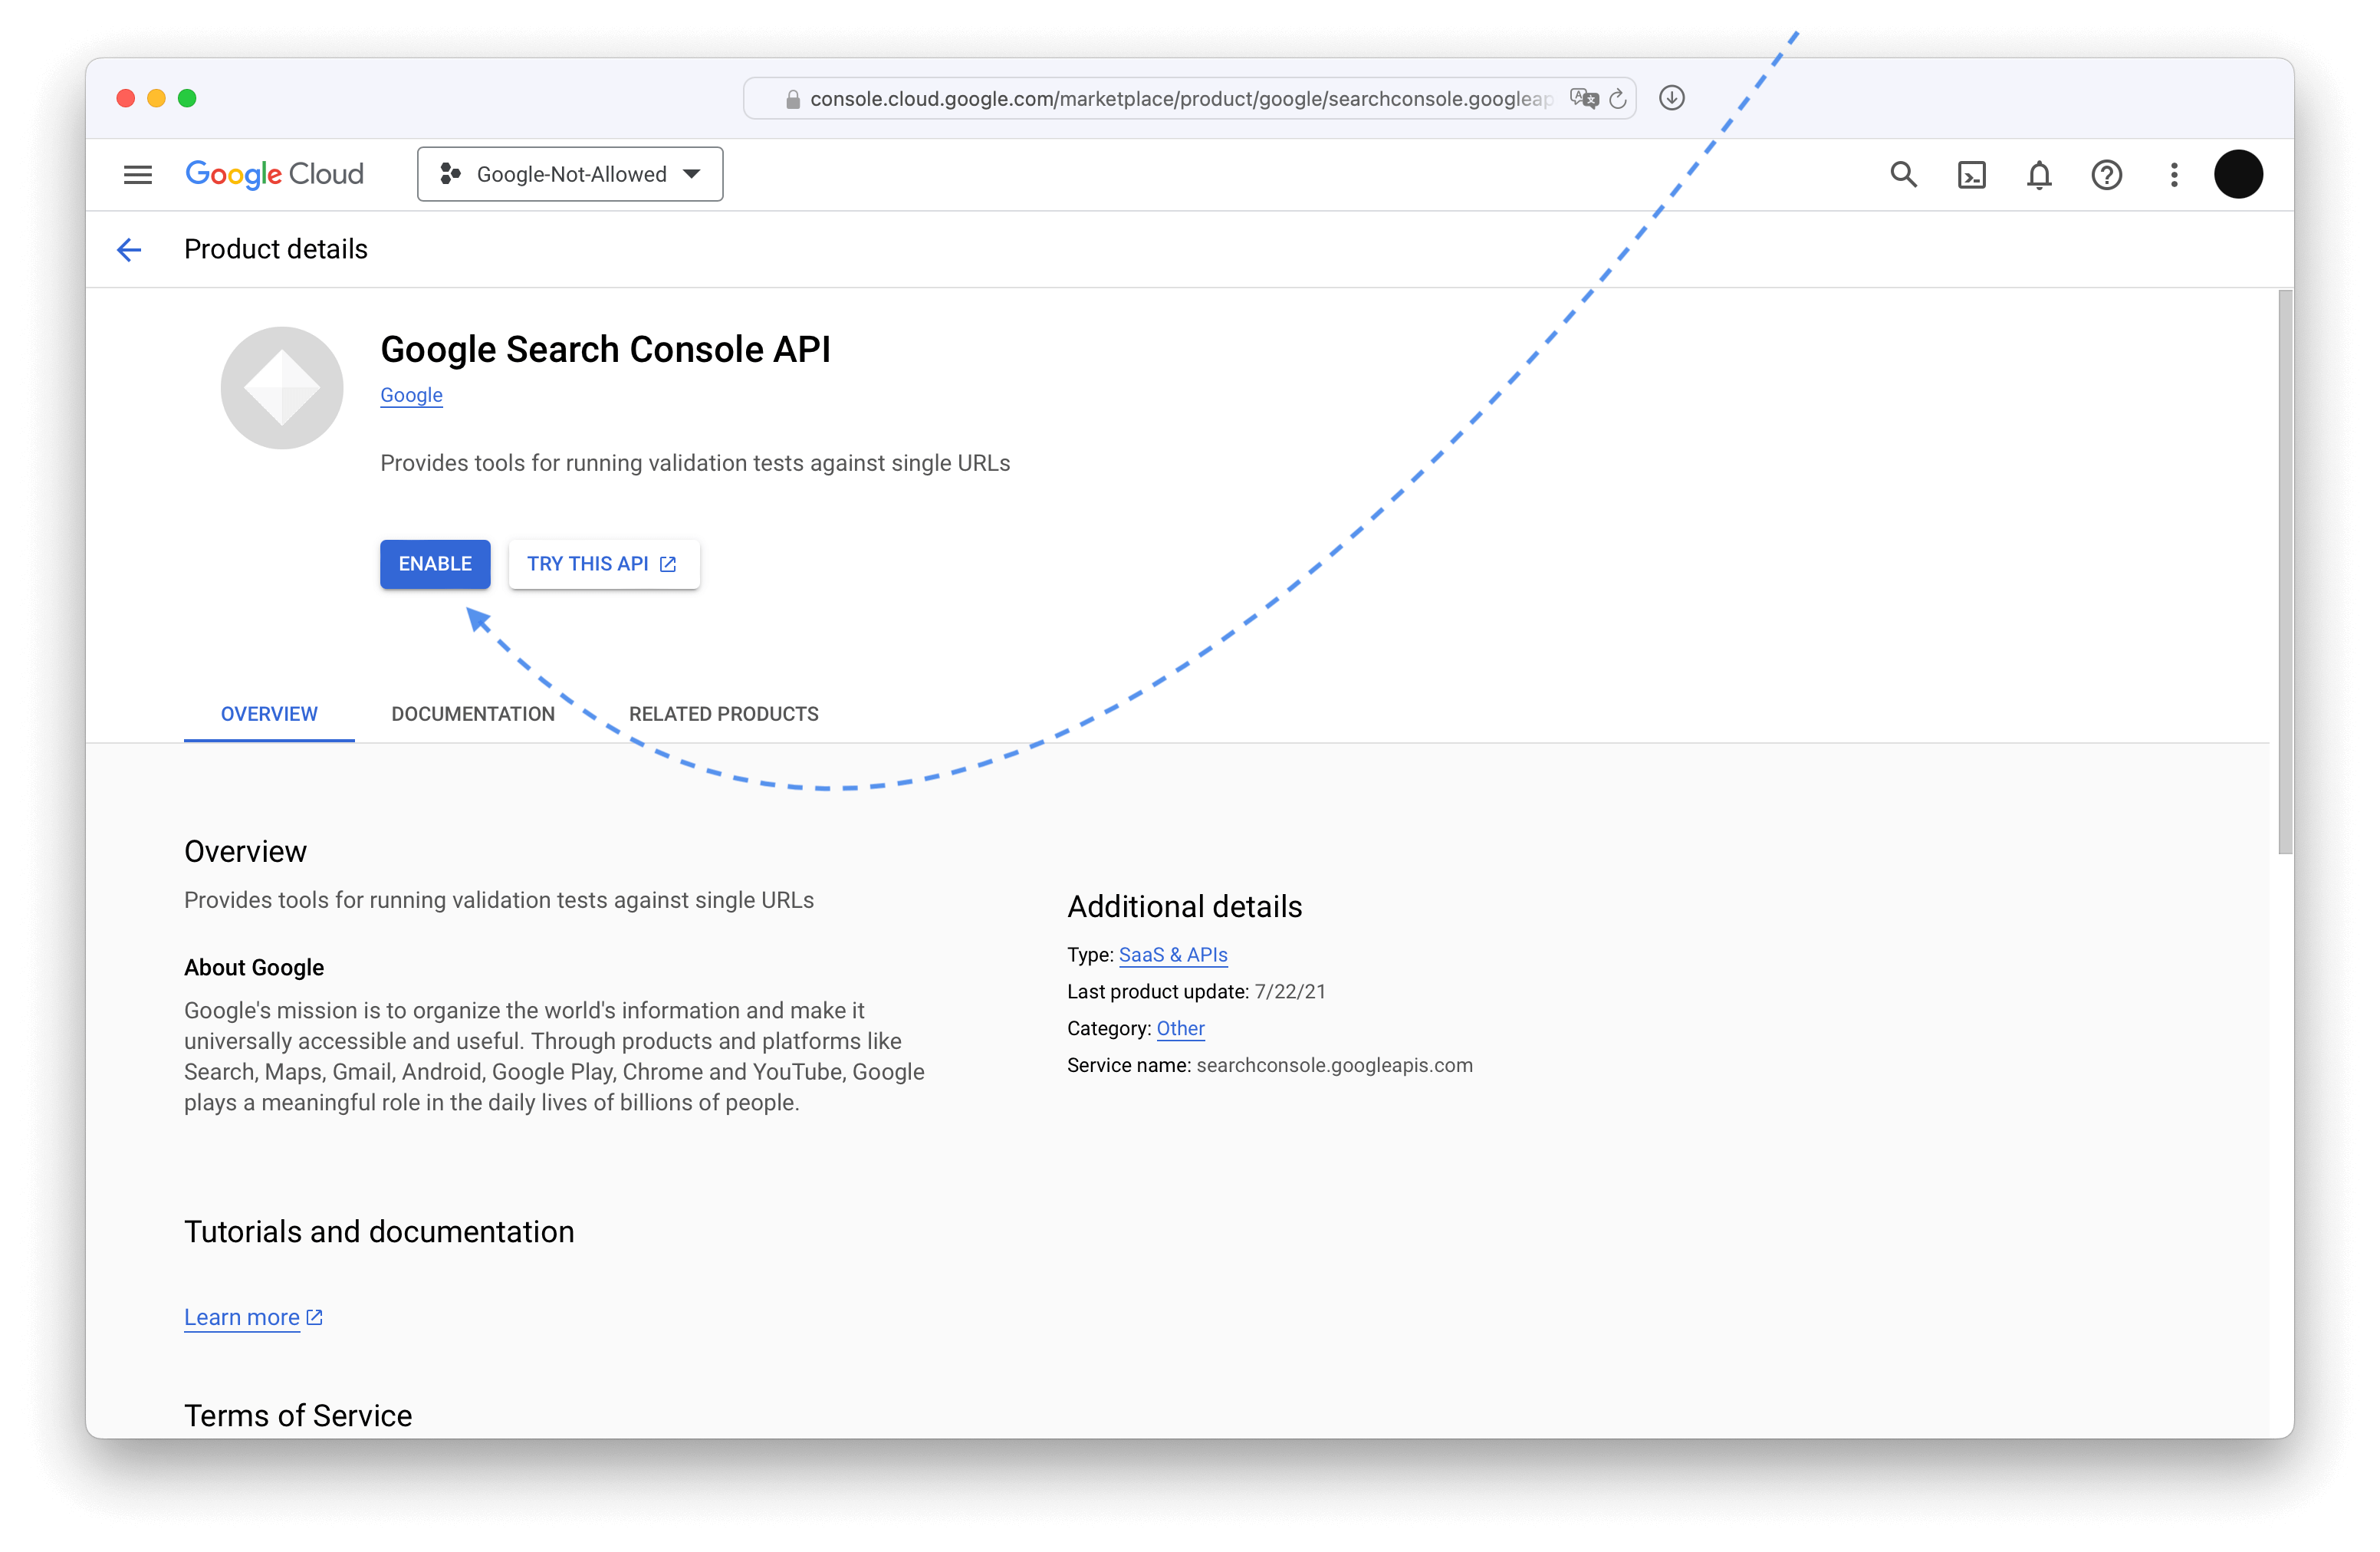
Link it with Plausible
Go to the site settings on your Plausible dashboard.
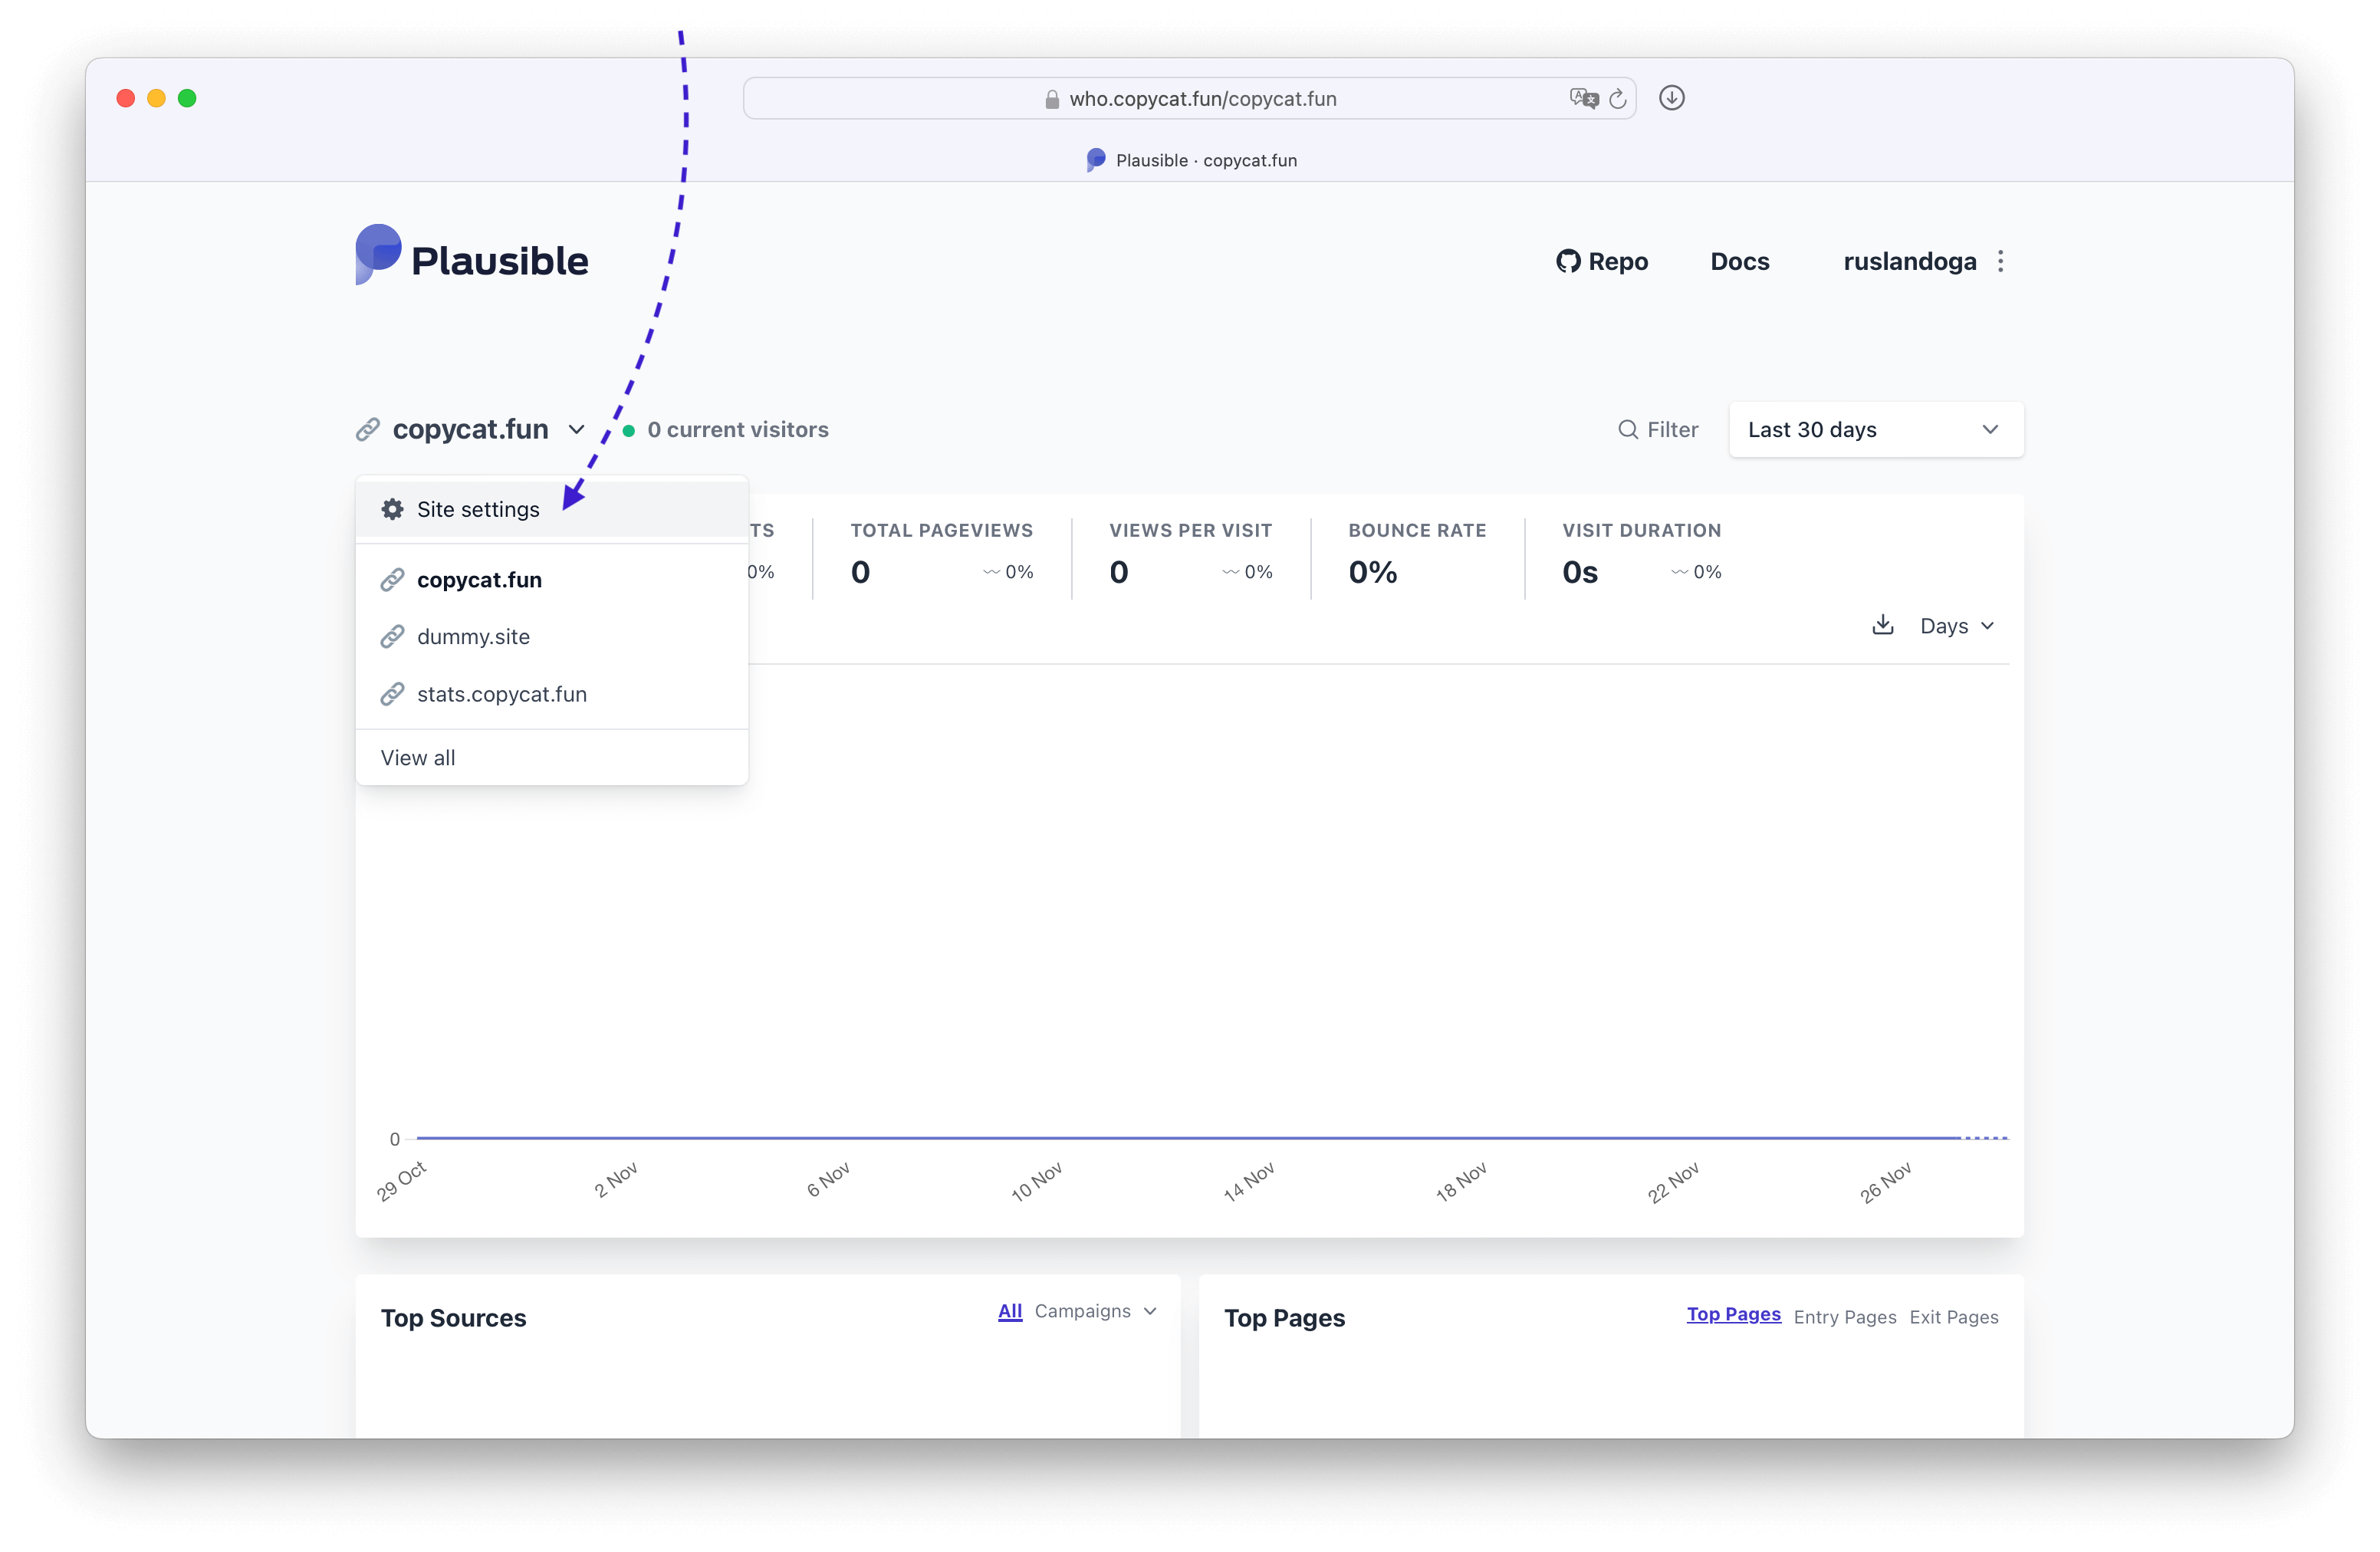
In the settings select Search Console and press Continue with Google
If you see a warning instead, that means you haven't set the GOOGLE_CLIENT_ID and GOOGLE_CLIENT_SECRET environment variables correctly.
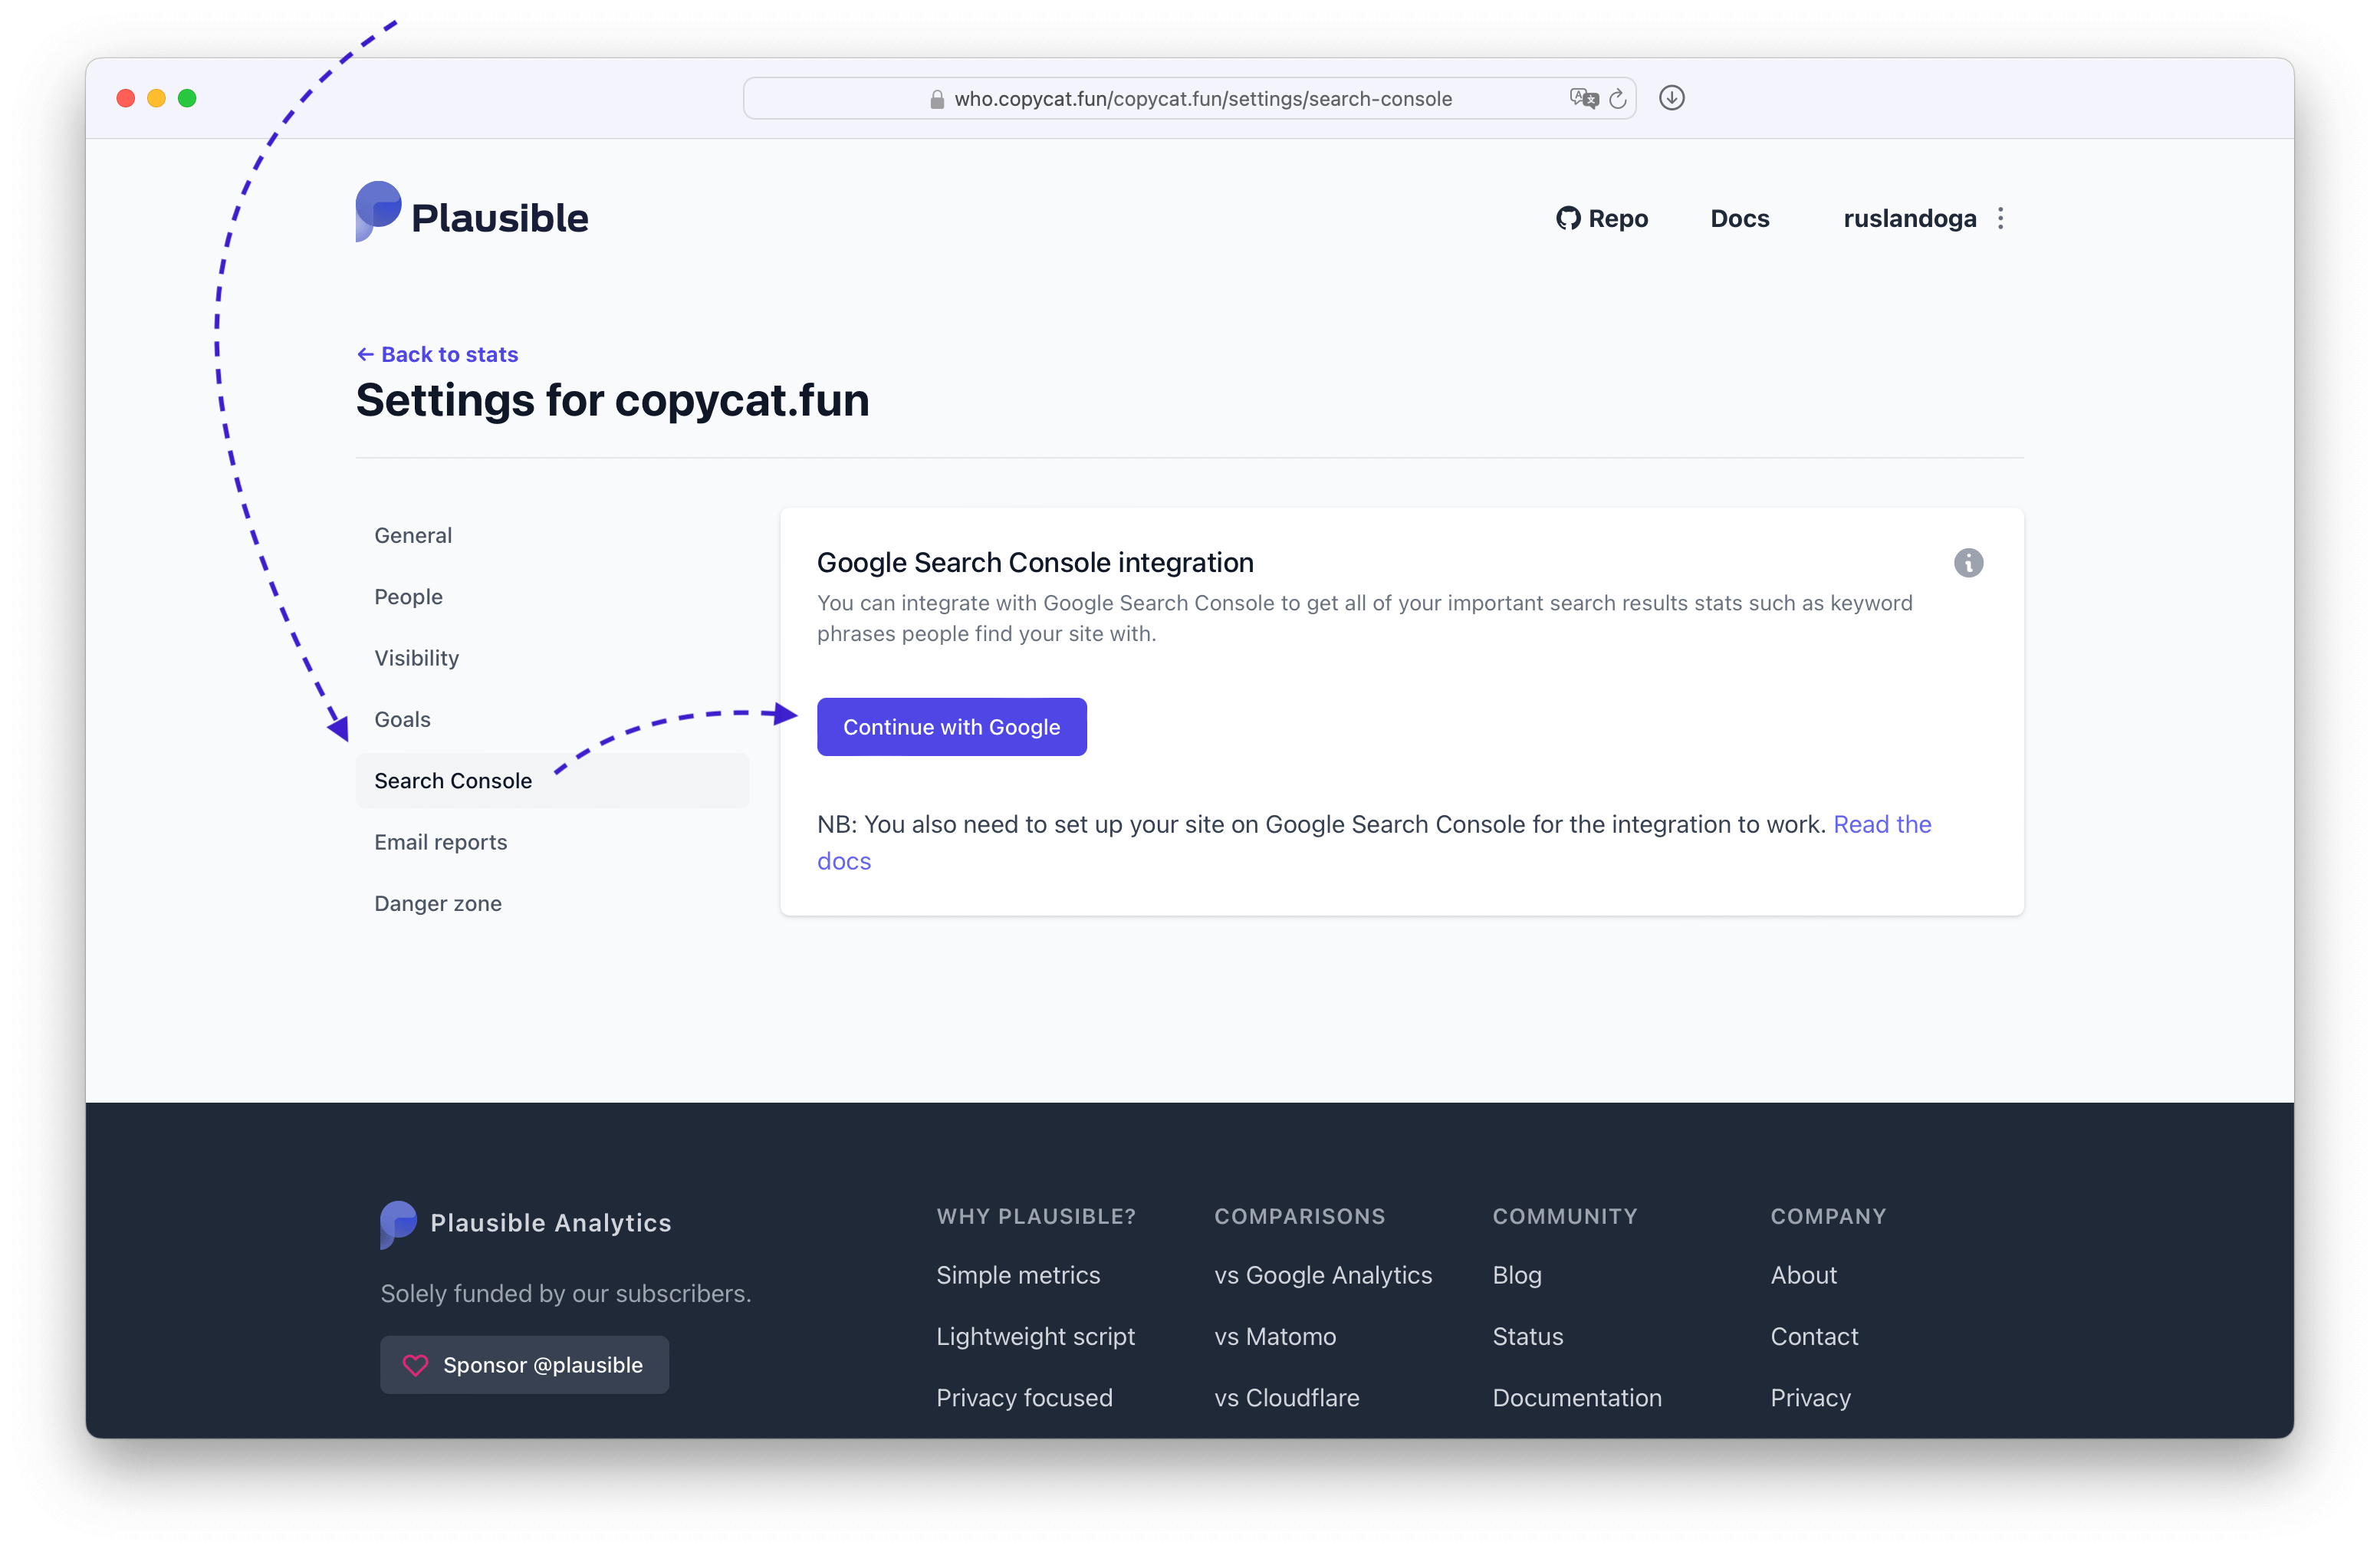
Choose the account that you added as the test user.
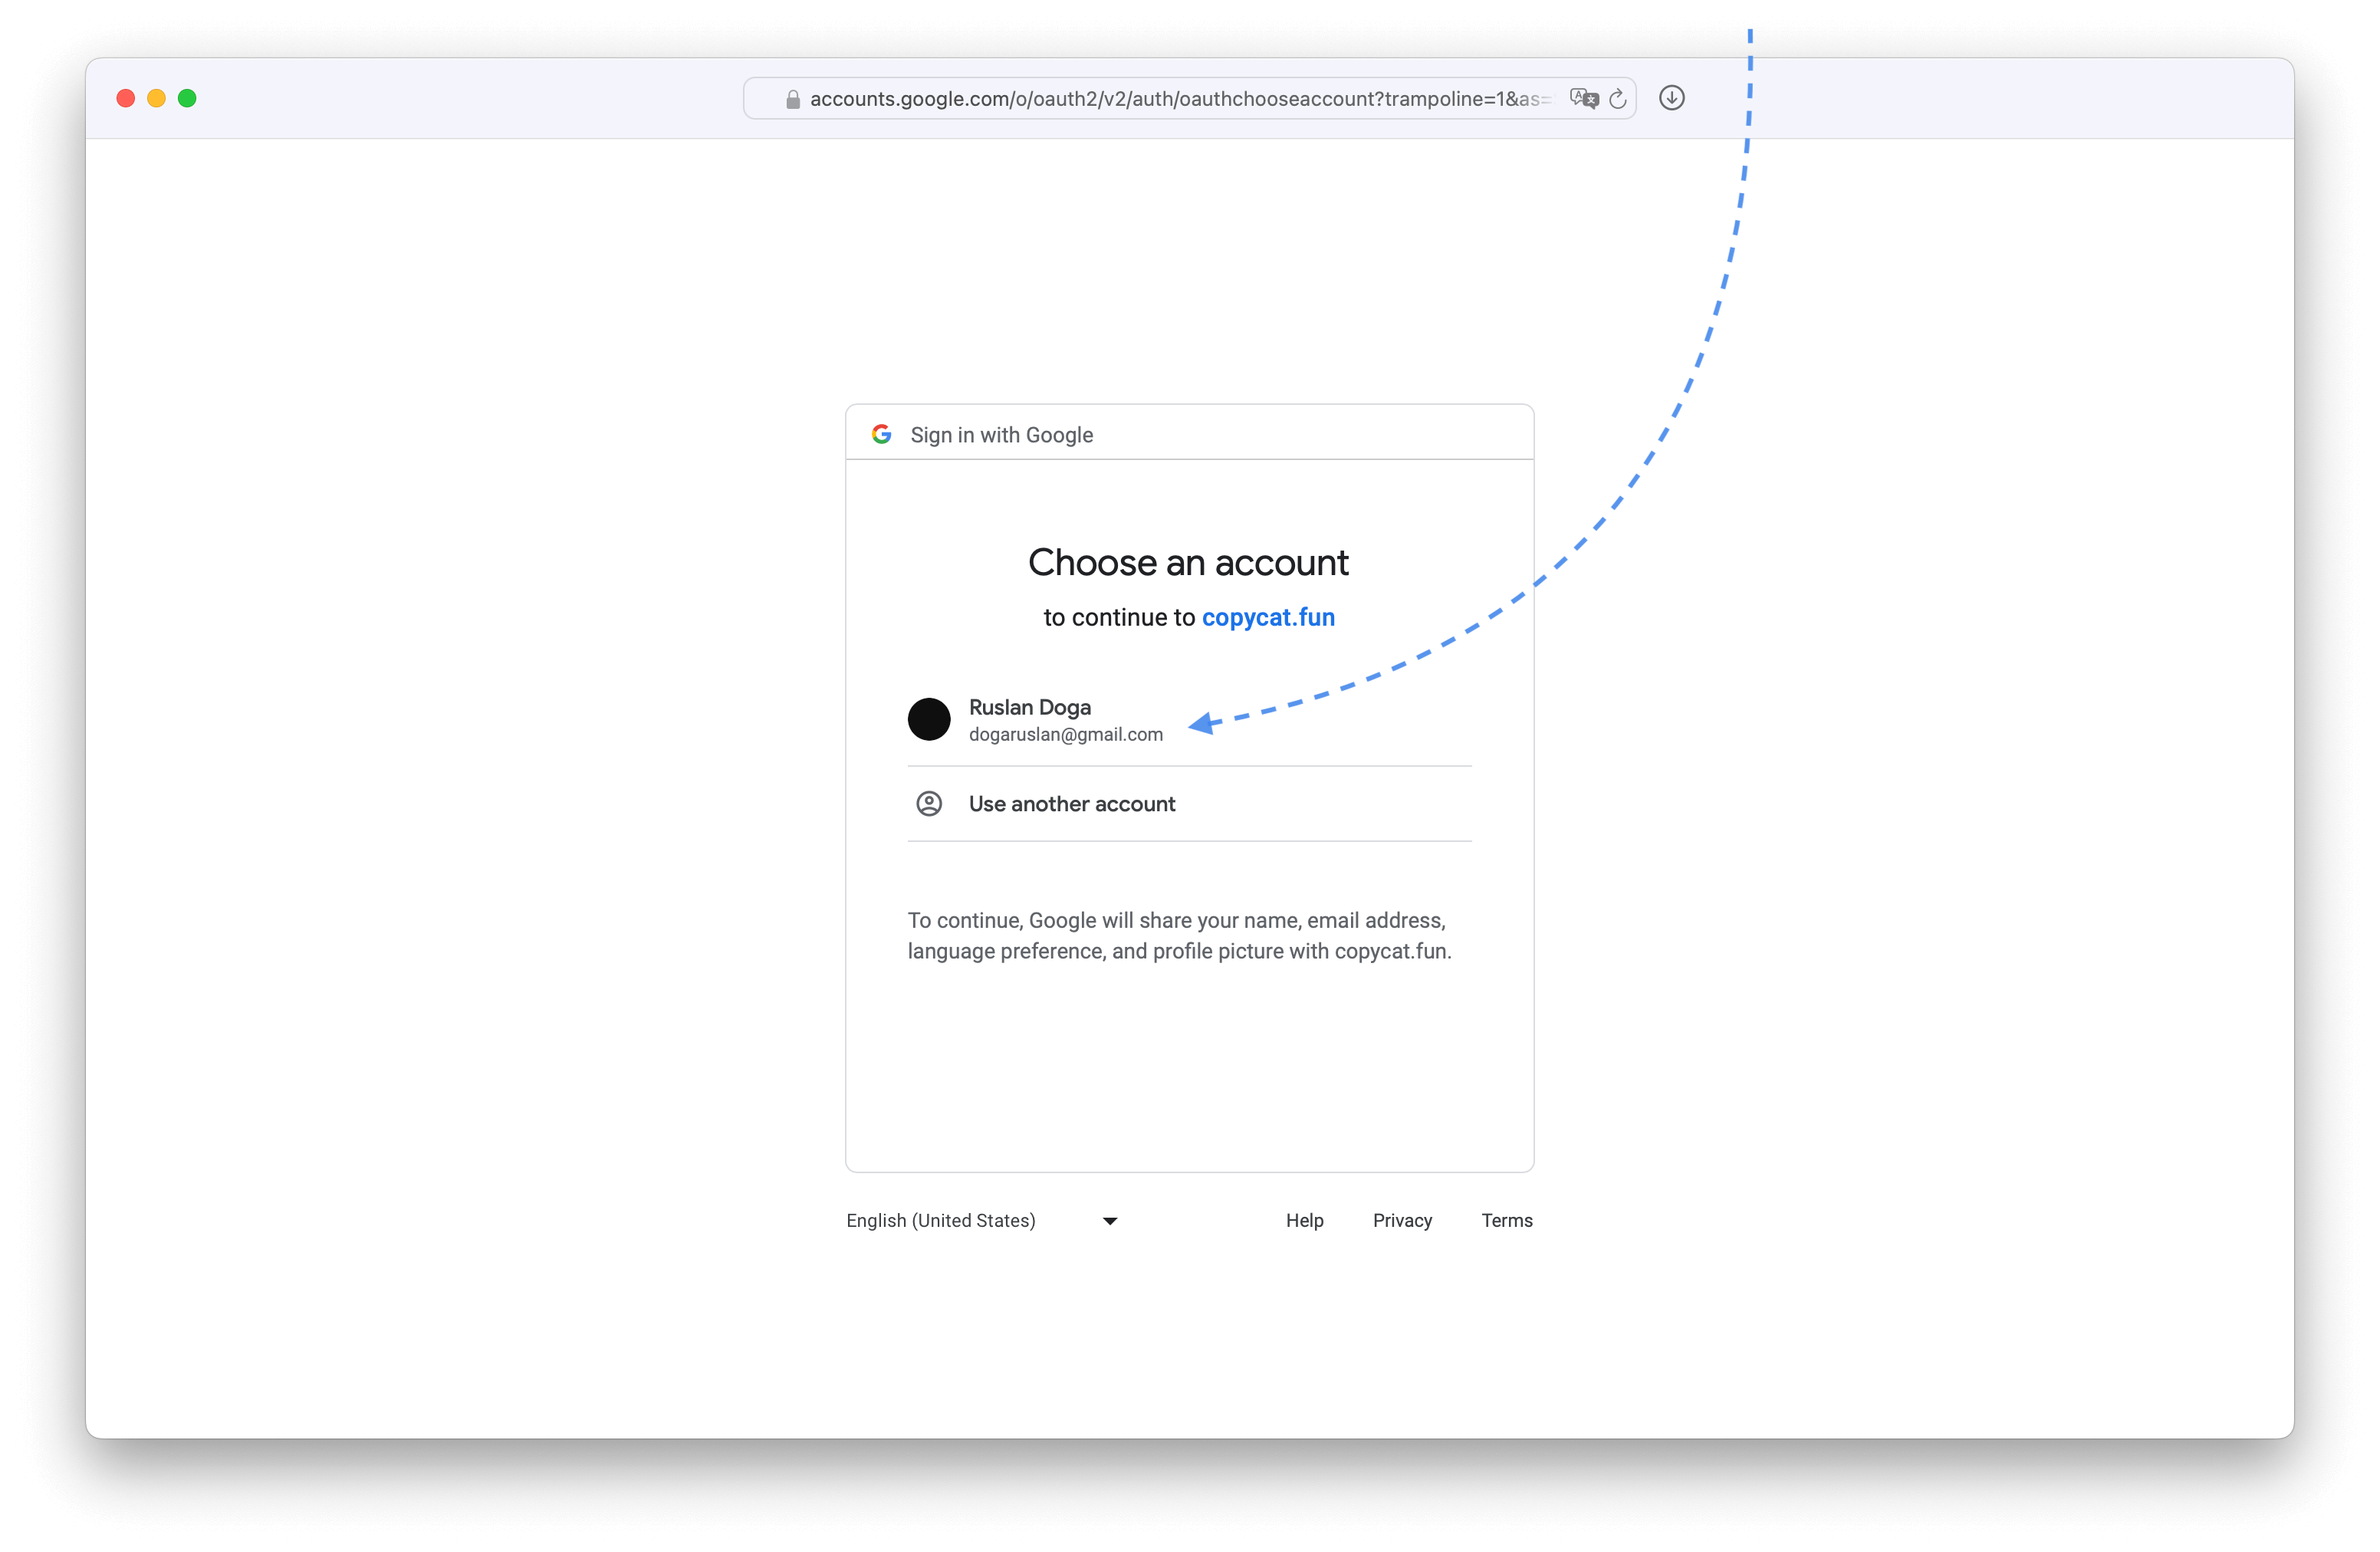
Trust our own application.
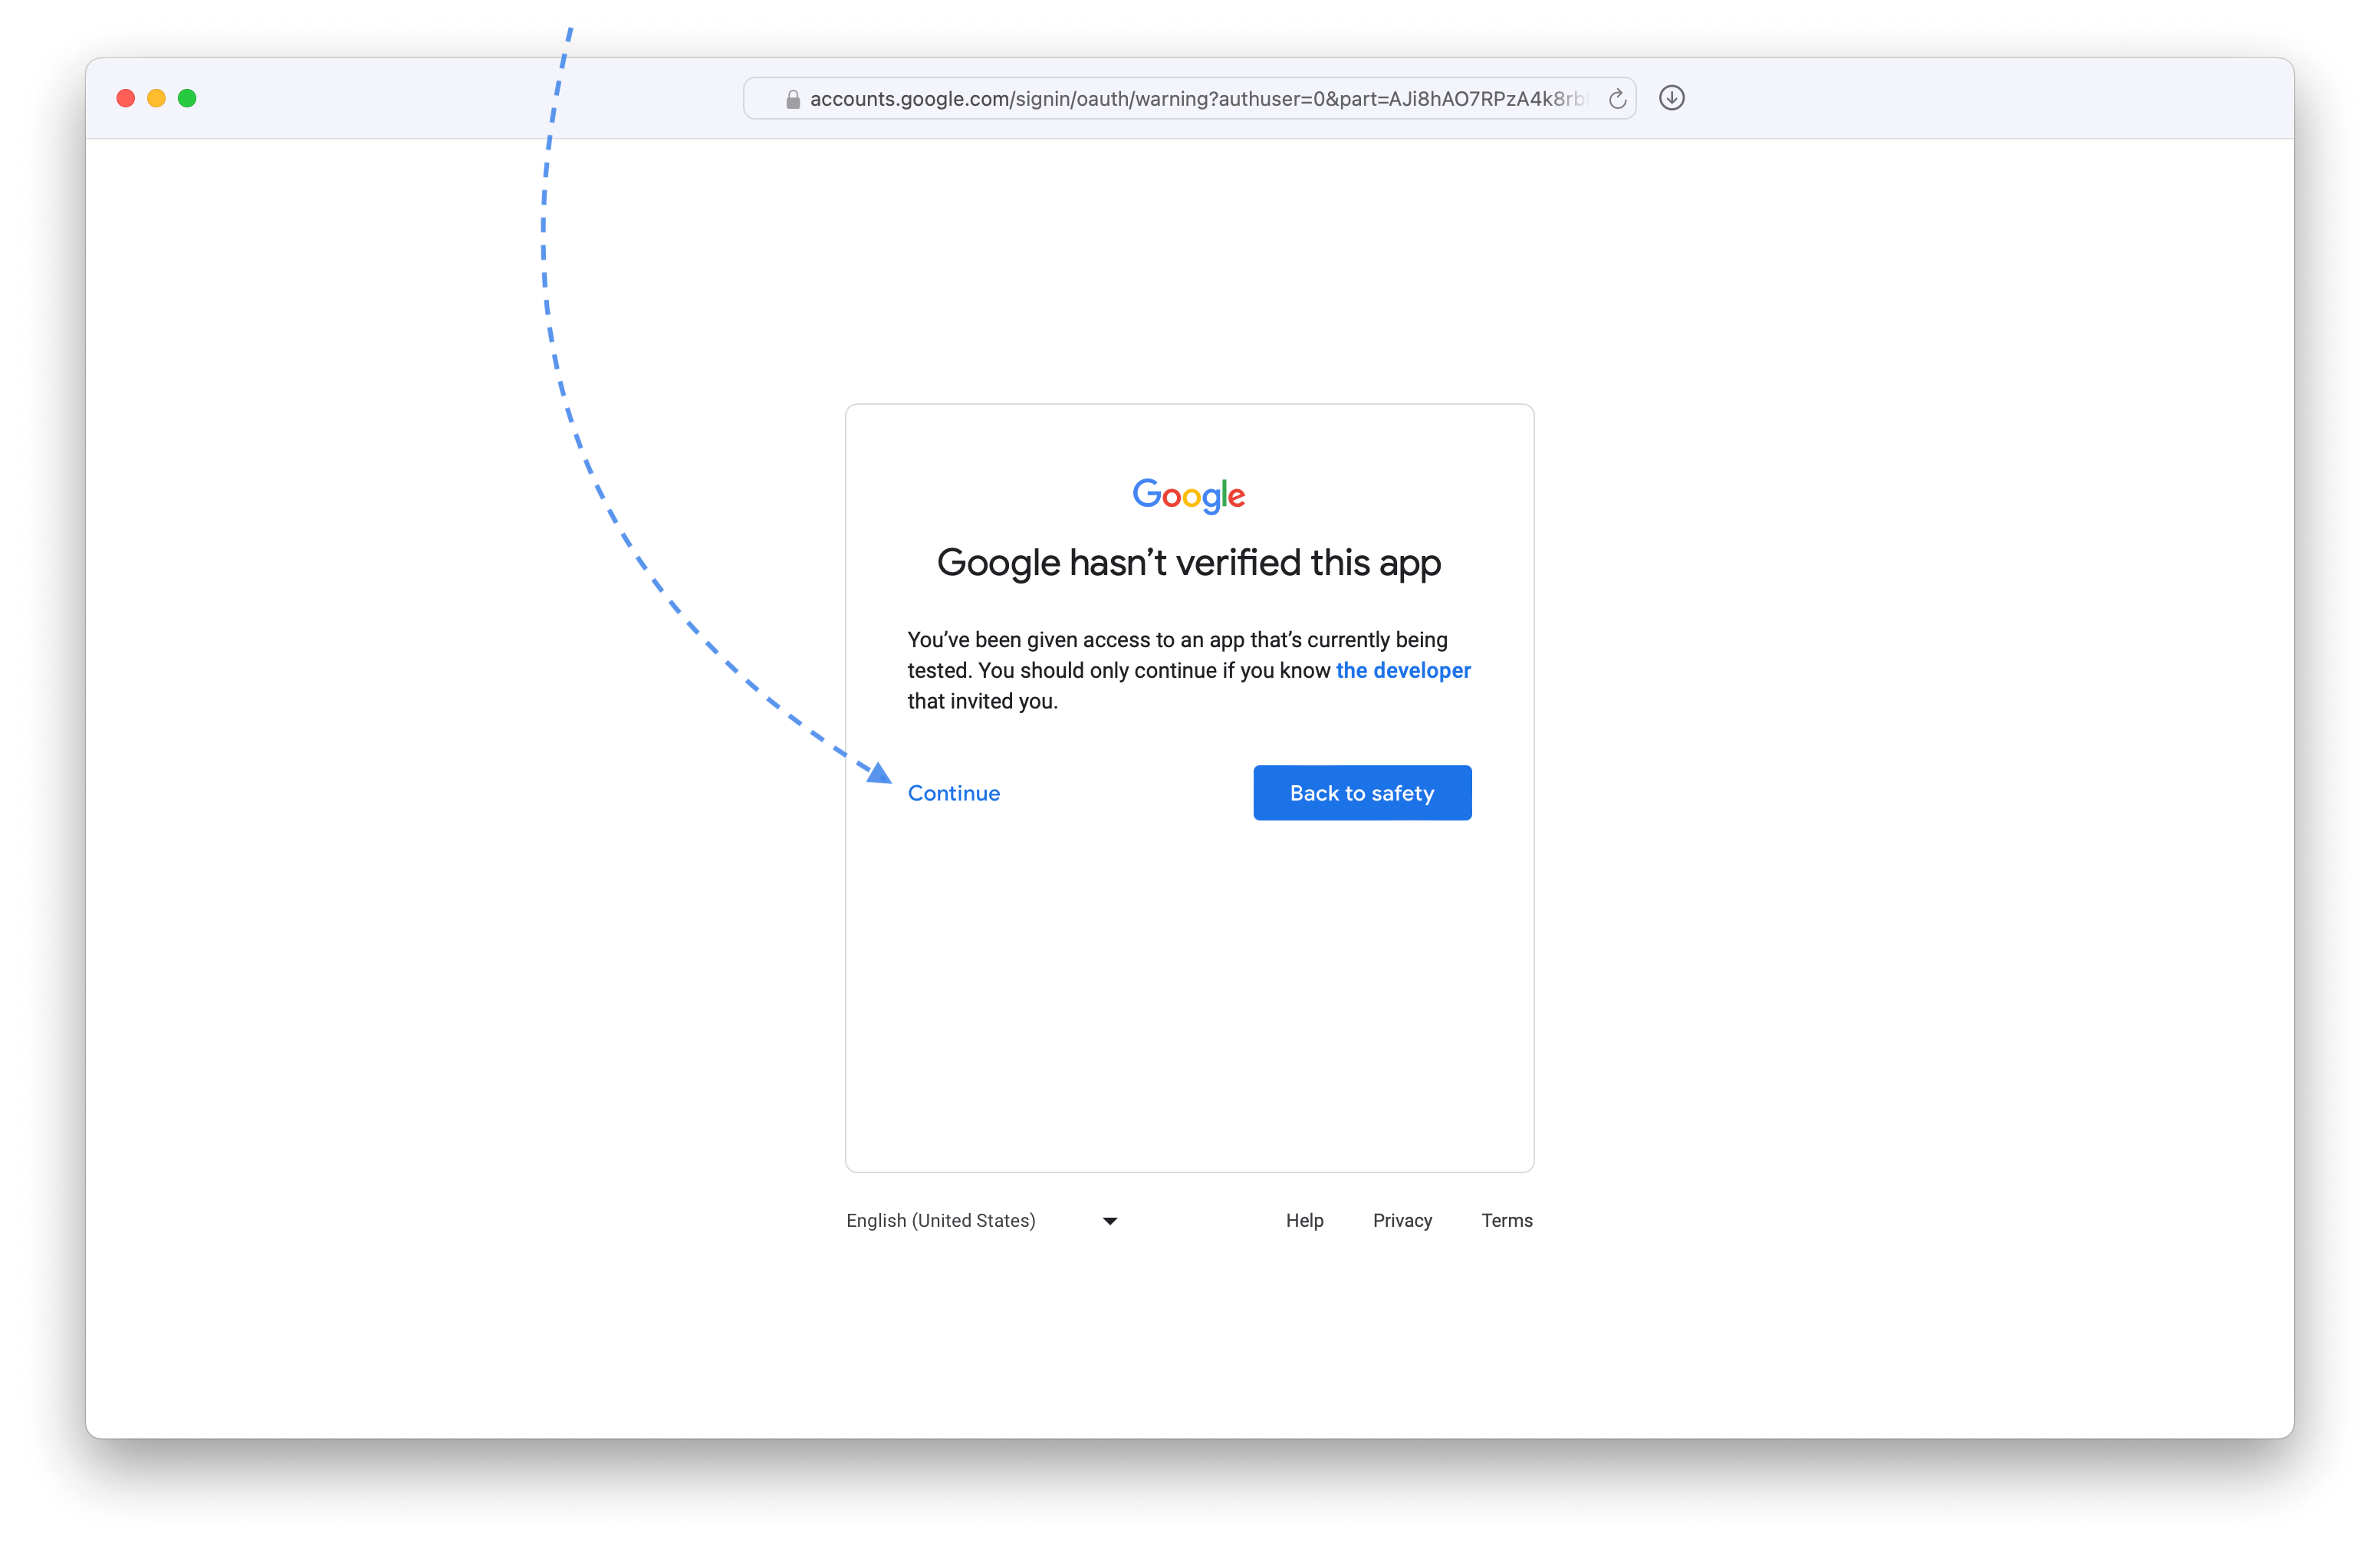
Allow viewing Search Console data.

Pick the property from Search Console.

And now we should be able to drilldown into Google search terms like on plausible.io
Import historical data from Universal Analytics
Enable APIs for exports on Google Cloud
Go back to Google Cloud, ensure you have the correct project selected, and search for Google Analytics API
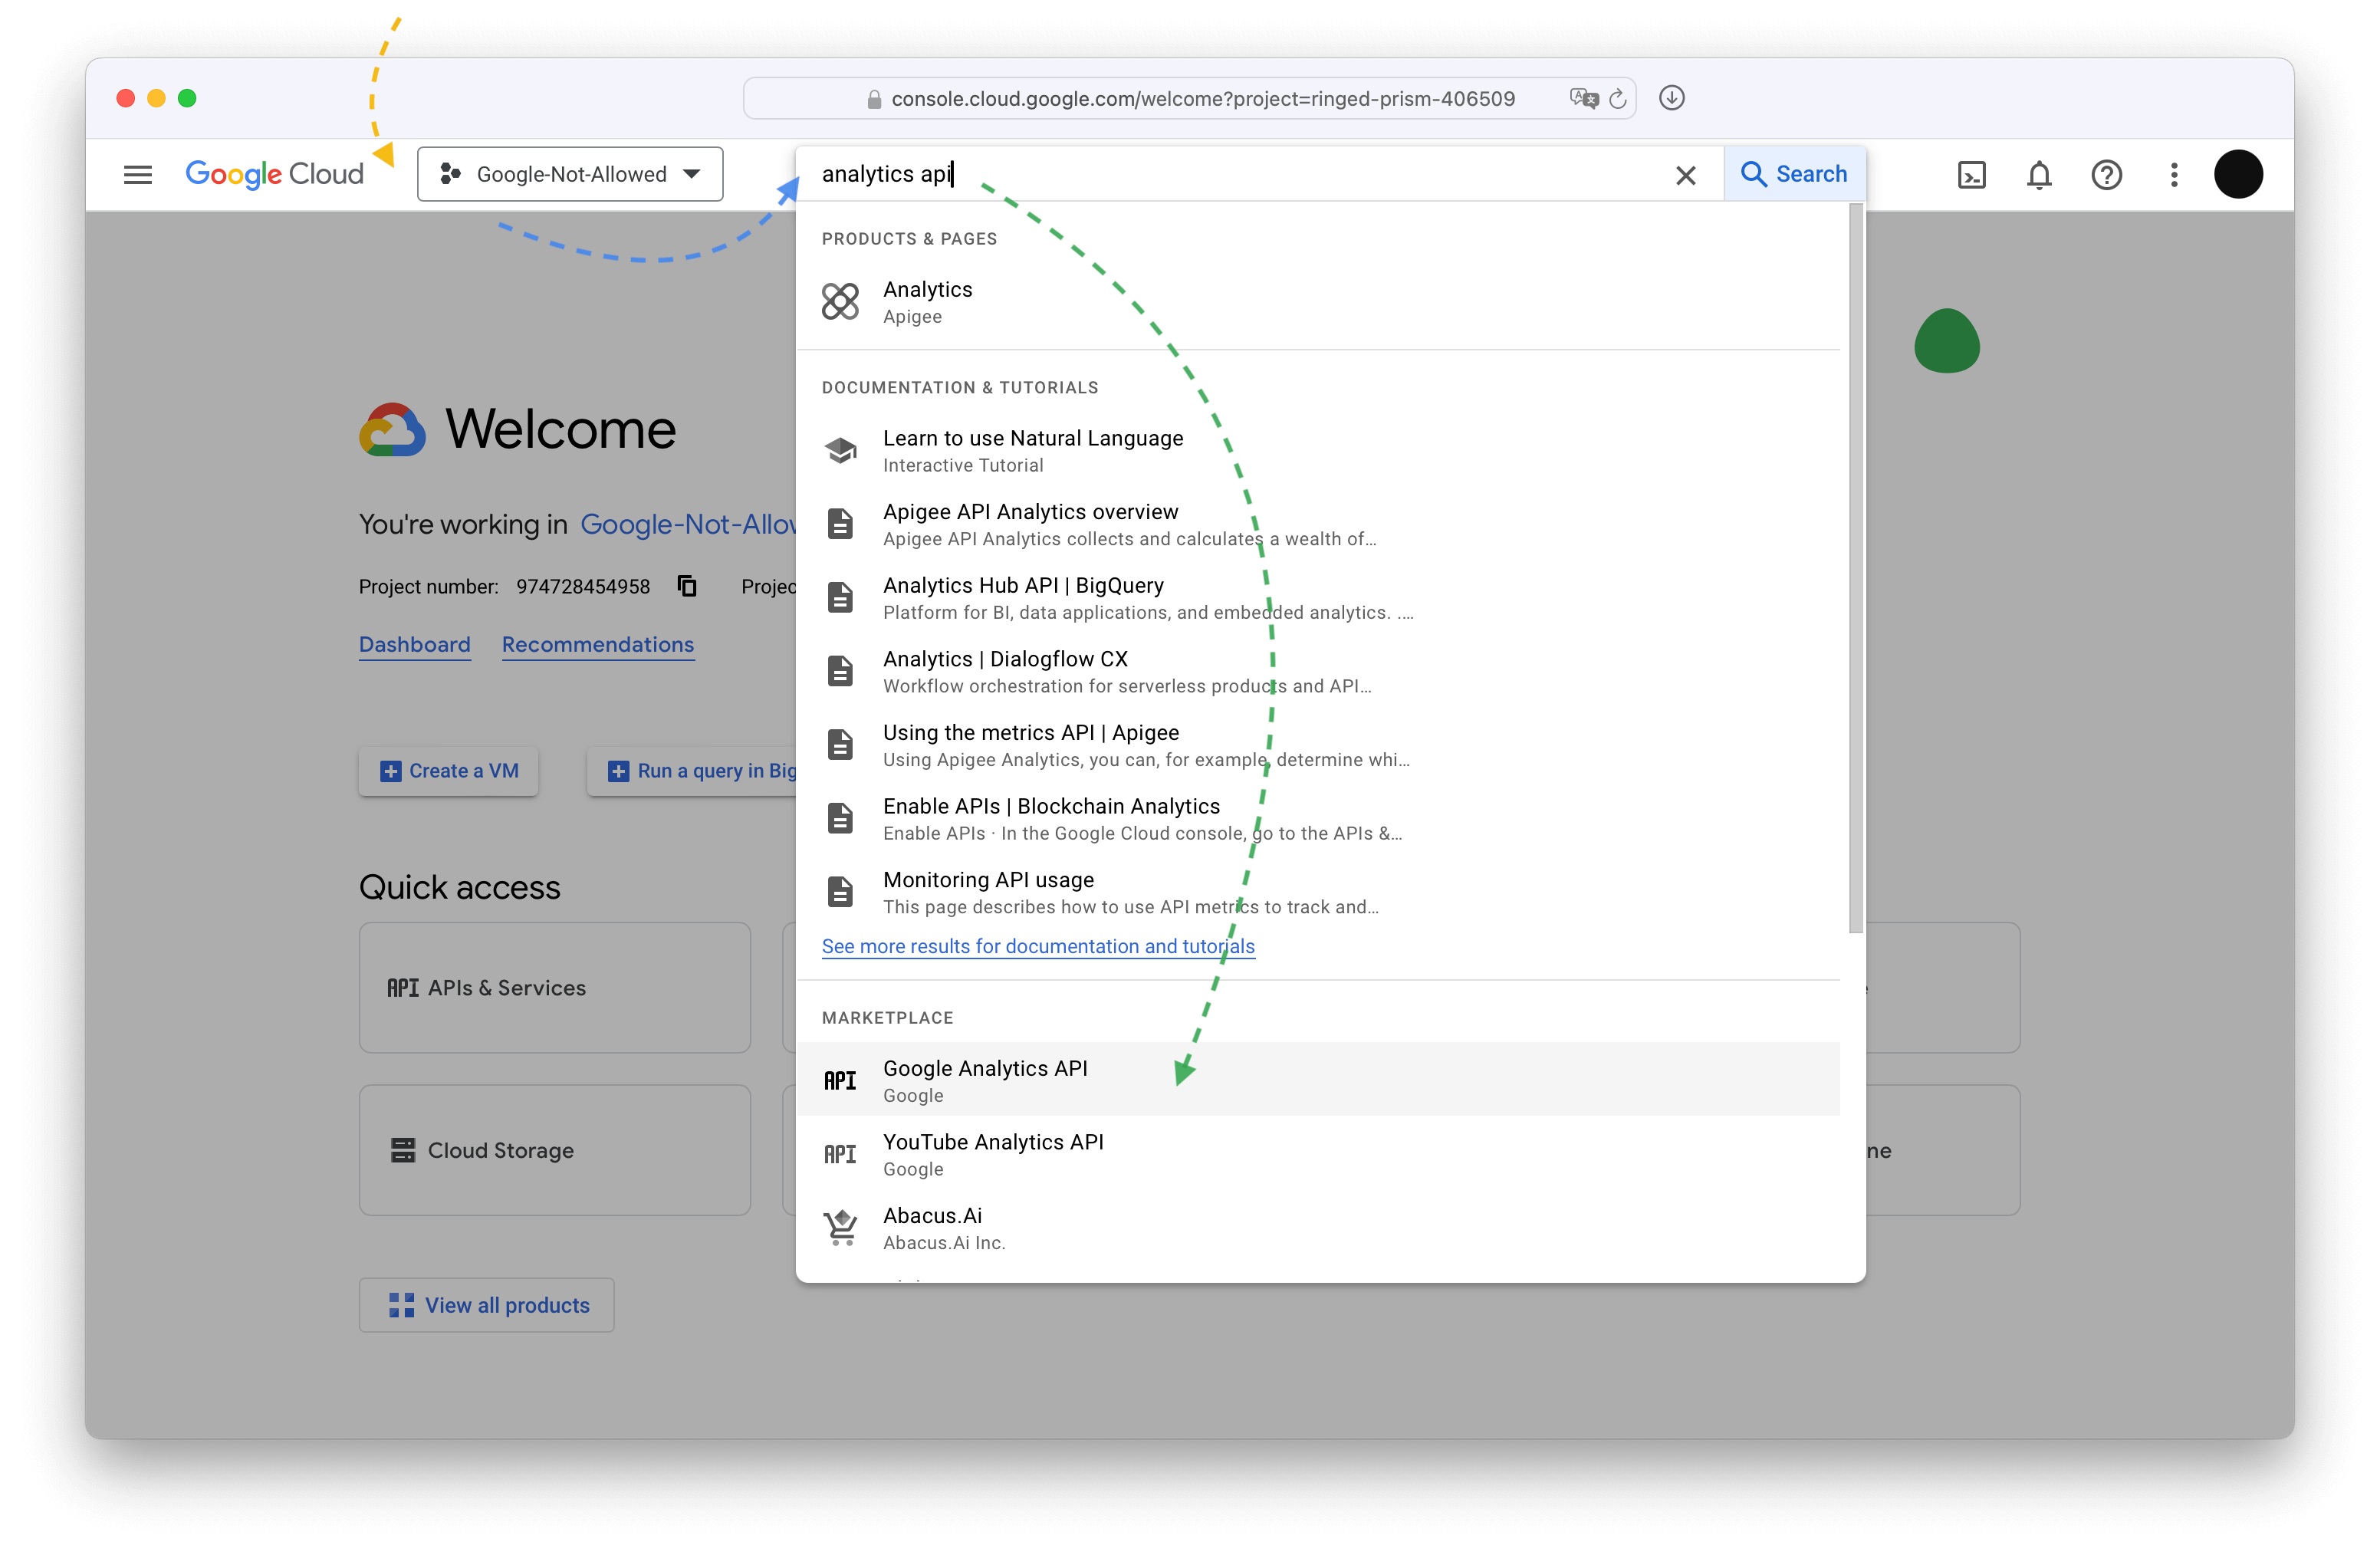
Enable it.
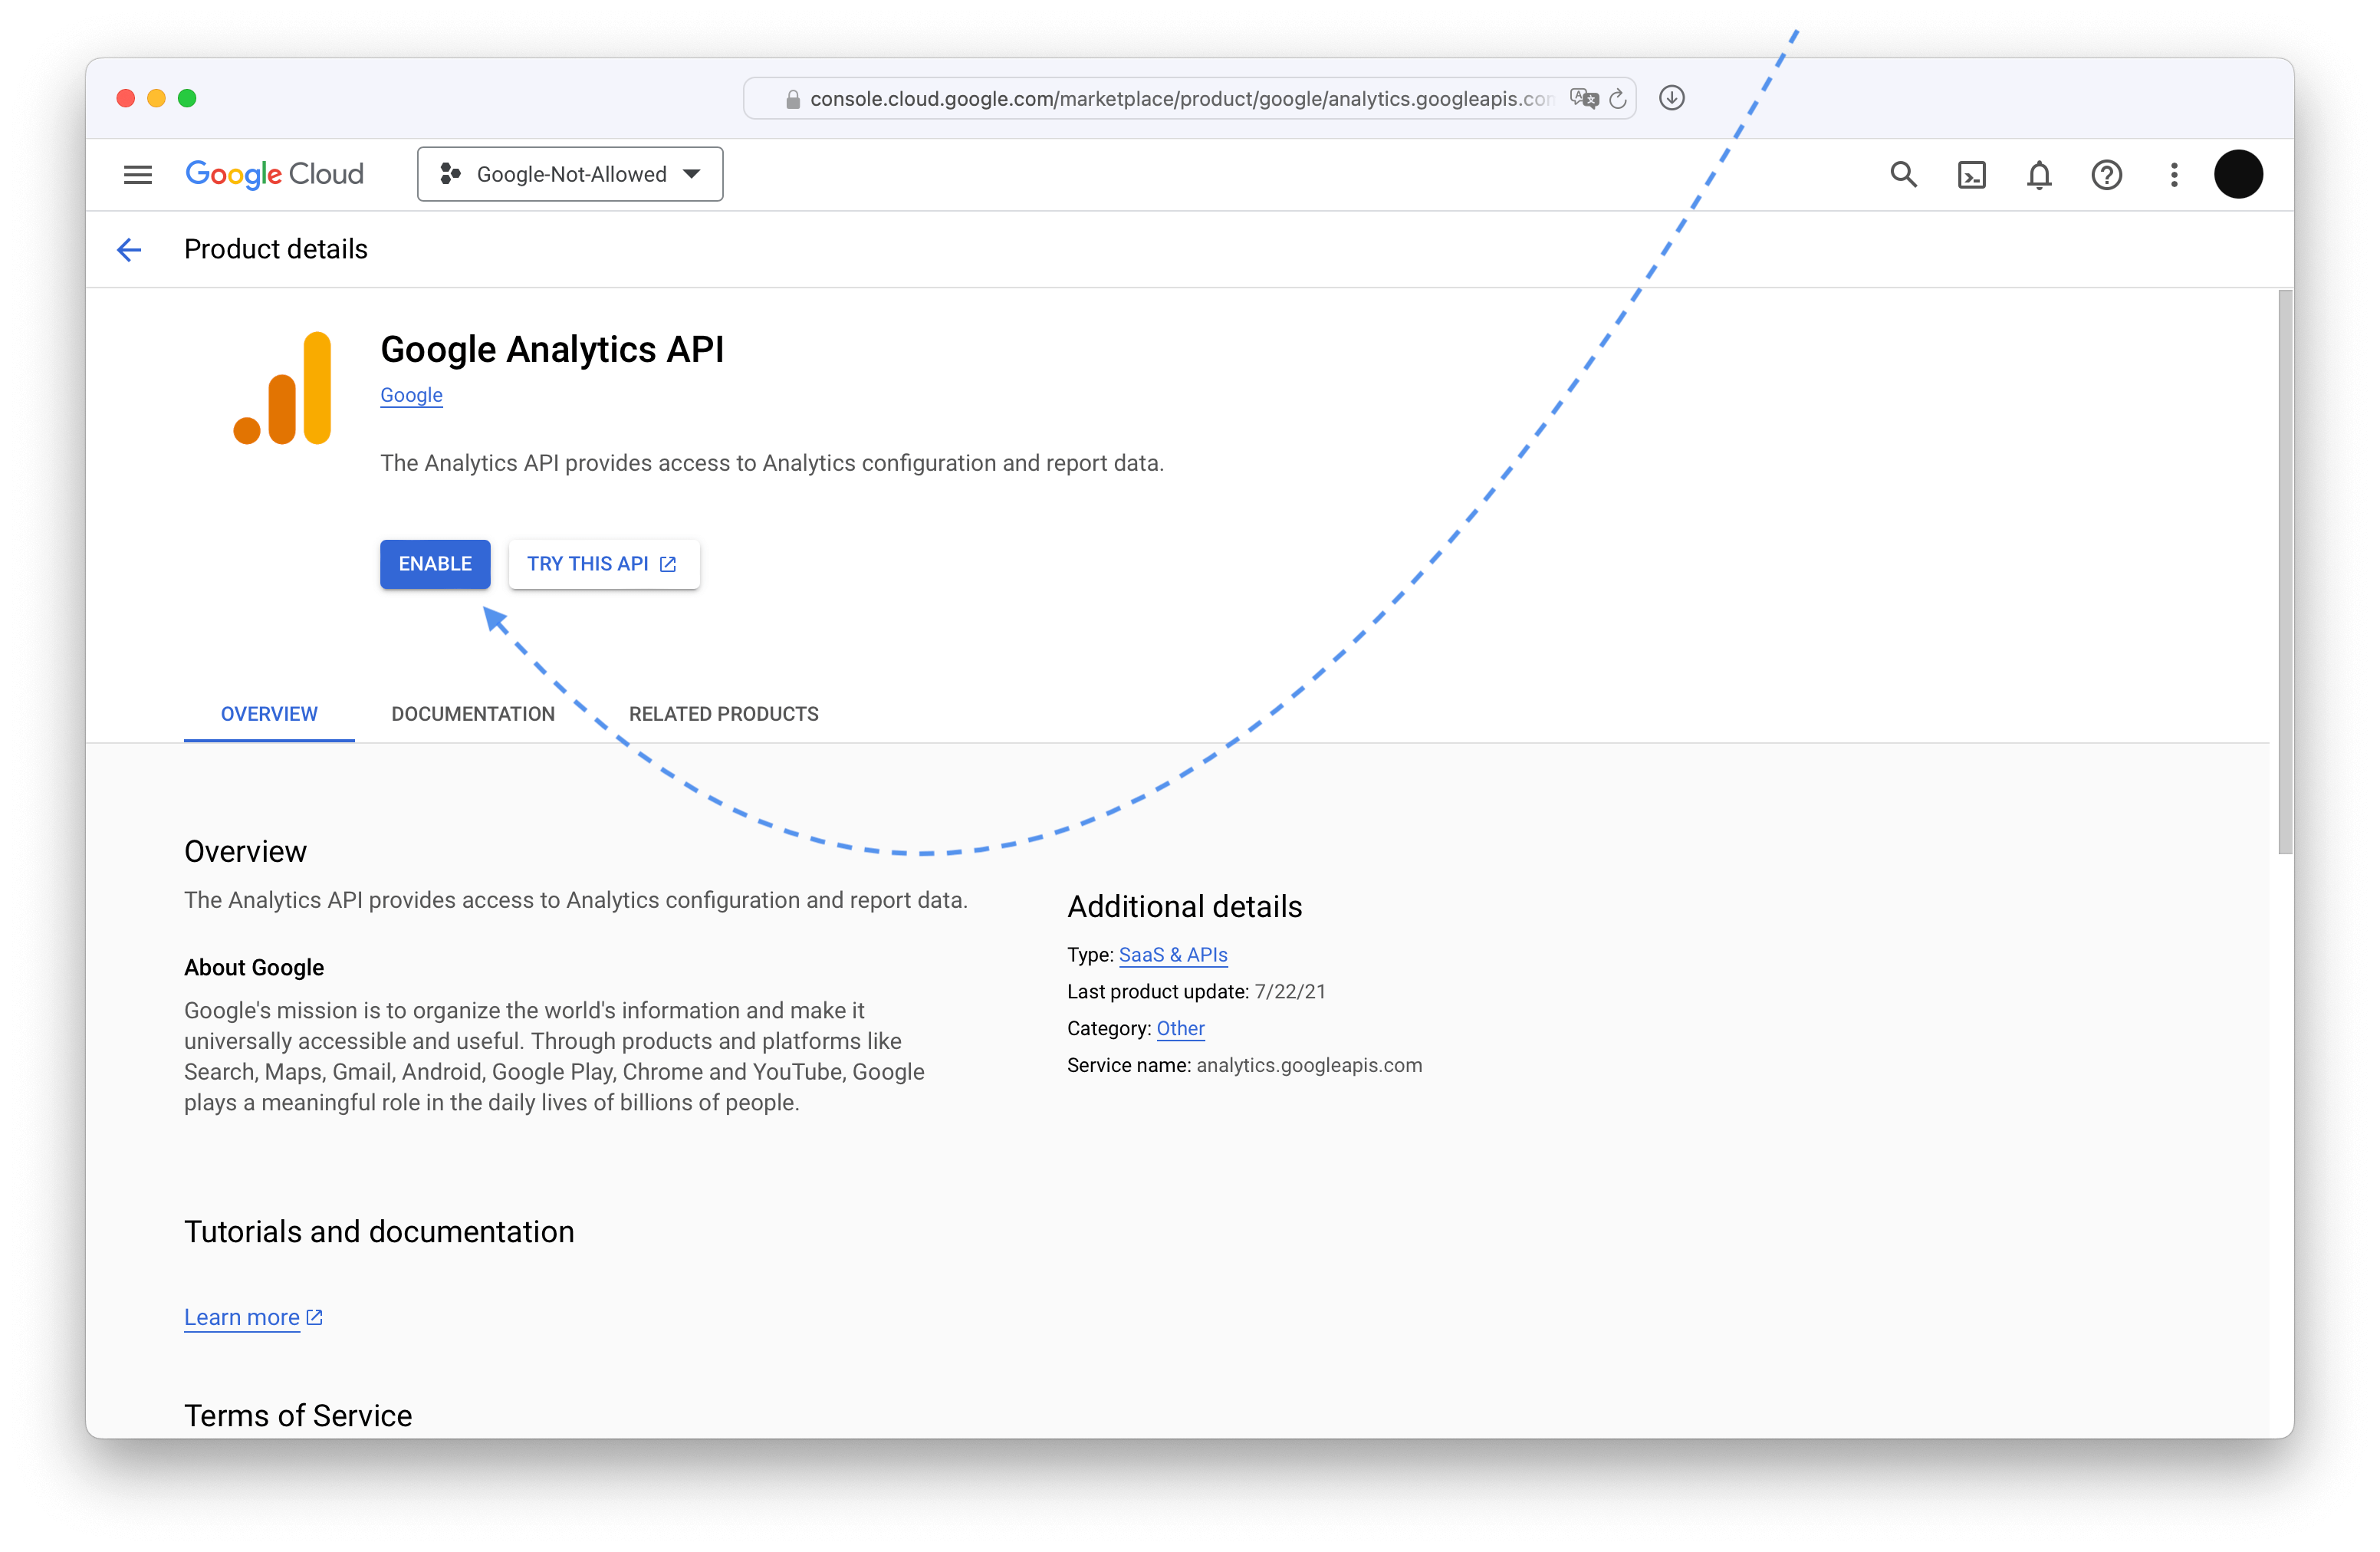
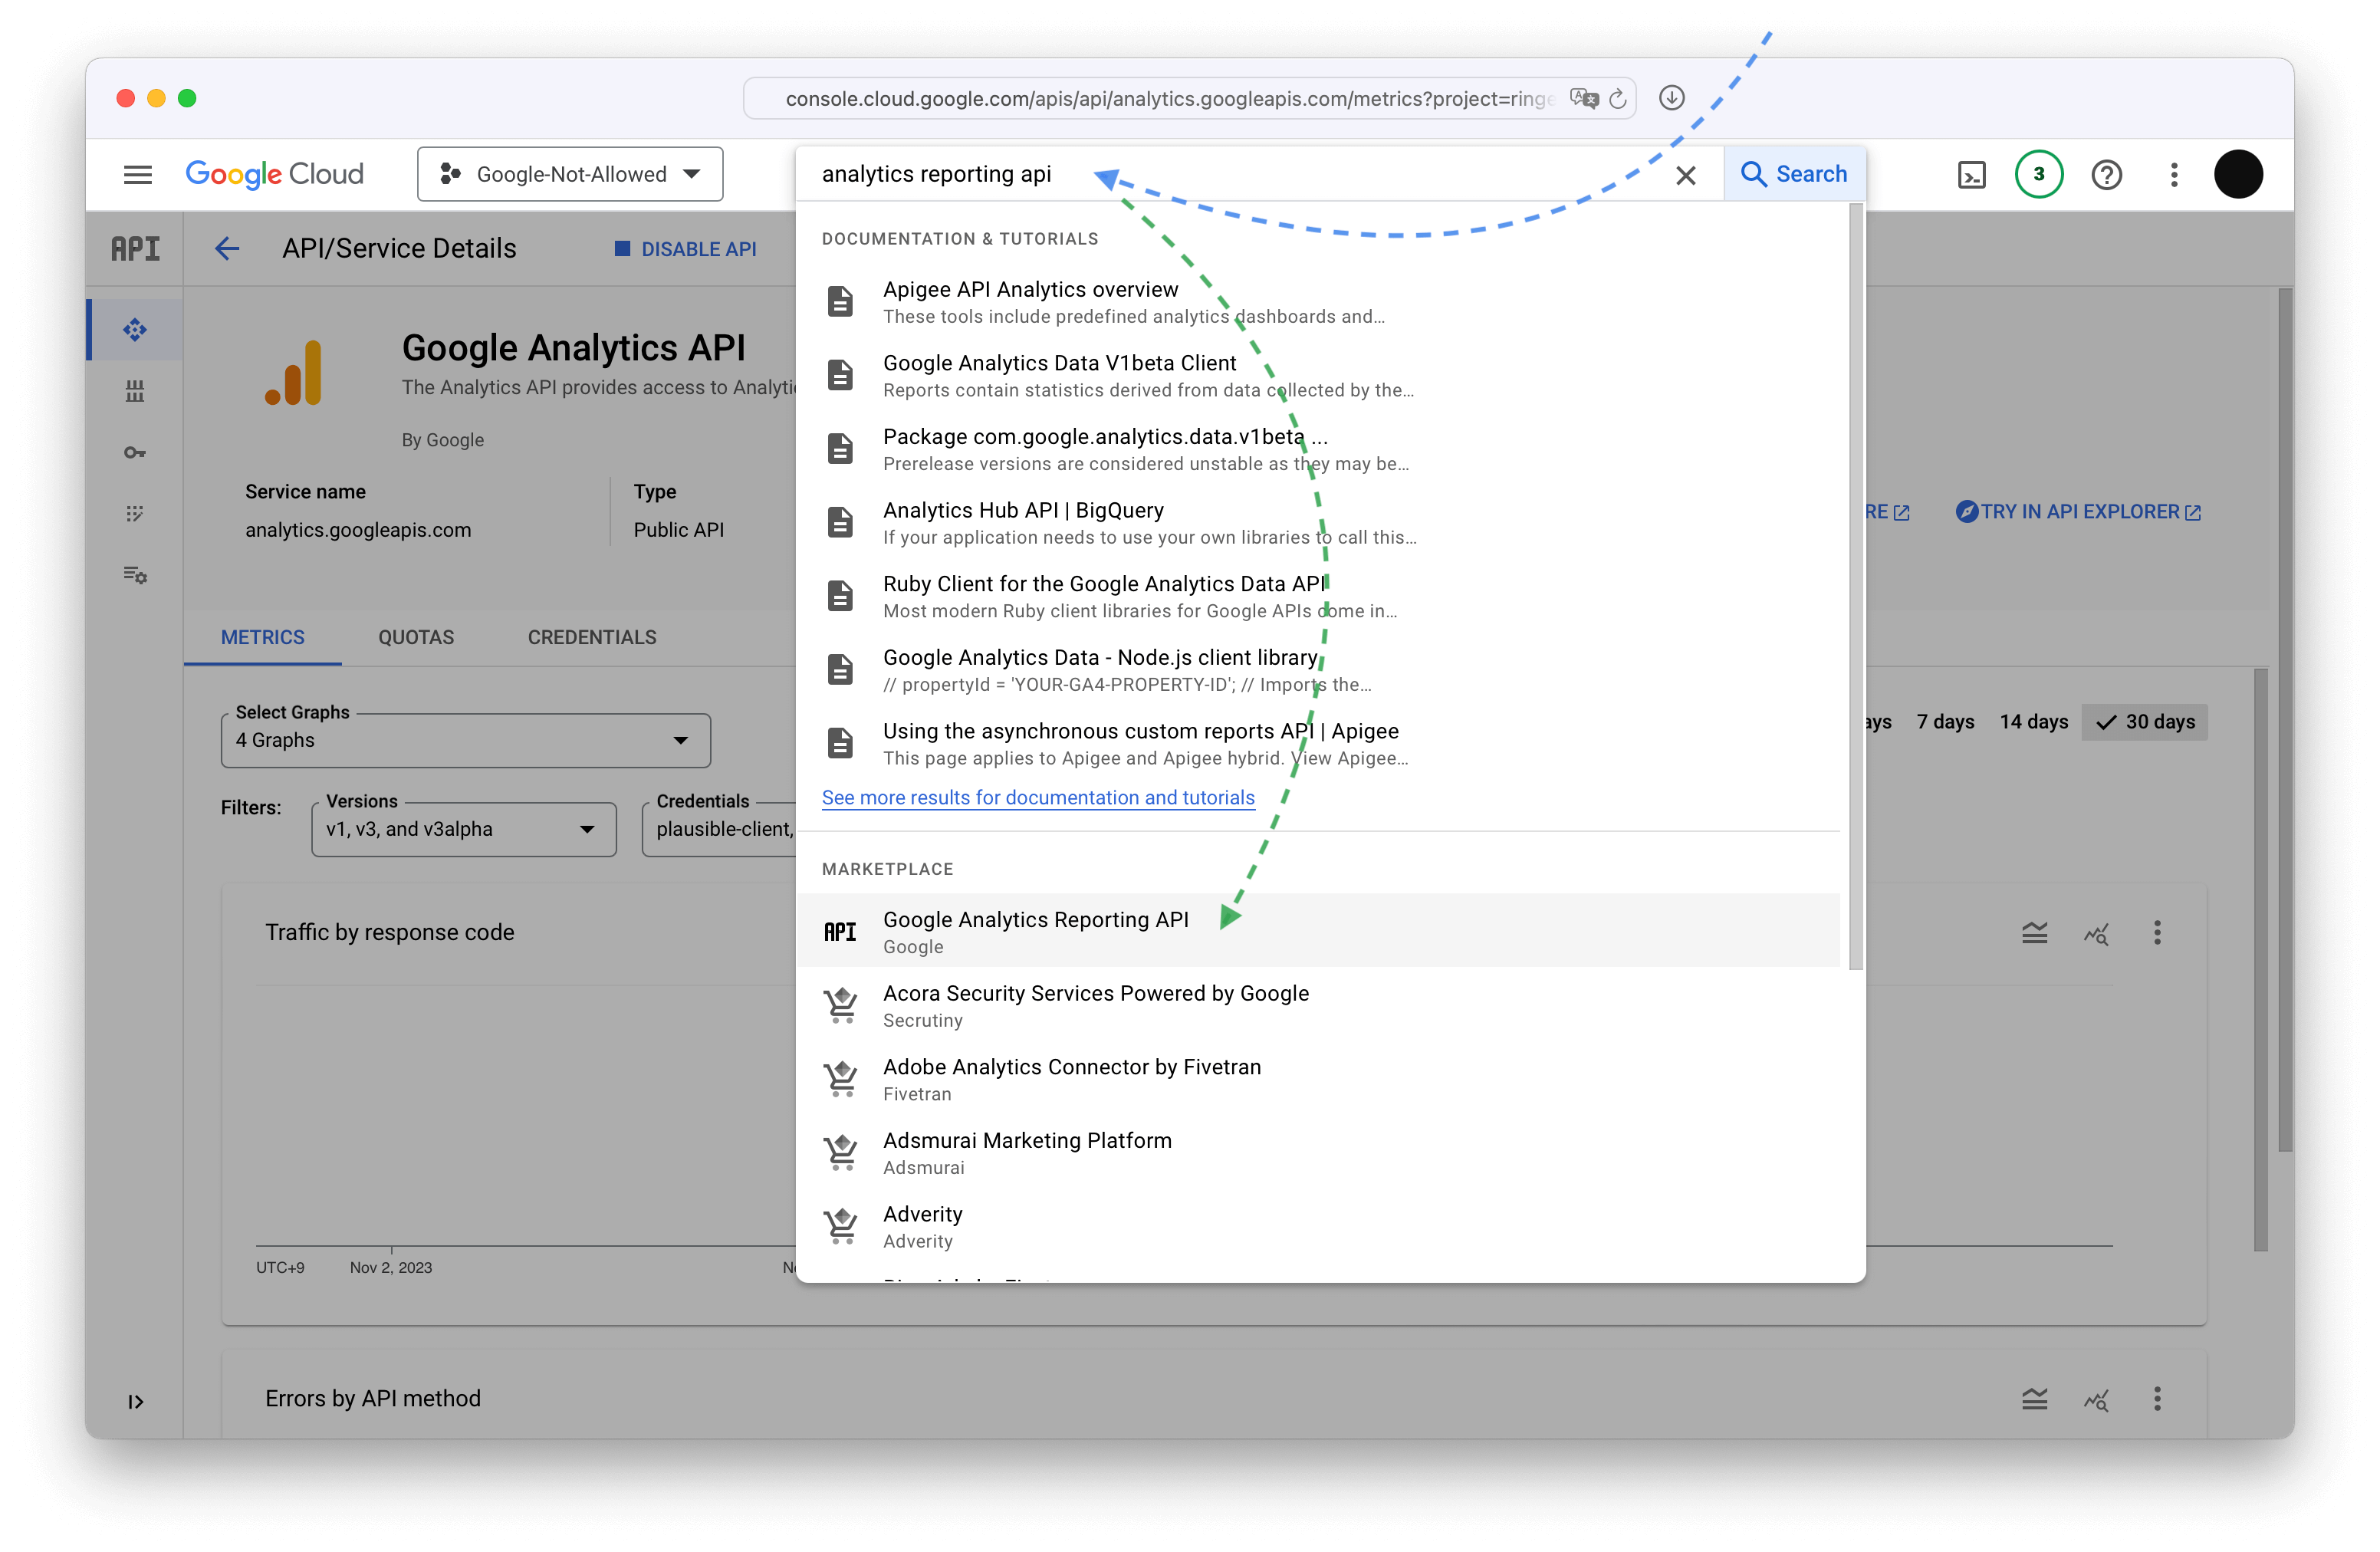
Next search for Google Analytics Reporting API
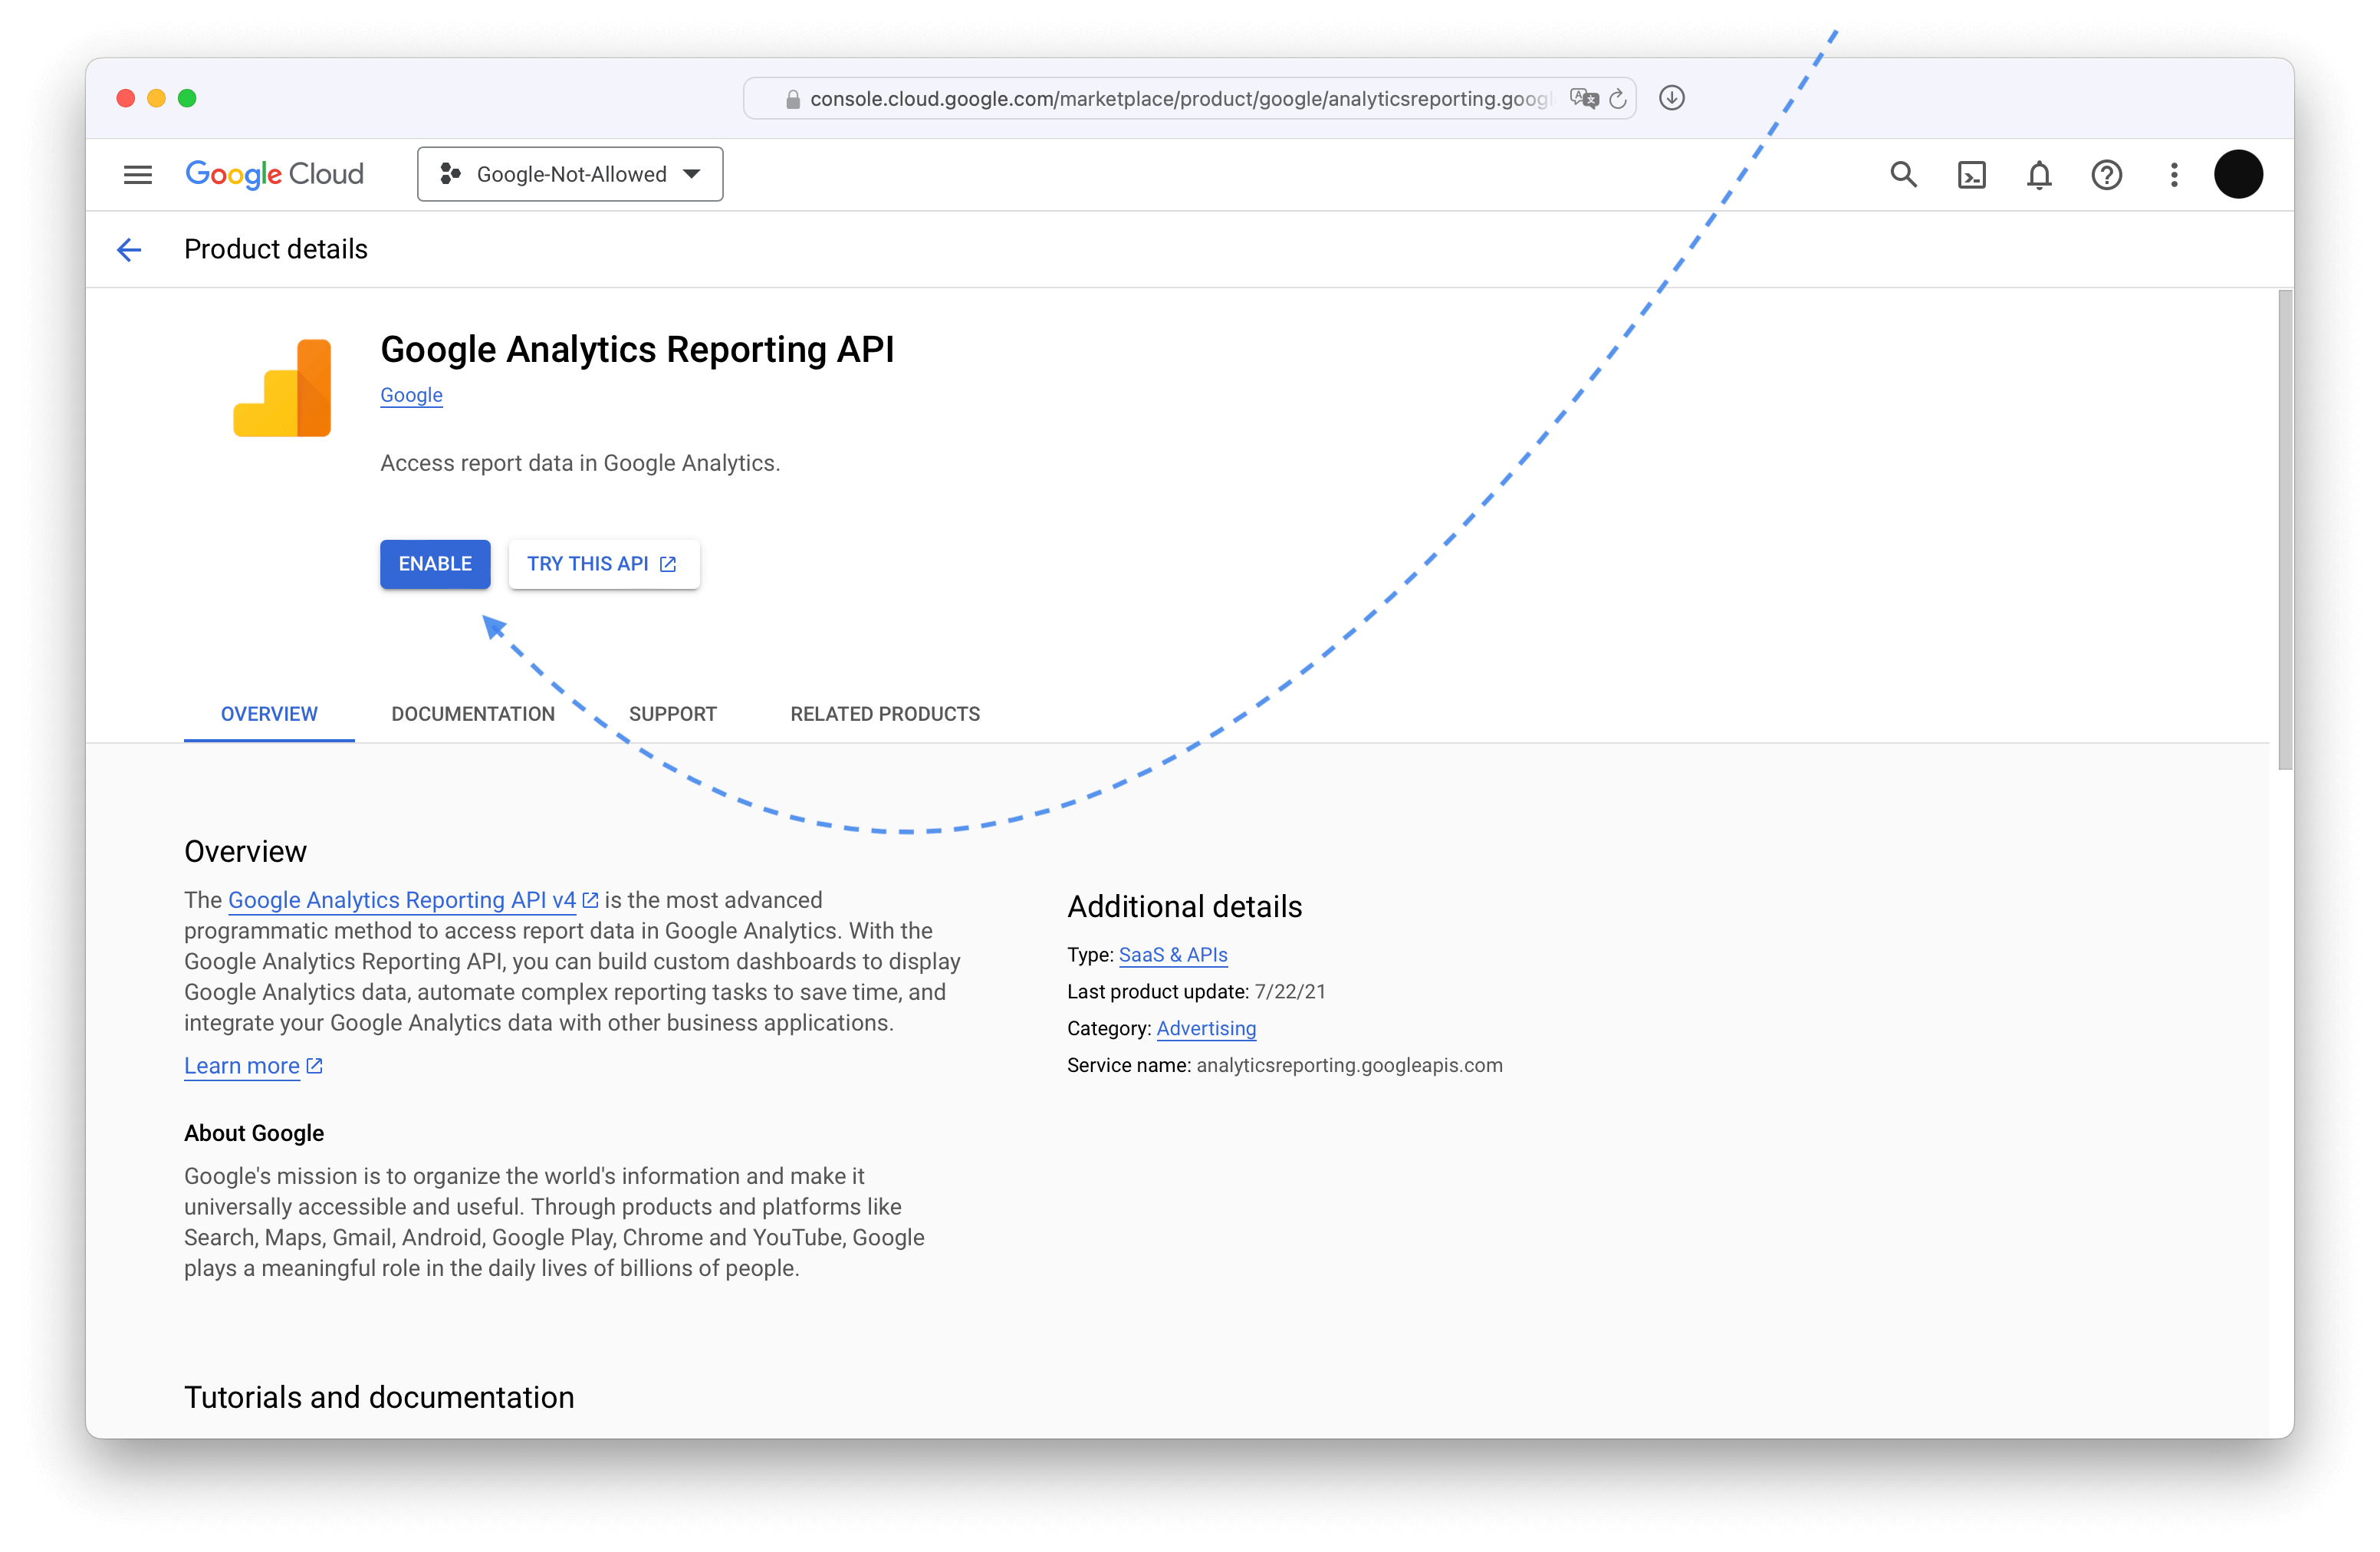
And enable it.
Import into Plausible
Go to the site settings on your Plausible dashboard.

In the General settings section scroll down to Data Import from Google Analytics and press Continue with Google button.
If you see a warning instead, that means you haven't set the GOOGLE_CLIENT_ID and GOOGLE_CLIENT_SECRET environment variables correctly.

Choose the account that you added as the test user.

Trust our own application.

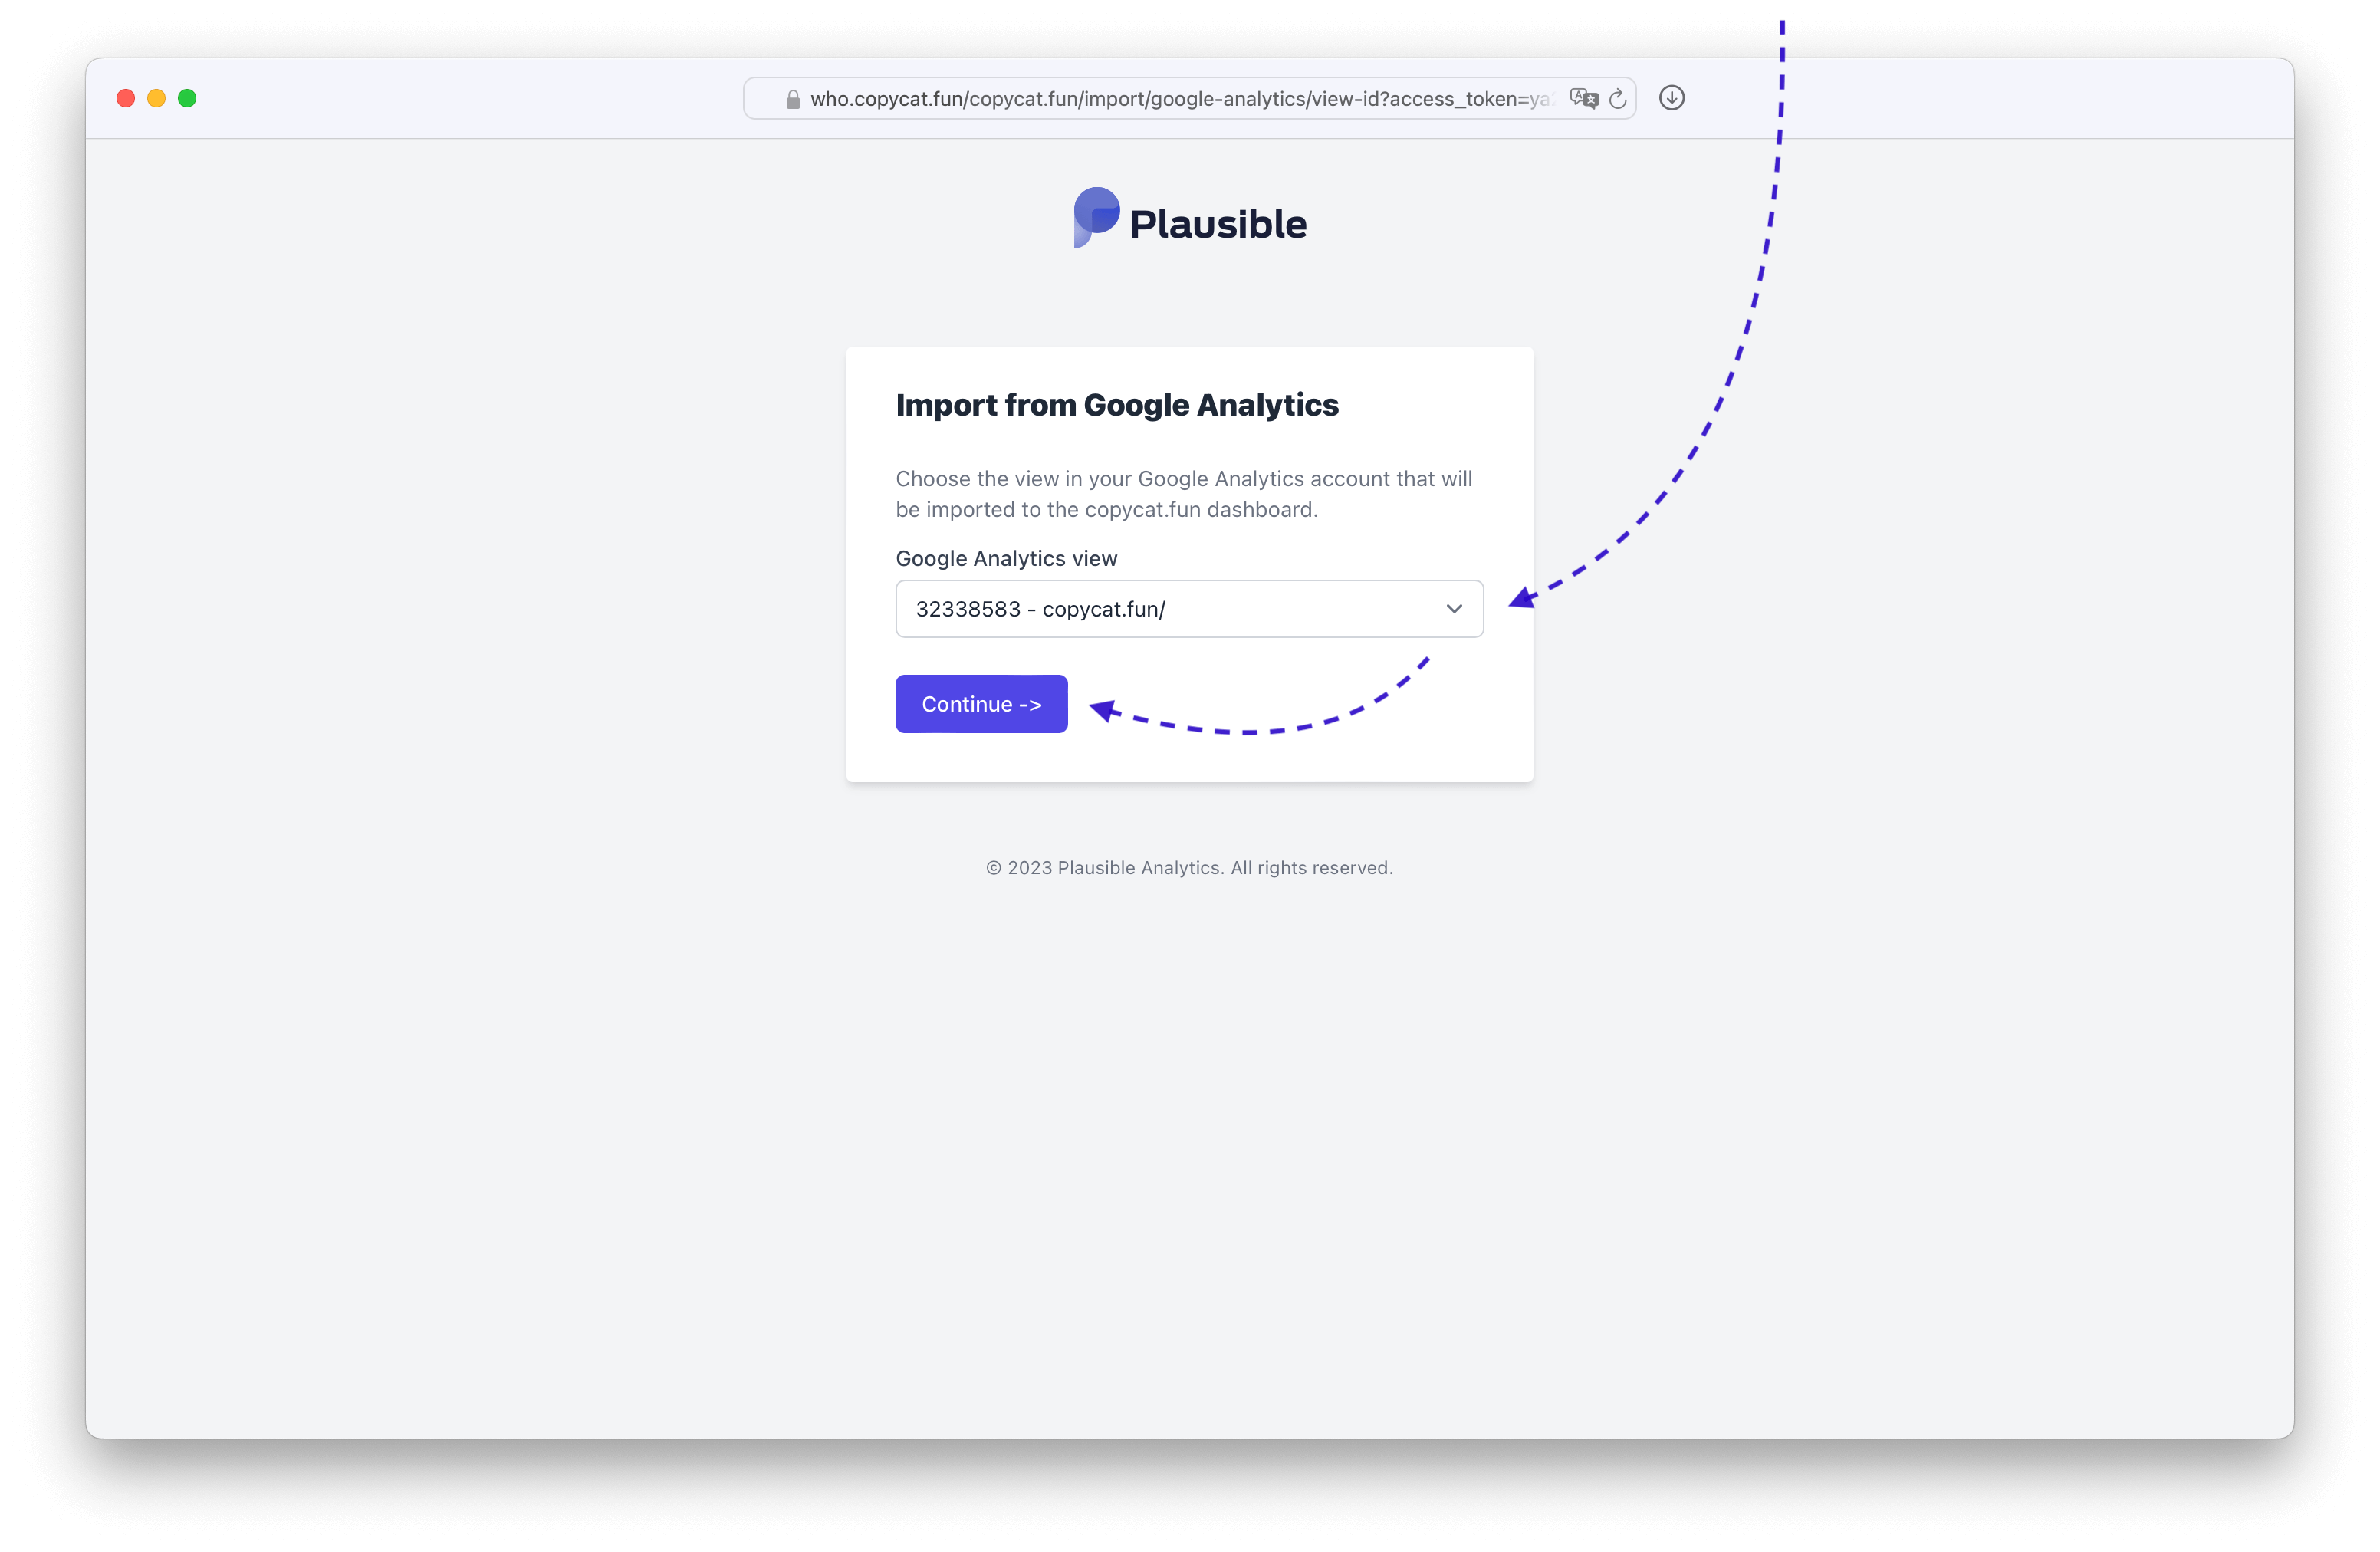
Pick the view to import and then follow the Plausible directions.
You'll receive an email once the data is imported.
MaxMind
To use MaxMind you need to create an account here. Once you have your account details, you can add MAXMIND_LICENSE_KEY and MAXMIND_EDITION environmental valiables to your plausible-conf.env and the databases would be automatically downloaded and kept up to date. Note that using city-level databases like MaxMind's GeoLite2-City requires ~1GB more RAM.
FAQ
How do I access Plausible from terminal?
You can starts an Interactive Elixir session from within the plausible container:
console
$ cd hosting
$ docker compose exec plausible bin/plausible remote
iex> Application.get_all_env :plausible
[
  {PlausibleWeb.Endpoint,
   [
     live_view: [signing_salt: "f+bZg/crMtgjZJJY7X6OwIWc3XJR2C5Y"],
     pubsub_server: Plausible.PubSub,
     render_errors: [
       view: PlausibleWeb.ErrorView,
       layout: {PlausibleWeb.LayoutView, "base_error.html"},
       accepts: ["html", "json"]
     ]
# etc.
# use ^C^C (ctrl+ctrl) to exit
How do I access ClickHouse from terminal?
You can starts a clickhouse client session from within the plausible_events_db container:
console
$ cd hosting
$ docker compose exec plausible_events_db clickhouse client --database plausible_events_db
:) show tables

-- ┌─name───────────────────────┐
-- │ events                     │
-- │ events_v2                  │
-- │ imported_browsers          │
-- │ imported_devices           │
-- │ imported_entry_pages       │
-- │ imported_exit_pages        │
-- │ imported_locations         │
-- │ imported_operating_systems │
-- │ imported_pages             │
-- │ imported_sources           │
-- │ imported_visitors          │
-- │ ingest_counters            │
-- │ schema_migrations          │
-- │ sessions                   │
-- │ sessions_v2                │
-- └────────────────────────────┘

:) exit

-- Bye
How do I access PostgreSQL from terminal?
You can starts a psql session from within the plausible_db container:
console
$ cd hosting
$ docker compose exec plausible_db psql -U postgres -h localhost -d plausible_db
plausible_db=# \d

--  Schema |                      Name                      |   Type   |  Owner
-- --------+------------------------------------------------+----------+----------
--  public | api_keys                                       | table    | postgres
--  public | api_keys_id_seq                                | sequence | postgres
--  public | check_stats_emails                             | table    | postgres
--  public | check_stats_emails_id_seq                      | sequence | postgres
--  public | create_site_emails                             | table    | postgres
--  public | create_site_emails_id_seq                      | sequence | postgres
--  public | email_activation_codes                         | table    | postgres
--  public | email_activation_codes_id_seq                  | sequence | postgres
--  public | email_verification_codes                       | table    | postgres
--  public | enterprise_plans                               | table    | postgres
--  public | enterprise_plans_id_seq                        | sequence | postgres
--  public | feedback_emails                                | table    | postgres
--  public | feedback_emails_id_seq                         | sequence | postgres
--  public | fun_with_flags_toggles                         | table    | postgres
--  public | fun_with_flags_toggles_id_seq                  | sequence | postgres
--  public | funnel_steps                                   | table    | postgres
--  public | funnel_steps_id_seq                            | sequence | postgres
--  public | funnels                                        | table    | postgres
--  public | funnels_id_seq                                 | sequence | postgres
--  public | goals                                          | table    | postgres
--  public | goals_id_seq                                   | sequence | postgres
--  public | google_auth                                    | table    | postgres
--  public | google_auth_id_seq                             | sequence | postgres
--  public | intro_emails                                   | table    | postgres
--  public | intro_emails_id_seq                            | sequence | postgres
--  public | invitations                                    | table    | postgres
--  public | invitations_id_seq                             | sequence | postgres
--  public | monthly_reports                                | table    | postgres
--  public | monthly_reports_id_seq                         | sequence | postgres
--  public | oban_jobs                                      | table    | postgres
--  public | oban_jobs_id_seq                               | sequence | postgres
--  public | oban_peers                                     | table    | postgres
--  public | plugins_api_tokens                             | table    | postgres
--  public | salts                                          | table    | postgres
--  public | salts_id_seq                                   | sequence | postgres
--  public | schema_migrations                              | table    | postgres
--  public | sent_accept_traffic_until_notifications        | table    | postgres
--  public | sent_accept_traffic_until_notifications_id_seq | sequence | postgres
--  public | sent_monthly_reports                           | table    | postgres
--  public | sent_monthly_reports_id_seq                    | sequence | postgres
--  public | sent_renewal_notifications                     | table    | postgres
--  public | sent_renewal_notifications_id_seq              | sequence | postgres
--  public | sent_weekly_reports                            | table    | postgres
--  public | sent_weekly_reports_id_seq                     | sequence | postgres
--  public | setup_help_emails                              | table    | postgres
--  public | setup_help_emails_id_seq                       | sequence | postgres
--  public | setup_success_emails                           | table    | postgres
--  public | setup_success_emails_id_seq                    | sequence | postgres
--  public | shared_links                                   | table    | postgres
--  public | shared_links_id_seq                            | sequence | postgres
--  public | shield_rules_ip                                | table    | postgres
--  public | site_imports                                   | table    | postgres
--  public | site_imports_id_seq                            | sequence | postgres
--  public | site_memberships                               | table    | postgres
--  public | site_memberships_id_seq                        | sequence | postgres
--  public | site_user_preferences                          | table    | postgres
--  public | site_user_preferences_id_seq                   | sequence | postgres
--  public | sites                                          | table    | postgres
--  public | sites_id_seq                                   | sequence | postgres
--  public | spike_notifications                            | table    | postgres
--  public | spike_notifications_id_seq                     | sequence | postgres
--  public | subscriptions                                  | table    | postgres
--  public | subscriptions_id_seq                           | sequence | postgres
--  public | totp_recovery_codes                            | table    | postgres
--  public | totp_recovery_codes_id_seq                     | sequence | postgres
--  public | users                                          | table    | postgres
--  public | users_id_seq                                   | sequence | postgres
--  public | weekly_reports                                 | table    | postgres
--  public | weekly_reports_id_seq                          | sequence | postgres

plausible_db=# exit
